How to use Java CDK to define a DynamoDB-backed REST API with only AWS API Gateway
A step by step tutorial to make AWS API Gateway implement a REST API on top of a DynamoDB table, deployed using a CDK script written in Java.
In “traditional” Java development, a REST API for objects stored in a database would mostly be served by some Java code handling the HTTP requests and transforming the database model to the appropriate models used in the API. You probably wouldn’t even consider to implement it in another way, for example in the HTTP proxy that connects your application to the internet. When architecting a Java application, it doesn’t feel right to put business logic in an infrastructure component. And it would not be very convenient in the development stage either, because the HTTP proxy is often not even present in the development environment.
Enter cloud
With cloud development, this is all a bit different. With infrastructure-as-code, the infrastructure has become part of the development and probably, its definition is even in the same source code repository as the application itself. Moreover, one of the major advantages of the cloud is that it provides a plentitude of services, or building blocks, that should make our (developer) live easier. Well, if it makes it easier is something we’ll cover later on, but at least it should support the notion of writing less code and concentrate on business code in stead of code that moves data (“write code that transforms, not transports”).
CDK
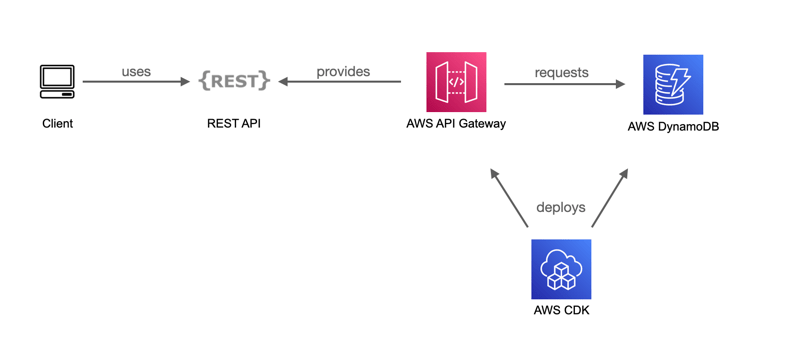
In this blog, we’ll take a look at using AWS API Gateway to provide a REST interface on top of a DynamoDB table, as a low-code alternative to writing a Lambda function to implement a REST interface. Of course we’ll be using CDK to define and deploy the cloud components (infrastructure-as-code) and we’ll the Java variant of the CDK. Of course you can use CDK with different languages, and you could as well use TypeScript, but if support for different languages has the same maturity level, you should pick the language you are most familiair with, so that no doubts about how to express yourself in the language get in the way of what our focus is: get it deployed in the cloud.
The sample we’ll use is storing a small and simple JSON document that records the distance you walked / biked / run everyday (i know there are great Apps for this, it is just a simple example ;-)). The tiny JSON document will have a format like this:
{ date: "2021-05-23", distance: 38 }
Please note that the complete sample code developed in this blog, as well as the different stages of development presented in this blog, can be found on github.
Getting started
Assuming you’ve already installed and bootstrapped the CDK (if not, check out this), we can generate a project template with cdk init app --language=java. This will even initialise a git repository and create a first commit with the generated sources; the name of the project and generated classes is based on the directory name. The first thing to do is to change the package name of the generated classes from com.myorg to something sensible.
The next thing to do is the edit the DynamoRestApp class and remove the call to the DynamoRestStack.Builder and replace it by a simple instantiation of the DynamoRestStack. Even though usage of a builder is very common in CDK, we remove it here because the referenced DynamoRestStack.Builder class is not generated at all. It will compile (thanks to inheriting a no-op implementation), but it won’t do anything useful, which is of course very confusing and not something you would expect from generated code that is there to give you a quick start. So replace the contains of the generated main method by
public static void main(final String[] args) {
    App app = new App();
    new DynamoRestStack(app, "DynamoRestStack");
    app.synth();
}
We’ll also remove (or truncate) the generated test case; we won’t need it for this blog.
Now it’s time to start coding. The AWS Solutions Constructs library provides a solution construct that seems ideal for our use case: the aws-apigateway-dynamodb module.
To use it, we need to declare it as a maven dependency (in the pom.xml):
<dependency>
    <groupId>software.amazon.awsconstructs</groupId>
    <artifactId>apigatewaydynamodb</artifactId>
    <version>${cdk.version}</version>
</dependency>
To construct our solution, we could do with this minimal piece of code
ApiGatewayToDynamoDBProps apiGatewayToDynamoDBProps =
    ApiGatewayToDynamoDBProps.builder()
        .allowCreateOperation(true)
        .allowUpdateOperation(true)
        .allowReadOperation(true)
        .build();
ApiGatewayToDynamoDB apiGateway =
    new ApiGatewayToDynamoDB(this, "dynamogateway",
                             apiGatewayToDynamoDBProps);
However, that would create an API with the rather meaningless name “RestApi”, so to avoid our AWS account gets messy with non-descriptive names, we’ll fix that right away by explicitly defining the name:
RestApiProps apiGatewayProps = RestApiProps.builder()
    .restApiName("DynamoRest")
    .build();
Also, the default will use IAM authentication, which is very inconvenient for testing with for example a curl client, so we’ll replace that by authentication type none. If you code along with this blog, make sure you remove the deployment when done. (Alternatively, you could secure the API with an API_KEY, which is much easier to use.)
RestApiProps apiGatewayProps = RestApiProps.builder()
    .restApiName("DynamoRest")
    .defaultMethodOptions(MethodOptions.builder()
    .authorizationType(AuthorizationType.NONE)
    .build())
.build();
When you deploy the solution with the cdk deploy command, it will ask for confirmation when IAM roles are affected. This can be very annoying, especially when deployment takes several minutes, and you spend the waiting time doing something else only to discover upon return that all the time, the deployment command has been waiting for your approval. To get rid of this confirmation, add the following line to the cdk.json file:
"requireApproval": "never"Nearly done!?
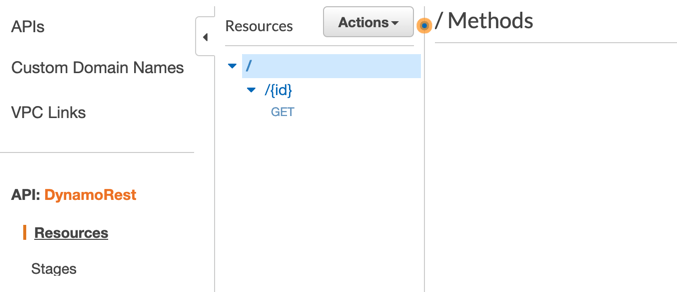
If you deploy what we have got so far and take a look at the API in the AWS console, you’ll be disappointed to see the API defining only one HTTP method. The solution only has a GET method that can be used to read from DynamoDB, there are no create and update operations, even though we defined them in our code (e.g. with allowCreateOperation(true)).
This is because the create and update methods need a template that tells API Gateway how to convert the request body into a proper DynamoDB command. Let’s start with the creation. The template we need is this:
{
    "TableName": "exerciseStats",
    "Item": {
        "id": {
            "S": "$input.params('id')"
        },
        "content":
            "S": "$util.escapeJavaScript($input.body)"
        }
    }
}
If you read this template, it’s probably obvious that the DynamoDB item will consist of a partition key (by default named “id”) and an attribute named content, that we will use to store our JSON data. The command syntax of DynamoDB requires the values to be indicated by type, the “S” stands for String (see Data Type Descriptors in DynamoDB developer guide)
Because the content is JSON, the quotes need to be escaped, which is why we need the $util.escapeJavaScript() function.
The update template is similar, but uses a different syntax as you must explicitly define what to update:
{
    "TableName": "exerciseStats",
    "Key": {
        "id": {
            "S": "$input.params('id')"
        }
    },
    "UpdateExpression": "set content = :v1",
    "ExpressionAttributeValues": {
        ":v1": {
            "S": "$util.escapeJavaScript($input.body)"
        }
    },
    "ReturnValues": "NONE"
}
After deploying this version, you can POST, PUT or GET items with curl. To obtain the URL, open the AWS Console in your browser and go to API Gateway, select the “DynamoRest” API, select stages and click the “prod” stage; the invoke URL is displayed in the stage editor at the right.  To create or update an item, use curl commands like these:
curl -X POST -H 'Content-Type: application/json' -d '{ date: "2021-05-25", exercise: 42 }' https://xxx-api.eu-west-1.amazonaws.com/prod?id=2021-05-25
curl -X PUT -H 'Content-Type: application/json' -d '{ date: "2021-05-23", time: 38 }' https://xxx-api.eu-west-1.amazonaws.com/prod/2021-05-23
Note that the POST has the id as query parameters, while the PUT has the id embedded in the URL.
GET
Of course, the GET is just curl https://xxx-api.eu-west-1.amazonaws.com/prod/2021-05-25. This returns
{"Count":1,"Items":[{"content":{"S":"{ date: \"2021-05-25\", exercise: 42}"},"id":{"S":"2021-05-25"}}],"ScannedCount":1}which is not exactly what we want. What we get here is the raw DynamoDB result, not the response we would expect from a proper REST API, which is the JSON content returned in the same format as we used for inserting ({ date: "2021-05-23", time: 38 }).
If we would deploy this solution, it would leak implementation details: anyone could tell from the result that under the hood, DynamoDB is being used. From engineering point of view, this is a bad thing – and not because the fact that DynamoDB is being used should be kept secret. It is a signal that implementation and interface are not clearly separated. This is bad because once clients of there API exist, they will always expect this syntax and thereby depend on (the implementation detail that) DynamoDB is being used. If you would ever want to change implementation by using a different persistence mechanism, your API will change and clients will break. If the interface is cleanly separated from the implementation, this will never happen.
To make the GET request return the JSON document only, we would need to use custom response template: a script that defines how the output from DynamoDB is mapped to the response of the GET request. AWS API Gateway supports this out of the box, but unfortunately, the AWS solution construct we used here does not support this (yet). In order to finish this REST API properly, we need to return to using the constructs from the basic CDK library. This requires more coding, but it will enable us to customise every single piece of it, including the response template. How this is coded exactly will be covered in part 2.