Generate a Cloud Backend using AWS Amplify
Ever had a great idea for a web or mobile app, however the thought of creating an entire backend consisting of user management, API’s, storage and hosting kept you from creating it? With AWS Amplify, you can generate a backend by answering some questions in a command line tool and use the SDK to quickly use this new backend. This blog will show you how to get started
What is AWS Amplify?
AWS Amplify is a set of tools to help you connect your web or mobile app to AWS Cloud resources. These include:
- AWS Command line interface (CLI): Allows you to create AWS resources from the command line and set up your project to make use of them
- Libraries/SDK: JS, Android and iOS libraries to help you easily access these cloud resources from your application. Available for many frameworks.
- UI components: UI components for common use cases related to the AWS resources you can create with the CLI.
- Amplify console: The console shows you all your Amplify projects for a region in an account and allows you to set up a CI/CD pipeline and manage a lot of things related to your project.
The UI components part is optional, however to get the most out of Amplify you will need to use the CLI’s and libraries. With Amplify you can generate and use AWS resources by simply answering some questions in the CLI and using the libraries provided by Amplify. There are Amplify libraries for React and React-Native, Angular and Ionic, Vue.js, Native Android and iOS, Flutter and NextJS. Amplify consists of categories of services which can be configured:
- Analytics: Collect analytics for your app. Makes use of Amazon Pinpoint and Amazon Kinesis.
- API: HTTP REST or GraphQL API. Uses API Gateway(REST) or AWS AppSync (GraphQL)
- Authentication: Create user authentication. Makes use of Amazon Cognito.
- Function: Create serverless functions. Makes use of AWS Lambda.
- Hosting: Hosts your web app in the Cloud. Makes use of S3 and Amazon CloudFront.
- Interactions: Add Chatbot functionality to your app. Makes use of Amazon Lex.
- PubSub: Create a publish-subscribe message-oriented middleware. Makes use of AWS IoT and MQTT over WebSockets.
- Push Notifications: Set up push notification functionality for mobile apps. (only available for React Native)
- Storage: Add Content or a NoSQL database. Makes use of S3 and DynamoDB
- XR: Add Augmented reality to your app. Makes use of Amazon Sumerian.
In this blog we will cover Hosting, Authentication, API, Function and Storage.
Requirements
In order to get started, we need to have the following:
- An Amazon AWS account. In order to create one, you will need a credit card.
- Install AWS Amplify CLI.
You can find instructions here: https://aws-amplify.github.io/docs/ You also need:
- A code editor. (I use Visual Studio Code)
- Some knowledge of either React, Angular or Vue.js

Advice: I advise you to set a budget alarm for your AWS account just to be safe. Go to the “Billing” service in the AWS console and set a budget alarm for 10-20 dollars. You will get an email if your costs ever reach or pass this budget. I have not experienced this yet, as AWS free tier was enough for me so far.
Configuring Amplify CLI
Once you have the CLI installed and an active AWS account, run the first command (current directory does not matter yet), which is: “amplify configure” which will open the AWS console login page. Log in with your account and follow the steps. The steps will create an IAM account, which will have permissions to create AWS Cloud resources from the command line. You will be asked to enter an access key ID and a Secret Access key, which belong to the IAM user you create in the configure step. You only do this once.

From this point on this IAM account is added as a local profile to your CLI and will be used to create Cloud resources. Note that this step does not have anything to do with your project specifically yet. This is only the configuration of your Amplify CLI. In case you already have other AWS profiles locally, check this page out related to multiple profiles: https://docs.aws.amazon.com/cli/latest/userguide/cli-configure-profiles.html. If you want to read more about IAM, see this page: https://aws.amazon.com/iam/
Initializing Amplify Project
Now that our Amplify CLI is configured, we can use it to “amplify” our projects. I have created a project, which is available on GitLab where you can check out all of the steps I took and compare it to your own project. Use a terminal and navigate to the root of your new project. Run the following command: “amplify init”. You will get a series of questions that you must answer in order for Amplify to initialise. I will share what I entered for my demo project:
| Question | Answer | Explanation |
| Enter a name for the project | amplify-blog-article | This name will be used to identify the project and will be used as a suggestion when adding functionality. |
| Enter a name for the environment | dev | You can add multiple environments, which will be discussed later. The name entered here will be used as a postfix for the name of certain resources created in later steps. |
| Choose your default editor | Visual Studio Code | Not sure what this does, but just choose your default editor from the list |
| Choose the type of app you’re building | javascript | Amplify works differently depending on which you choose. This blog will focus on a javascript web app. |
| Which javascript framework are you using | react | I create a react app with “create-react-app”. Feel free to choose which one you prefer. |
| Source directory path | src | Where your source code will be. Amplify will add some files there. |
| Distribution Directory Path | build | Where the distribution of your app will end up once it is built. Amplify will use it when you want to publish your app for Hosting on S3. |
| Build command | npm run-script build | The command that is used to build the distribution of your app. |
| Start command | npm run-script start | The command that is used to start/run your app. |
| Do you want to use an AWS profile? | Yes | I really don’t know what happens if you choose no here… |
| Please choose the profile you want to use | amplify | This should be the name of the profile you used in the “configure” step. If it doesn’t show up in the list of options, you need to go back and try configuring it again. |
After you answer all of these questions, Amplify will create an S3 bucket and store the project configurations. It will also make the following changes to your project:
- Your .gitignore fill will get updated with paths to files that are generated by Amplify that should not be checked in.
- These files are added (paths are relative to root directory of project):
- amplify/.config/local-aws-info.json (gitignored): Tells Amplify which AWS profile to use.
- amplify/.config/local-env-info.json (gitignored): Contains user and system preferences, such as default code editor
- amplify/.config/project-config.json: Project specific information, such as where the src directory is located.
- amplify/#current-cloud-backend/amplify-meta.json: Contains metadata of all resources pushed to the Cloud via Amplify. More on this later.
- amplify/backend/amplify-meta.json: The same as the previous file, except this reflects the local state of your amplify resources. More on this later.
- amplify/backend/backend-config.json: Contains a description of all the resources you have created with Amplify. It will be an empty object when starting off.
- amplify/team-provider-info.json: This file has information about the environments tied to this project and should be checked into git so that other team members can also make use of these configured environments. More on this later.
- src/aws-exports: A file used to configure the Amplify frontend libraries, which we will be using later on in this article.
Amplify works similar to Git with regards to file changes. You will first make changes locally, which will edit files in your amplify/backend directory. Once you push your changes, your amplify/#current-cloud-backend directory will be updated. You can run the following command to check the current status of your local changes: “amplify status” which should show the following at this point:
Current Environment: dev

| Category | Resource name | Operation | Provider plugin |

| -------- | ------------- | --------- | --------------- |
It is similar to the “git status” command. In the next section we will be making a change by adding Amplify Hosting.
Hosting
Now we have our CLI configured and our project initialised, however we have not added any Amplify functionality yet. In this section, we will be adding the Amplify Hosting functionality, which will deploy our application to the Cloud and make it publicly available. To get started, we will run this command: “amplify add hosting” This will trigger a list of questions again, which I answered in the following way:
| Question | Answer | Explanation |
| Select the environment setup | PROD (S3 with CloudFront using HTTPS) | Even though I called the environment “dev”, I want to use https, so I chose PROD |
| hosting bucket name | amplify-blog-article-20190630152229-hostingbucket | It was the default recommended name. You can name it whatever you want. |
| index doc for the website | index.html | Indicates which file in the distribution directory is the index doc |
| error doc for the website | index.html | Since I have a Single Page Application, errors will be handled by the framework and not by separate .html files. Feel free to change this if you need to. |
That’s it! We should now have the following local changes in our project:
- amplify/backend/backend-config.json: An entry has been added that represents the hosting functionality.
- amplify/backend/hosting/S3AndCloudFront/parameters.json: This file is created and contains the name of the S3 bucket that Amplify will publish the app to.
- amplify/backend/hosting/S3AndCloudFront/template.json: Not sure what this does, looks complicated to me.
If you run “amplify status”, you should see the following:
Current Environment: dev

| Category | Resource name   | Operation | Provider plugin   |

| -------- | --------------- | --------- | ----------------- |

| Hosting  | S3AndCloudFront | Create    | awscloudformation |
We can see that Amplify now has local changes. Note that nothing has been pushed to the Cloud yet. In order to push our changes to the Cloud and actually make the S3 bucket, we need to run: “amplify push”. For Hosting I have noticed that this step could take a while, approximately 10 minutes. After that is done, an S3 bucket will have been created. You can log in to the AWS console in your browser and go to the S3 service. Here’s mine:
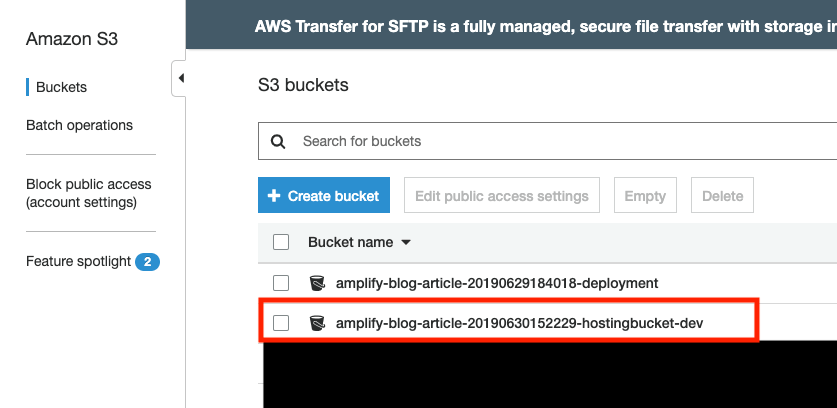
WARNING: Do not make any changes in the console here, because they will not get synced back to your Amplify project. More on that later. If you check your /amplify/#current-cloud-backend directory, it should now also contain a “hosting” folder. Also, running “amplify status” should now show this:
Current Environment: dev

| Category | Resource name   | Operation | Provider plugin   |

| -------- | --------------- | --------- | ----------------- |

| Hosting  | S3AndCloudFront | No Change | awscloudformation |

Hosting endpoint: https://d12609snxlw6tg.cloudfront.net
Note that your app has not been published yet, only the S3 bucket has been created. To build your app and publish it so that it is available publicly, run: “amplify publish” If you click on the link shown, the browser should open and you should see your app. (Blog update: Note that after publishing your application in this way for the first time it could take up to 30 minutes to actually see your app live. Before that you will see something in the range of “Access denied”. The newer version of Amplify allows you to deploy via the Amplify Console which will show you immediate results). For me, that is the default create-react-app starter page:
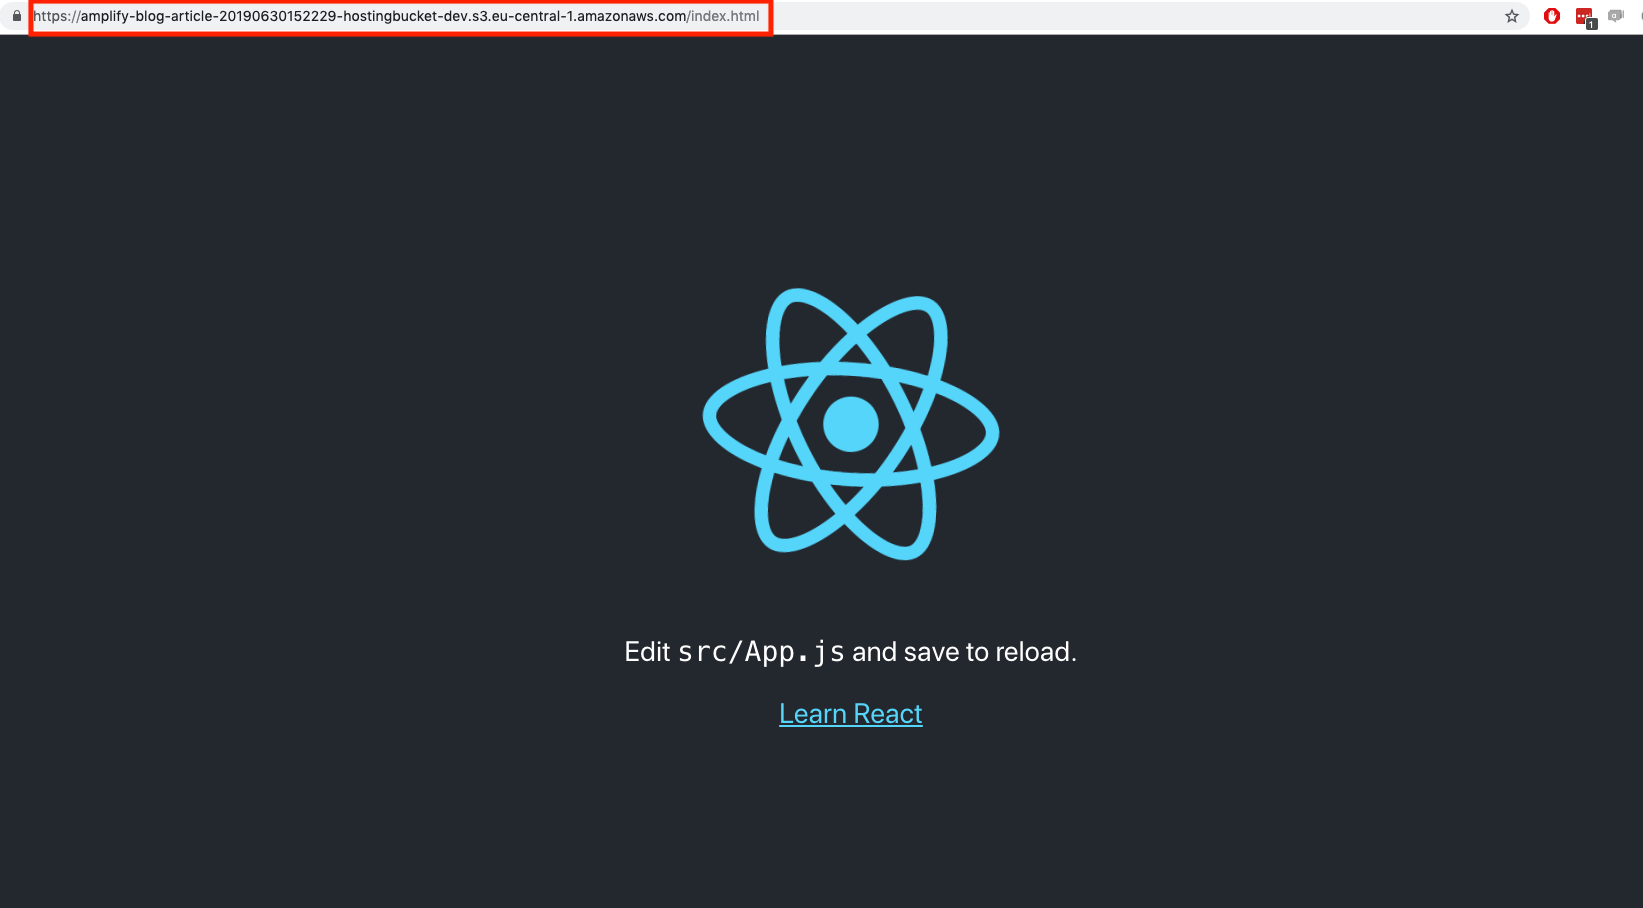 There you have it, just like that your app is published and available online, with https setup. In the next section we will add the “Auth” functionality.
Amplify push vs publish
The difference between “amplify push” and “amplify publish” is that the first one pushes your local Amplify changes to the Cloud, meaning that AWS resources will be created, updated or removed. The publish command performs an “amplify push” and builds your app and pushes it to S3. So anytime you make changes in your app (not amplify), you can run publish to see it live.
Authentication
In this step we are going to be adding the Amplify Authentication functionality to our app. When we are done, users will be prompted to log in our register before being able to use our app. We will not only be making use of the Amplify CLI, but also the Amplify frontend libraries and UI components. We will start off by running this command: “amplify add auth”. I answered the questions in the following way:
| Question | Answer | Explanation |
| Do you want to use the default authentication and security configuration? | Default Configuration | Choose “I want to learn more” for an explanation |
| How do you want users to be able to sign in when using your Cognito User Pool? | Users will register and sign in using an email as username. | |
| What attributes are required for signing up? | You can add more if you want to enforce this, however for this project email is fine. |
The following changes will have been made to your repository:
- amplify/team-provider-info.json modified: A cognito pool is added to this configuration. This is part of the environment “dev” we created.
- amplify/backend-config.json modified: “auth” has been added next to our “hosting” configuration
- amplify/backend/auth/<<cognitoPoolId>>/<<templatename.yml created: A YAML file describing the Cognito Pool, which will be used by Amplify to actually create the Cognito Identity Pool on AWS
- amplify/backend/auth/<<cognitoPoolId>>/parameters.json created: Also used for the creation of the Identity Pool on AWS.
Running “amplify status” now shows the following:
Current Environment: dev

| Category | Resource name   | Operation | Provider plugin   |

| -------- | --------------- | --------- | ----------------- |
| Auth | cognito58be9282 | Create | awscloudformation |
| Hosting  | S3AndCloudFront | No Change | awscloudformation |

Hosting endpoint: https://d12609snxlw6tg.cloudfront.net
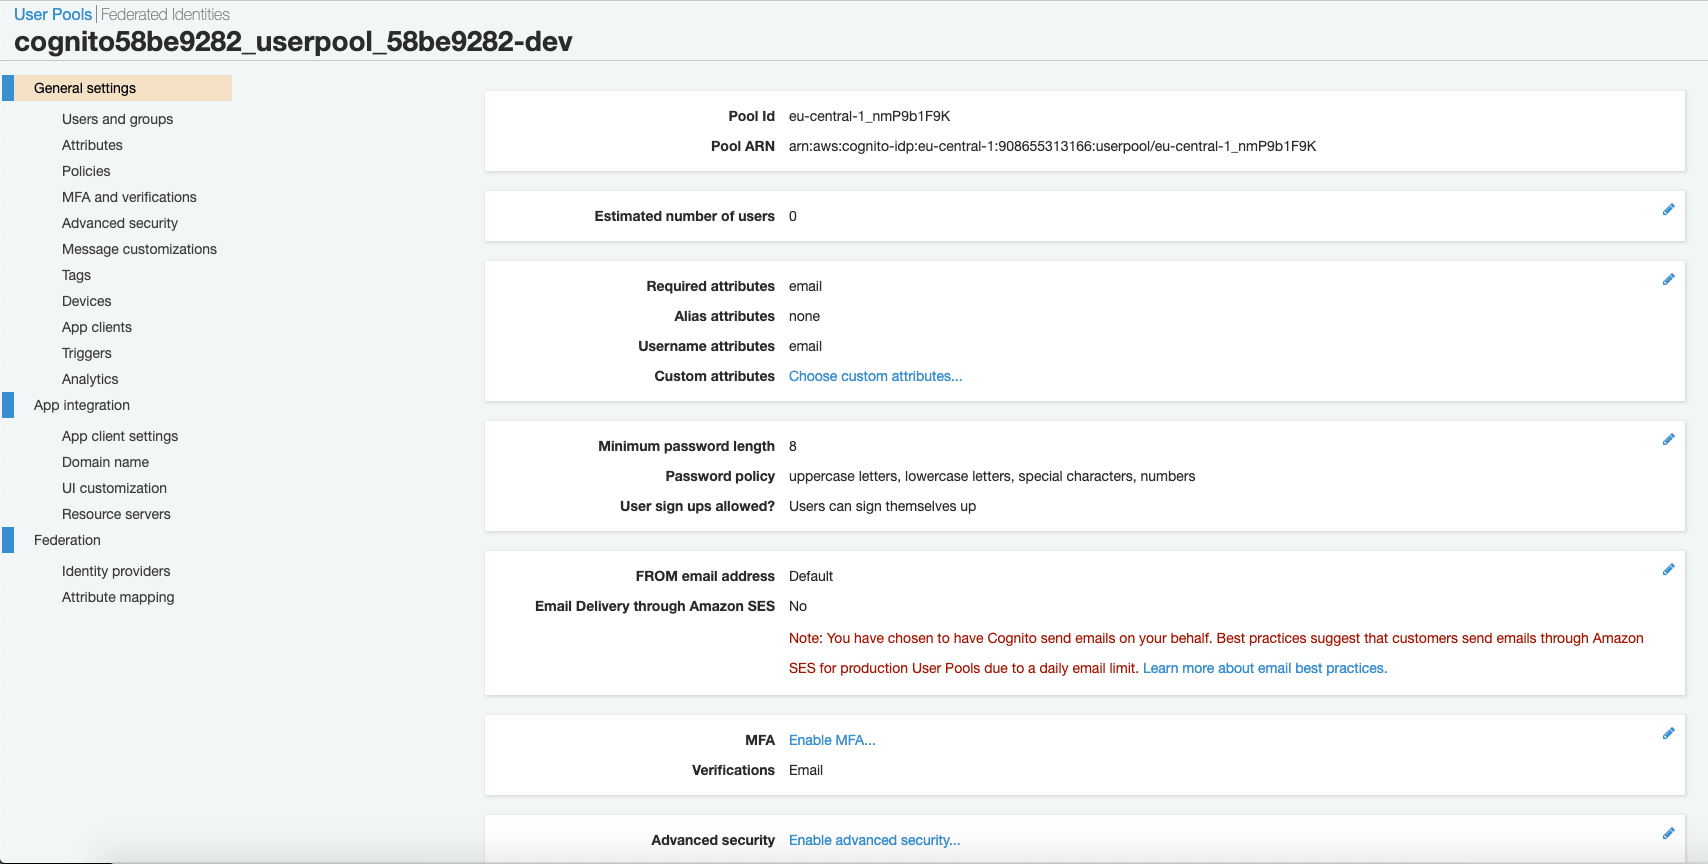
We are now ready to push our changes to AWS by running “amplify push”. This will again take several minutes to create the AWS resources. After this is done you can head on over to the AWS console in your browser and navigate to the Cognito service. Click on manage user pool and you should see one entry there. Click on it to see its configuration. Mine looks like this:
Your amplify/#current-cloud-backend directory should have also been updated now to reflect the changes you pushed. Now it’s time to make use of this Cognito Pool in our app. To do that, we first need to use npm to get two dependencies: “npm install aws-amplify aws-amplify-react”. The second one can be the Angular or Vue.js dependency if you want to use another language. For this example I will be using React. From the aws-amplify-react I am going to be using the “WithAuthenticator” React component, which is going to wrap my App component and show a Sign in/Log in UI if the user is not yet logged in. To do that, I first need to import Amplify and configure it in the file I want to use it in. In the App.js file I am going to add the following:
import Amplify from 'aws-amplify';

import awsconfig from './aws-exports';

import { withAuthenticator } from 'aws-amplify-react'; // or 'aws-amplify-react-native';

Amplify.configure(awsconfig);
The first line imports the Amplify component, which will be used by many other components in order to know which AWS resources should be used. The second line imports the configuration that Amplify generated for you when you ran “amplify init”. This will be used to configure the Amplify component with the correct information. The third import is the withAuthenticator component, which I already mentioned. And at the bottom of the App.js file, I replaced “export default App;” with “export default withAuthenticator(App, {usernameAttributes:’email’});” That’s it! Now if we run our app using “npm run start”, we will see the Amplify Auth UI component asking us to log in or register:

Click on Create account and fill in the form. Once that is done you will receive a confirmation email with a code:

Enter this code and you will can now log in. After logging in you will see the home page of the app again. From this point on the user is logged in and you can make use of the “Auth” component from the “aws-amplify” library to do things like get the currently logged in user. See this page for all the info. It would be nice to also give the user an option to sign out. You can import the “Auth” component and add a button somewhere that calls “Auth.signOut()” onClick. This will show the user Sign in/Register page again. See the repository for the complete example. In the next section we will be adding a functioning REST API that will allow us to CRUD a resouce in a database. It will also make use of the Cognito user pool we created in this step to authorize the REST calls.
REST API, Lambda and Database
Now that we have Hosting and users need to register and log in to view our site, it is time to add some functionality. We are going to use Amplify API, Function and Storage in order to create a functioning backend where we can CRUD a resource. In this case we will be able to create, get, update and delete a list of beer. To get started, we will run this command: “amplify add api” and answer the questions as follows:
| Question | Answer | Explanation |
| Please select from one of the below mentioned services | REST | REST or GraphQL |
| Provide a friendly name….. | api83194554 | I just used the recommended, you can name it whatever you want. |
| Provide a path | /beer | Add the name of the resource you want to expose via your API |
| Choose a Lambda source | Create new Lamda function | We have not created a Lambda function in Amplify yet |
From this point the questions will be about the new Lambda function which will be hooked up to our /beer endpoint in our API.
| Question | Answer | Explanation |
| Provide a friendly name… | amplifyblogarticle703db77c | I went with the recommended default again |
| Provide the AWS lambda function name | beerLambda | I gave it a name for the endpoint it will be hooked up to |
| Choose the function template you want to use | CRUD function for Amazon DynamoDB table (Integration with Amazon API Gateway and Amazon DynamoDB) | This will hook up DynamoDB for us in our Lambda function. |
| Choose a DynamoDB data source option | Create a new DynamoDB table | We don’t have a DynamoDB table yet. |
And now the questions will be about the DynamoDB database:
| Question | Answer | Explanation |
| Provide a friendly name…category in the project | dynamo5ed5aae4 | The default again. |
| Please provide table name | beer | Name of the resource we want to CRUD |
| Adding columns | id: string | We only need an ID. If you want to be able to query based on other properties of your records in the DB, you can add these columns later. For this example that is not necessary |
| Do you want to add a sort key to your table? | No | Not necessary for this demo, however if you want to sort by any of the columns it will be a good idea to add this. |
| Do you want to add global secondary indexes to your table? | No | If you are going to query the table based on something other than the ID, then it is a good idea to add this. |
A question about the Lambda function:
| Question | Answer | Explanation |
| Do you want to edit the local lambda function now? | No | We can look at the lambda in our code editor after this is done. By default there will be functions to CRUD the resource. |
And back to the API:
| Question | Answer | Explanation |
| Restrict API access | Yes | We want only users logged in to be able to make calls to our API |
| Who should have access? | Authenticated users only | Since registration happens outside of our API, everything else can be restricted |
| What kind of access do you want for Authenticated users? | create, read, update, delete | We want to be able to call all http methods. Make sure to use the space button to select all 4! |
| Do you want to add another path? | No | We can always add more later. |
There are a lot of changes in our repository after this action. I will only mention the most important ones:
- amplify/backend/backend-config.json: Api,Function and Storage have been added.
- amplify/backend/function/<<lamdaidentifier>>/src/app.js: This file contains the lambda function, which is an Node express server with 4 functions for the GET, GET ALL, POST, PUT and DELETE. Edit this file to change how your API calls get handled.
Run “amplify push” to push all your changes to AWS and create the resources. Once this is done, we can log in to the AWS console in your browser and navigate to API Gateway to see that the API has been created:
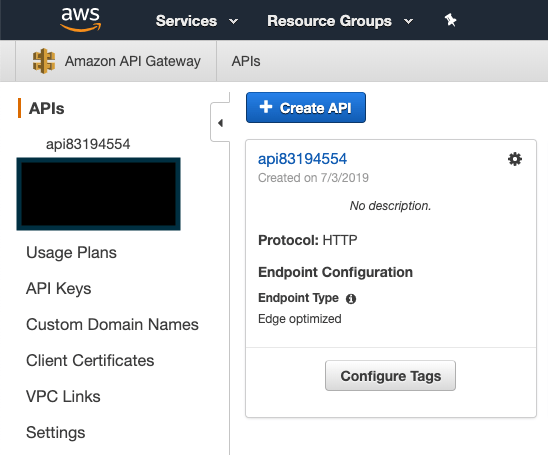
And clicking on it shows that the Beer path has been created as well:
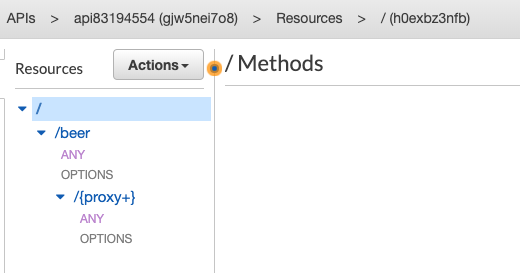
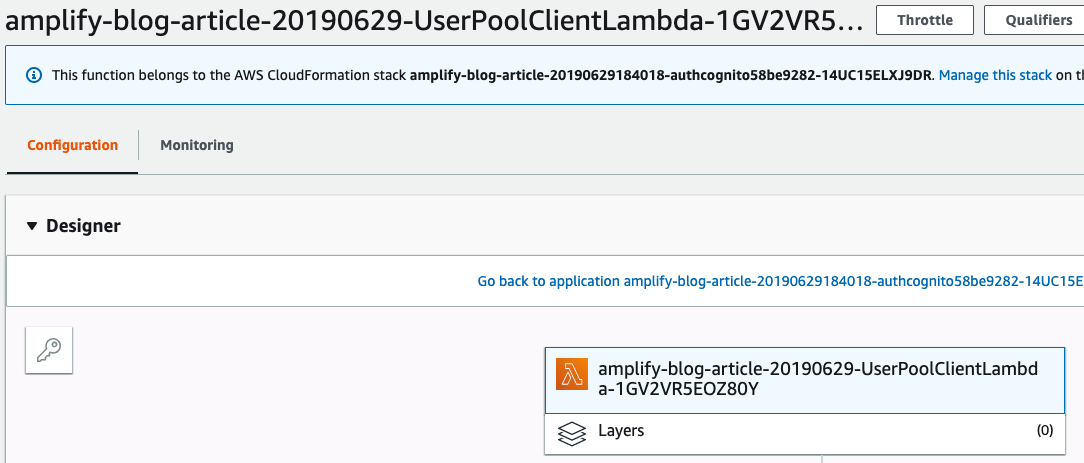
Notice how we have a /beer resource but the methods we support are “OPTIONS” and “ANY”. As we will soon see, this resource is mapped to a Lambda function which will handle any calls going to this API that starts with /beer. This includes the GET, PUT, POST and DELETE. Next, we can navigate to Lambda and see that our function has also been created:
And finally, our table in DynamoDB has also been created: 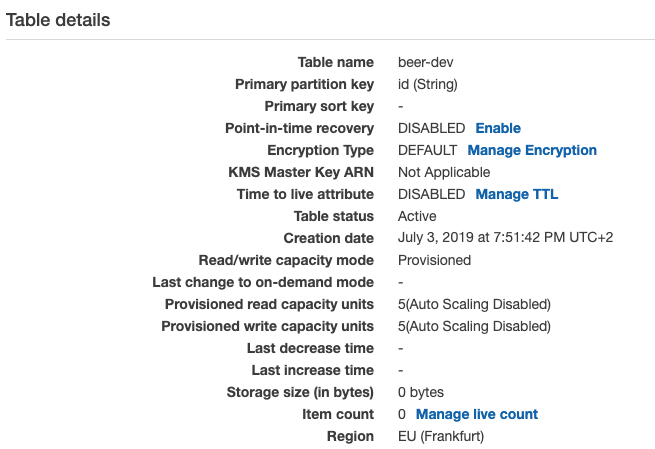
Just like that we now have a REST API, a Serverless Function and a Database running and ready to use. We are going to be making use of another of Amplify’s React libraries for API. At this point I added a React component that has a Table for showing all beer in the database and a form for adding new beer. Check the git Repo for the code, however here is a screenshot: 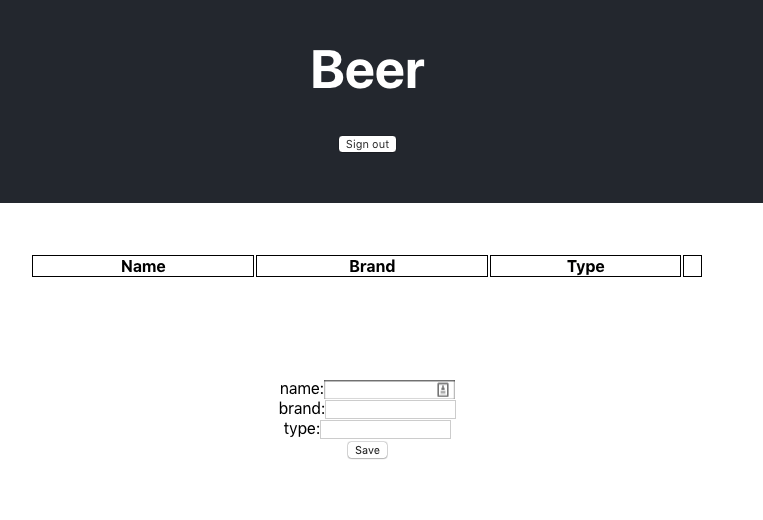
Disclaimer: I am no good with styling and also did not spend a lot of time on this. Feel free to create any kind of UI you want. The idea is that the user can enter a name, brand and type for the beer and click on Save. This should call our POST /beer endpoint which will save it in the database. When this is done, we will call a GET /beer to get all of the beer. this will then show in the table. There will also be an “x” button, which will call the DELETE /beer for that item.
Creating new beer items /POST
I created a BeerApi.js class which does the interaction with the Amplify API library. You can view the entire code in the Git repo, however this is the example code that does the POST: 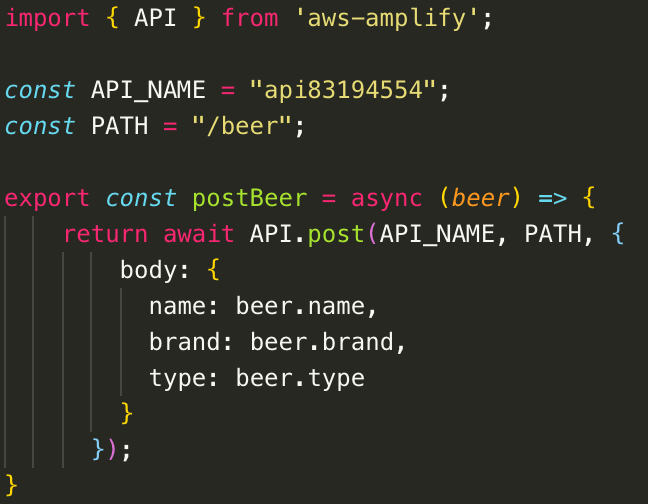
This function gets the “beer” object from the form in my UI and uses the API library to make a post call. Since Amplify is configured, it only needs the API name and Path to know which url it should use. Note that no “id” is sent in this body. Instead, I modified my lambda to inject a uuid whenever a post is done.
List all items /GET
The lambda function generated for the “list” items does not let you get all items in the /beer resource. I made some changes in the lambda function for the GET LIST:
- Removed the “+ hashKeyPath” from the path
- Removed KeyConditions from the query parameters
- used “scan” instead of query
And then in the BeerApi.js, you can call:

Delete item /DELETE This one did not require any changes to the lambda. Simply call this function with the id of the item you want to delete:
 Customize your business logic It is up to you to customize the Lambda functions to suite your needs. You have access to the request and to the Dynamo database at this point.
Shortcomings
With a few quick commands we were able to publish our app which has an authentication page and can make calls to an API that stores data in a database. However, Amplify is very new and there are some drawbacks.
Amplify push takes a long time Every Amplify push command takes at least 5 minutes. This can be frustrating, especially when editting Lambda’s. There is a way to test your functions/lambda’s locally, however I could not get it running with DynamoDB.
Black magic It can sometimes feel like you are not in control since so much is done for you. If something goes wrong it can take a while to figure out where to problem lies. However, there is a lot of documentation and most things get logged to the CloudWatch service. Knowledge of the AWS services behind the Amplify functionality helps here. Like most things, the more you use it the more you start to understand and get better at it.
Conclusion
AWS Amplify is a useful tool to quickly get your (Web) app up and running. The reason it is so powerful is the combination of the CLI and libraries, which automatically hook up the different services together. In its current state I advise you to use this for small beginner projects with small teams, since it can get tricky when working with multiple people. Create different environments if that is the case. There is still a lot more you can do with Amplify as mentioned in the intro. Also: You do not need to use all of the functionality of Amplify. If you only want to use the AUTH part for example, that is also possible. The documentation gives clear examples of how you could do this. It is up to you to decide what you want to use Amplify for and what you want to use something else for. I hope this article has given you an idea of what is possible with AWS Amplify. If you have any questions please let me know in the comments of this article. Good luck and enjoy.
Training: AWS Amplify
Have you always wanted to create a Cloud native app but you don’t know where to begin? The Cloud can be an intimidating concept. In this training you will get a good introduction to the Cloud and you are going...