Production-Ready CDK – CDK Pipelines
We initiated our AWS CDK project in the previous chapter and focused on the project structure. Now, we can leverage CI/CD to speed up the technical value stream. Besides, as the project gets bigger, it becomes more challenging to automate; therefore, why not do it initially?
The most powerful feature of Cloud Development Kits is abstracting complex cloud applications and, as a result, making the cloud more straightforward. AWS CDK does this also for CI/CD pipelines by offering a module called CDK Pipelines.
CDK Pipelines save us from writing a lot of code, configuration, and wiring. I have used and tried many CI/CD tools, and CDK Pipelines way is one of the most painless ways of implementing CI/CD. For a more detailed introduction, you can check the documentation. We won’t recap it, but we will focus on real-life scenarios in production-like environments.
If you tried CDK Pipelines in the past and did it with the old ways, you might disagree with this statement. I should say: I agree with you. And to clarify, there was another construct that was not the most intuitive in the past. But that one is deprecated. So from now on, we only use this CodePipeline construct from the CDK Pipelines library, which I think works as it should be. The code is compact and opinionated in a beautiful way.
Let’s start by taking a step back and thinking about the positioning before jumping into the code.
Don’t use ‘cdk deploy’ in your pipelines
“cdk deploy command is convenient, I always use it for my local CDK code, and I can also use it at my CI/CD pipelines. First, I use the CI/CD tool I want and do the CI part, then just deploy with a single command, easy peasy.” — probably someone who doesn’t care about CI/CD
Well, you can, but should you?
I see this in many CI/CD pipelines used for CDK projects, from simple PoCs to production environments in enterprises. cdk deploy command is quick and straightforward, but the intended purpose is fast development, not CI/CD pipelines. Why? Because as your application gets more extensive, you will have more CI/CD steps, more CloudFormation stacks, and cross-account or multi-region deployments. It might seem easy, but it is the dirty way in the long run.
Second, when using cdk deploy in a CI/CD pipeline, you must give deployment-related IAM permissions. What happens if your CI/CD tool is compromised? They will have access to your AWS account to deploy stacks or, maybe even if you don’t handle permissions right, destroy existing stacks. It sounds improbable, but it is not the well-architected way. We should be reducing permissions continuously.
I am not arguing that we shouldn’t be using the command at all, only saying it has a specific purpose which is not secure or complex pipeline scenarios.
Restricting to the Minimum
Okay, cdk deploy is out of the equation. So what is the right way?
We need to give the least privileges for controlling AWS resources from the CI/CD tooling. One way to do that is by providing only an S3 file upload permission to the IAM role used by the CI/CD tool and creating a deployment pipeline on AWS for the deployment step. We can implement more sophisticated controls in this way, like adding more checks or having manual approvals at different stages.
Furthermore, since only the S3 file upload action can be compromised, it becomes harder to deploy/destroy resources.
We can achieve this in two ways:
- Use Git to upload artifacts to S3, then do CI and CD on AWS using CDK Pipelines.
- Build artifacts with a CI tool, then upload artifacts to S3, finally do CD part on AWS using CDK Pipelines.
Let’s see what the first one looks like:
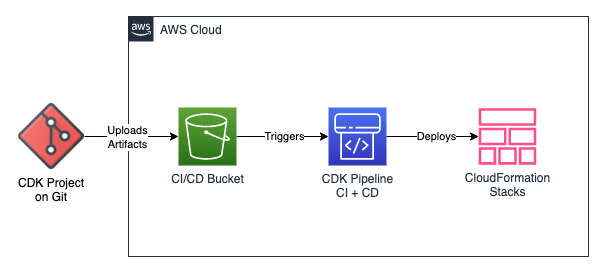
Way 1: CDK Pipeline for both Continuous Integration and Continuous Deployment
If you are not starting your software development from scratch for yourself or your company, you should already have at least one CI/CD tooling in use. As a result, you will have CI steps already figured out and implemented before. Good news and this takes us to the second way. We can use the CI tooling and still use CDK Pipelines for CD. This way is the way I use most at my projects:
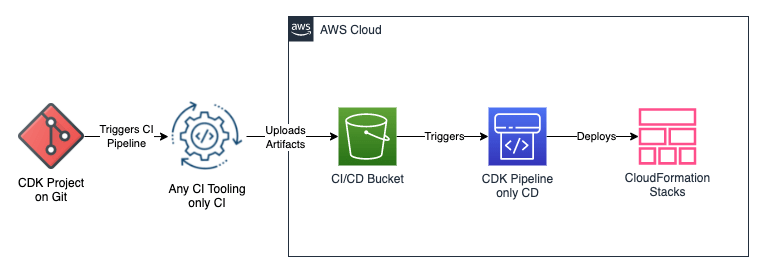
Way 2: CDK Pipeline for only Continuous Deployment
Integrating Github and AWS
We discussed keeping things at a minimum with S3 upload permission. For simplicity, we will skip the CI and go similar to the first way. We will push changes from Git to AWS directly and then deploy them as CloudFormation Stacks.
Luckily, we can simplify more and skip having an S3 Bucket part. Since we use Github, we can utilize the Github-AWS integration, namely CodeStar Connection. In this way, we use only CodeStar permission to deploy stacks (instead of S3 upload permission). It looks like this at the end:
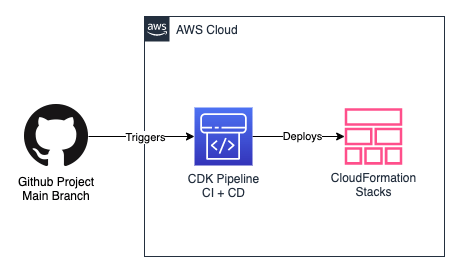
Way 3: Git-CDK Pipeline integration using CodeStar Connections
You can do it in a minute by using the API for it. Or even easier, you can go to one of the Developer Tooling Services of AWS like CodePipeline, click Settings, click Connections, and finally click Create Connection. Follow the steps and give the permissions you need.
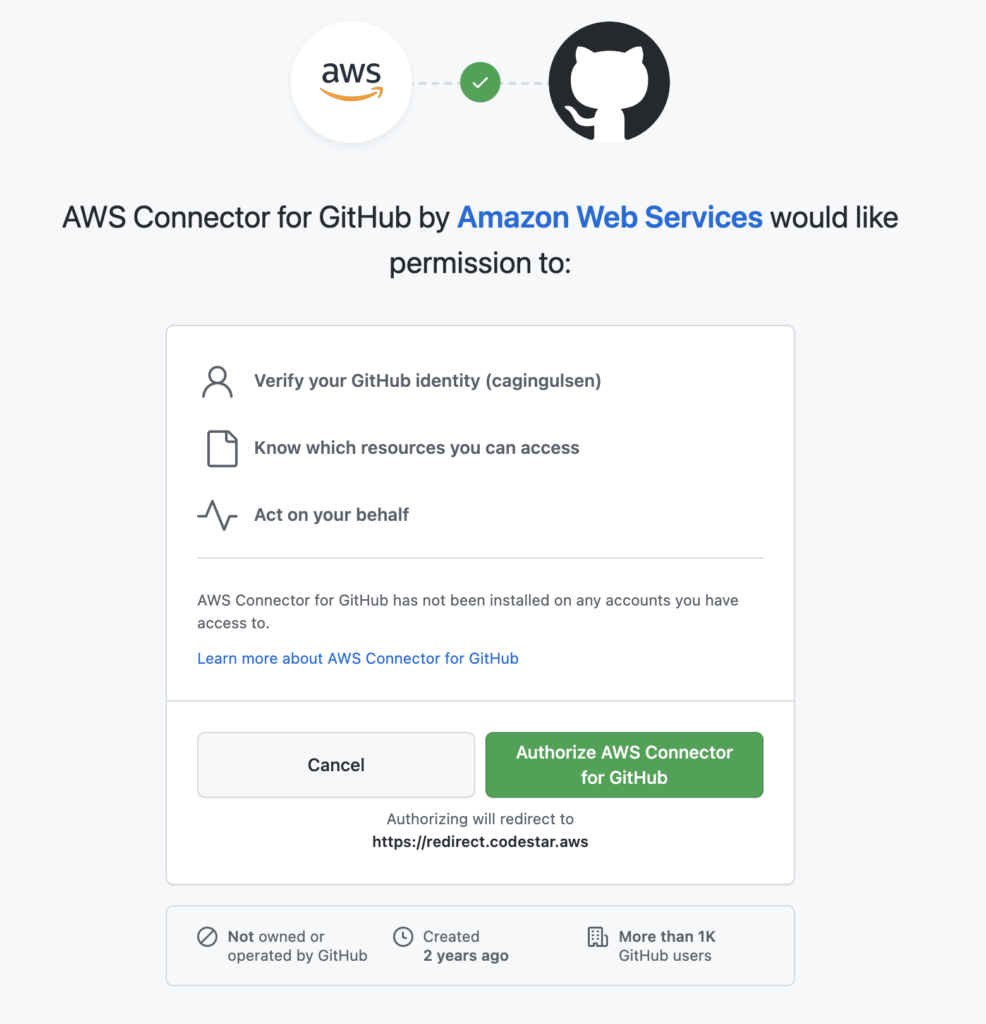
Voilà, ready for the CDK Pipeline!
Adding CDK Pipeline to the Project
If the stack from the previous article still exists, you should start over by destroying it using
cdk destroyornpx projen destroyas I explained before.
Let’s start by separating the Lambda Stack from src/main.ts. We create a new file with the path src/lambda-stack.ts:
import { Stack, StackProps } from 'aws-cdk-lib';
import * as lambda from 'aws-cdk-lib/aws-lambda';
import { Construct } from 'constructs';


// example cdk app stack
export class LambdaStack extends Stack {
  constructor(scope: Construct, id: string, props?: StackProps) {
    super(scope, id, props);

    new lambda.Function(this, 'ExampleFunction', {
      functionName: 'example-lambda',
      code: lambda.Code.fromAsset('lambda'),
      handler: 'hello.handler',
      runtime: lambda.Runtime.NODEJS_14_X,
    });
  }
}
Then implement the pipeline at a new file with the path src/cdk-pipeline-stack.ts.
import { Stack, StackProps, Stage } from 'aws-cdk-lib';
import { CodePipeline, CodePipelineSource, ShellStep } from 'aws-cdk-lib/pipelines';
import { Construct } from 'constructs';
import { LambdaStack } from './lambda-stack';

// 3a. We define a Lambda Stage that deploys the Lambda Stack.
export class LambdaStage extends Stage {
  constructor(scope: Construct, id: string) {
    super(scope, id);
    new LambdaStack(this, 'LambdaStack');
  }
}

export class CdkPipelineStack extends Stack {
  constructor(scope: Construct, id: string, props?: StackProps) {
    super(scope, id, props);

    // 1. We import the CodeStar Connection for Github-CDK Pipeline integration. Therefore,
    // you only need to provide the ARN of the Connection.
    const codePipelineSource = CodePipelineSource.connection('cagingulsen/prod-ready-cdk','main', {
      connectionArn: 'arn:aws:codestar-connections:eu-west-1:YOUR_ACCOUNTI_D:connection/YOUR_CONNECTION_ID'
      },
    );

    // 2. We define the CDK Pipeline using the source from the first step and
    // use three commands for the synth step. We install dependencies from the yarn.lock file
    // with yarn install --frozen-lockfile command to have deterministic, fast, and repeatable builds.
    // The following two lines, we already know.
    const cdkPipeline = new CodePipeline(this, 'CdkPipeline', {
      pipelineName: 'lambda-stack-cdk-pipeline',
      synth: new ShellStep('Synth', {
        input: codePipelineSource,
        commands: [
          'yarn install --frozen-lockfile',
          'npx projen build',
          'npx projen synth',
        ],
      }),
    });

    // 3b. Then we add this to the CDK Pipeline as a pipeline stage.
    cdkPipeline.addStage(new LambdaStage(this, 'dev'));
  }
}
Here we see three things happening; please check the comments in the code above.
Then, of course, we also need to change the src/main.ts, because we moved the Lambda Stack to a separate file, and the starting stack of the CDK App is from now on the CDK Pipeline Stack.
import { App } from 'aws-cdk-lib';
import { CdkPipelineStack } from './cdk-pipeline-stack';

// for development, use account/region from cdk cli
const devEnv = {
  account: process.env.CDK_DEFAULT_ACCOUNT,
  region: process.env.CDK_DEFAULT_REGION,
};

const app = new App();

new CdkPipelineStack(app, 'CdkPipelineStack', { env: devEnv });

app.synth();
And finally, we need to update the only test by renaming main.test.ts to lambda-stack.test.ts without changing the test. But again, we are testing if our Lambda Stack has exactly one Lambda Function.
import * as cdk from 'aws-cdk-lib';
import { Template } from 'aws-cdk-lib/assertions';
import { LambdaStack } from '../src/lambda-stack';

test('Lambda created', () => {
  const app = new cdk.App();
  const stack = new LambdaStack(app, 'LambdaStack');
  const template = Template.fromStack(stack);

  template.resourceCountIs('AWS::Lambda::Function', 1);
});
We need to run cdk deploy or npx projen deploy only once to deploy our stacks. Then, it will deploy the CDK Pipeline, and we can see the pipeline at the CodePipeline service. From now on, for every commit you have on the main branch, the CDK pipeline will pick it up. No more deploy commands. We only push to the main branch to deploy.
Neat, isn’t it?
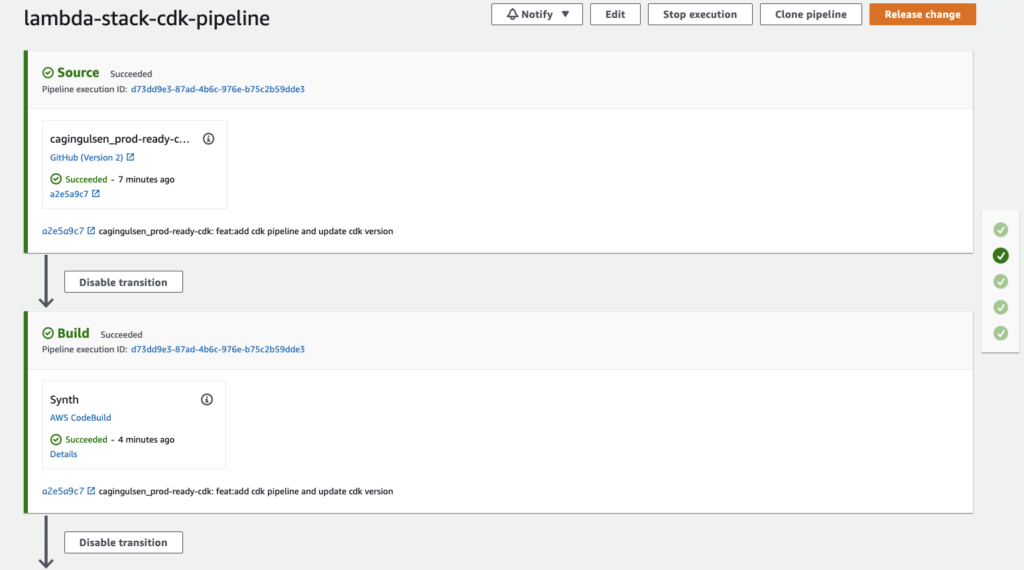
CDK Pipeline deployed and working
Here is the code with the CDK Pipeline.
Other Cool Features
As you saw, we only used the most basic way to use CDK Pipelines. We can always configure it more by:
- Adding more stacks. We could have a different stack like API Gateway Stack and deploy it in the same pipeline. Or use Lambda Stack again but deploy another version of it with a different configuration.
cdkPipeline.addStage(new LambdaStage(this, 'dev'));
cdkPipeline.addStage(new APIGatewayStage(this, 'dev'));
or
cdkPipeline.addStage(new APIGatewayStage(this, 'dev'));
cdkPipeline.addStage(new APIGatewayStage(this, 'acceptance'));
- Deploying stacks to multiple regions or accounts:
export class LambdaStage extends Stage {
  constructor(scope: Construct, id: string, appRegion: string) {
    super(scope, id);
    new LambdaStack(this, 'LambdaStack', {
      env: {
        account: process.env.CDK_DEFAULT_ACCOUNT,
        region: appRegion,
      },
    });
  }}
cdkPipeline.addStage(new LambdaStage(this, 'dev1', 'eu-west-1'));
cdkPipeline.addStage(new LambdaStage(this, 'dev2', 'us-east-1'));
- Adding other types of stages, like a ShellStep or CodeBuildStep:
declare const cdkPipeline: pipelines.CodePipeline;
const preprod = new APIGatewayStage(this, 'PreProd');
cdkPipeline.addStage(preprod, {
  post: [
    new pipelines.ShellStep('Validate Endpoint', {
      commands: ['curl -Ssf https://my.webservice.com/'],
    }),
   ],
 });
- Running pipeline stages in parallel using Waves.
declare const cdkPipeline: pipelines.CodePipeline;

const wave = cdkPipeline.addWave('MyWave');
wave.addStage(new APIGatewayStage(this, 'Stage1'));
wave.addStage(new APIGatewayStage(this, 'Stage2'));
- Adding manual approvals between pipeline stages:
declare const cdkPipeline: pipelines.CodePipeline;
const preprod = new APIGatewayStage(this, 'PreProd');
const prod = new APIGatewayStage(this, 'Prod');
cdkPipeline.addStage(preprod, {
  post: [
    new pipelines.ShellStep('Validate Endpoint', {
      commands: ['curl -Ssf https://my.webservice.com/'],
    }),
   ],
 });
cdkPipeline.addStage(prod, {
   pre: [
     new pipelines.ManualApprovalStep('PromoteToProd'),
   ],
 });
- Using the (default) self mutation feature. If you add new application stages in the source code or new stacks to
LambdaStage, the pipeline will automatically reconfigure itself to deploy those new stages and stacks.
Awesome!
We will use some of the features we mentioned here in the following chapters and improve our pipeline.
In this blog, we continued building our project by adding a CI/CD pipeline using the CDK Pipelines module of AWS CDK. The next topics are Bootstrapping and Aspects. We will tackle a few problems we see when we try to use AWS CDK in AWS platforms. See you soon in the next one, cheers!