Using Azure Active Directory for your web apps: Thoughts from a software developer
With the emergence of identity as a service (iaaS) from Cloud service providers such as Azure and AWS, managing authorization and authentication to your web application in a secure manner has become much easier and less work for developers.
For most scenarios we no longer need to implement ASP.NET Core Identity user management ourselves, nor setup our own identity server (for single sign-on). Instead we can make use of the identity service provider called Azure Active Directory (AAD) which is maintained and developed by Microsoft. This is a good thing, as correctly implementing such software patterns is non-trivial and may incite insecure practices (such as the password-credentials flow) unless the developer knows exactly what he or she is doing.
However, I have found that properly understanding and managing iaaS via Azure can be a confusing topic in itself and it took me some time to properly understand how to use and configure it. I would like to explain how you can use it for you own applications and clarify some concepts that were originally unclear to me in hopes of providing some illumination for others. For the scope of this article, I’ll focus on one of the most basic scenarios for using Azure active directory as a software developer: How to retrieve access tokens for your SPA (Single Page Application) which communicates with your web API, and subsequently protect your web API against unauthorized access.
For the scenario in which you have a SPA that targets a web API, I have found that this documentation best covers the steps you need to take.
The specific example here is registering the API and the SPA with Azure AD B2C (which is AAD for customer defined identities), but the process should be the same for normal Azure AD (which is AAD for Microsoft identities).
For the scope of this article, I would like to expand the following topics in that piece of documentation.
Specifically, I’ll cover three topics that I feel require additional emphasis beyond the official Microsoft documentation
- App registration and MSAL.
- Scopes and admin consent.
- Id tokens vs Auth tokens.
I’ll additionally provide the official links that cover how to implement these things technically for convenience of the reader.
App registration and MSAL
Picture the basic scenario that users will be logging into our SPA using a Microsoft AD account of employees from a single tenant. Our SPA needs to retrieve application specific information from a ASP.Net Core web API. We want to protect this API so that only a specific subset of the users within our tenant are allowed to retrieve data from the web API.
Schematically we arrive at the following idea:
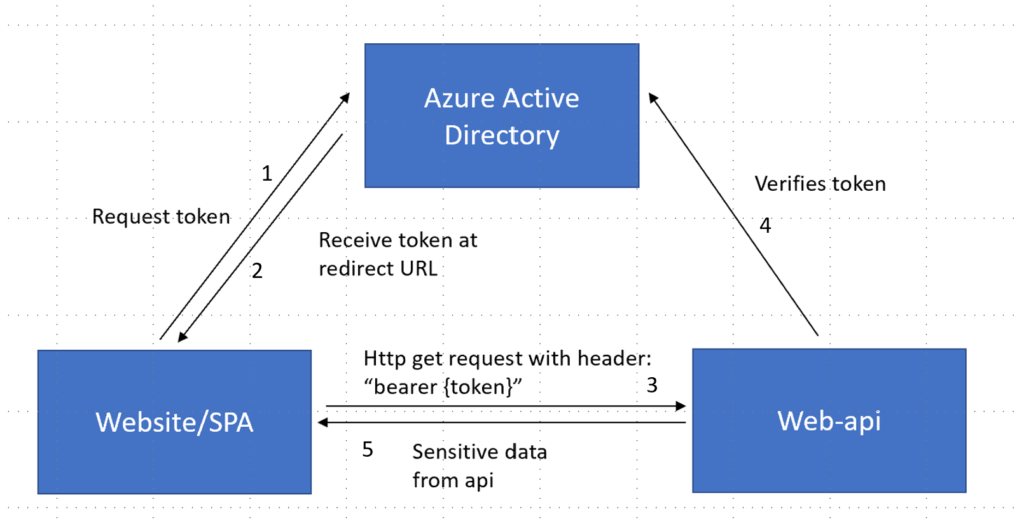
Receiving and verifying the token is a bit more complex than this schema suggests but this suffices to convey the basic idea for now.
Let’s first look at how the SPA registers with AAD.
On the Azure portal side, you will have to create an app registration. The app registration is an entry inside Azure that contains all identity related information of an application that you register with AAD. Perhaps somewhat counter-intuitively, this registration typically has no relationship with the deployed instance of the website on Azure itself. Instead, the front-end code of the SPA uses a Javascript library called MSAL (“Microsoft Authentication Library”) and a configuration file containing a TenantId, ClientId and redirect URL to find the app registration on Azure. Where the TenantId is the identifier of the organisation/tenant under which the app registration is created, the ClientID is the identifier of app registration instance on Azure itself and the redirect URL is the web address at which the SPA requests the access token to be returned. Upon successful retrieval of the token by the SPA via the logic from the MSAL library, the same token will be added as HTTP header to each request from your SPA to your web API. Note that the successful retrieval of the token is also generally the clue that the website user has successfully logged in for your front-end application logic.
MSAL isn’t just available as a JavaScript library, but also for .NET applications, Java applications, mobile applications and a few others. The beauty of it is that the library manages interaction with AAD for fetching tokens, fetching refresh tokens and expiring the token. Additionally, you don’t have to search for a discovery document, specify the token endpoint or manage storage of the token in the web browser (etc.) yourself as the MSAL library will do these things for you. You only have to follow the implementation instructions for your specific platform and configure a settings file generally.
On the app registration side, we need to specify which root domains we white-list to request an access token. We also specify what type of consent the user requesting the token must give, what scopes the token is for and what type of tokens are handed out. The above-mentioned Microsoft documentation explains clearly how to do these things, but in order to understand what you are actually doing I feel some extra explanation is very welcome. In the rest of this blog, I’ll elaborate on these things.
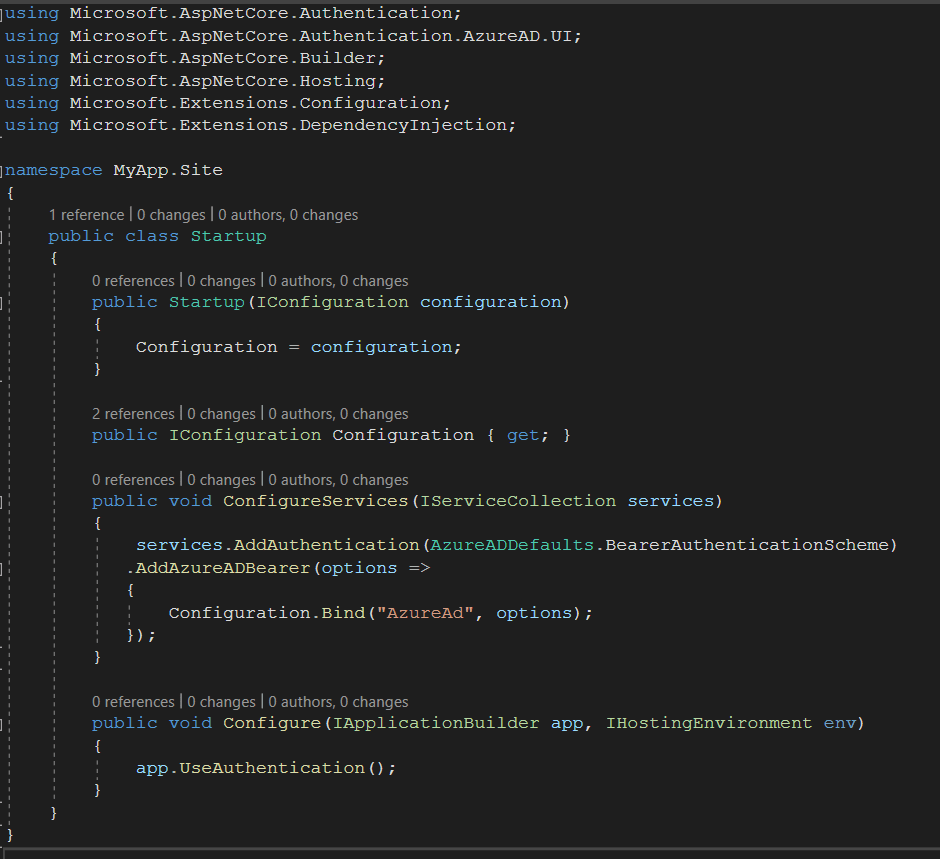
Now that I have given an overview of how the SPA will interact with AAD, that leaves the topic of the web API. With each request to the web API from our SPA, the authorization token, which is usually a Json Web Token (JWT), is passed along in the authorization headers. Therefore, the process for integrating the web API with AAD is a bit simpler than for the SPA. The only thing we really need to do is register our web API with AAD via a separate app registration and subsequently verify the JWT with the AAD service upon each request entering the API. You’ll usually want the Web API and the SPA to each have their own app registration, so you can finetune their scopes separately. The API can be granted admin consent for example, where the SPA is not (I’ll discuss consent and scopes in the next section). In a typical .NET Core webapp, the entire implementation could be something as simple as this (when using the Microsoft.AspNetCore.Authentication Nuget package):
Scopes and admin consent
The concept of scope for a JWT may be a little confusing at first. Scopes are not part of the JWT itself but are sent alongside a request towards the authorization service to specify what type of information the application would like access to. If the requested Scope and previously granted access (either previously by the user, or from admin consent), are not the same for the user identity matching to the requested JWT, the user will have to give consent for the app to fetch the additional information. Alternatively, if that user is not allowed to give this consent for a specific resource, he/she may be prompted to ask an admin within the organisation for consent. When the JWT is subsequently verified by the Web API, the scope that was agreed upon by that user, is again be checked via AAD (the previously granted scopes are stored on the AAD side for that User identity), to see if it encompasses the specific API information that the front-end tries to access.
Oftentimes you’ll find your SPA will need a complex set of information from your web API and you don’t want to bother the employees using your app with a consent pop-up. In these cases, AAD offers the option to provide tenant-wide admin consent. Basically, you login as an administrator to give an application or group of users in your tenant permanent consent for a specific scope without user interaction. This should be handled with some care and you should make sure the application is only granted access for the scopes that it actually needs. Granting admin consent can be done in the following Azure pane:
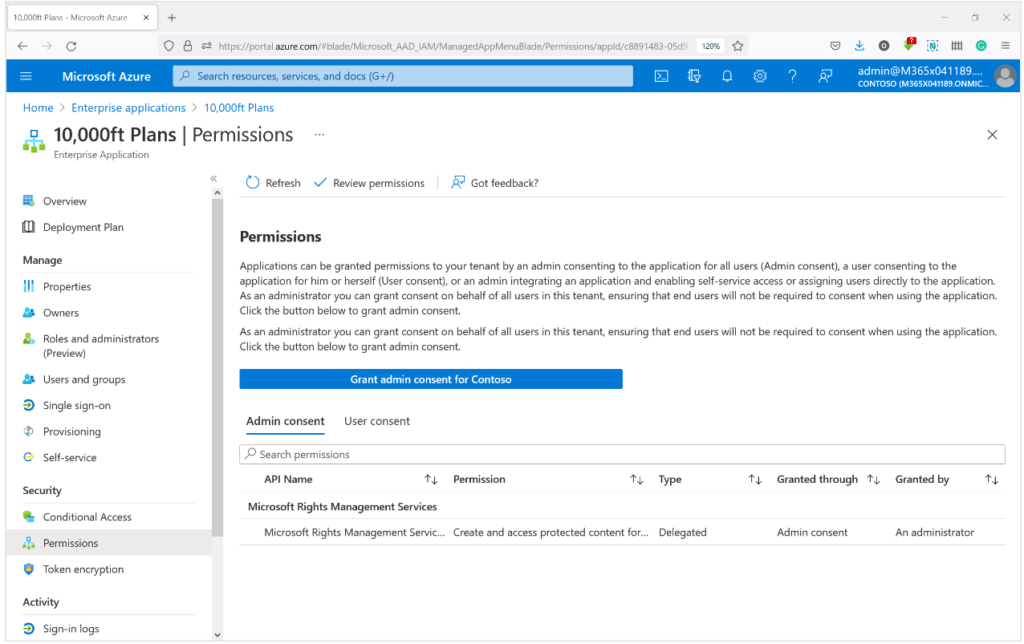
It is a powerful tool but the developer should take care to not abuse it in scenarios where user-consent would suffice.
ID tokens versus Auth tokens
Perhaps one of the most obscure options the AAD portal interface provides to the developer that tries to setup AAD single sign on for one of his or her app for the first time is the concept of ID tokens and access tokens:
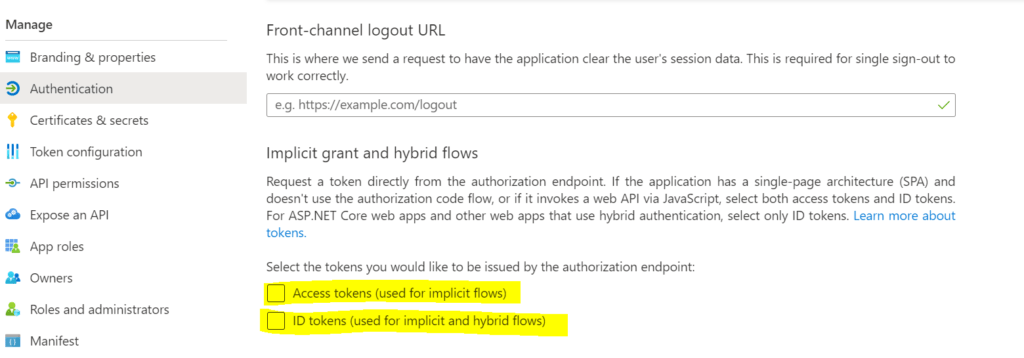
The wording here is extremely confusing so let me explain when and how to use this. Apparently AAD distinguishes between Access tokens and ID tokens. These are the two types of JWT that the authorization endpoint can hand out. Note that the Azure portal speaks about the AUTHORIZATION endpoint and specifically not the TOKEN endpoint. To understand the difference between the two, we need to cover the two OAuth based authorization flows that are commonly used. Namely the authorization code flow and the implicit flow.
Implicit grant flow
A popular authentication method that has been used for single page web applications (SPA’s) in recent years, is the implicit flow (a.k.a. the OpenId Connect (OIDC) implicit grant flow). However, the most commonly used way to implement this type of authentication and authorization nowadays, is via the so called authorization code flow. (Implicit flow has fallen out of favor since browsers started supporting cross origin resource sharing).
Because it’s chronologically the more dated one, let’s start by discussing the implicit flow:
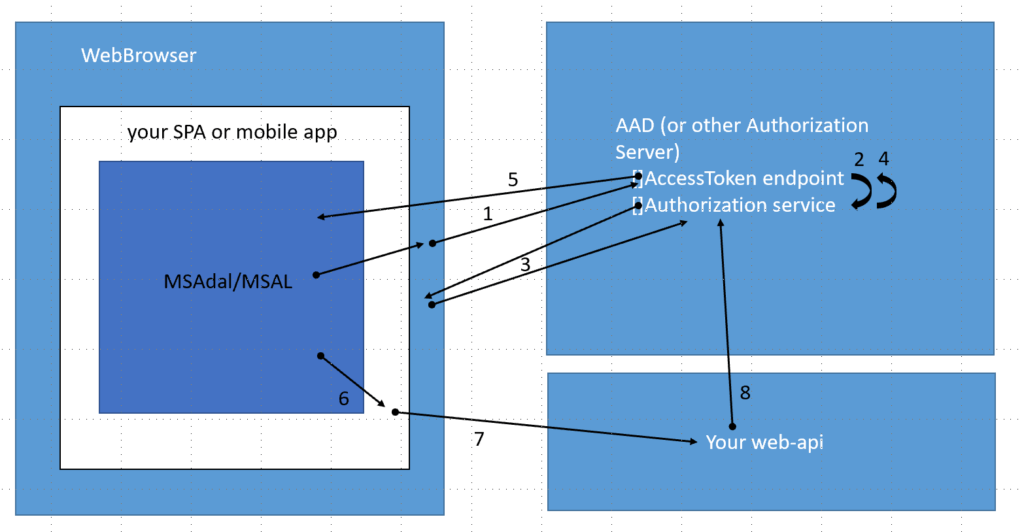
Implicit grant flow
- The authentication library signals the browser to navigate to the access (bearer) token endpoint of the identity provider*.
- Because the user is not authenticated, the browser is redirected to login screen for the authentication service.
- The user enters his credentials and these are verified by the authentication service.
- The browser is redirected to the access token endpoint.
- The access token is returned as a URL/query parameter to a redirect URL that was pre-configured at the Authorization Server, ensuring that only the designated domain can request the token. Because the token is passed in the URL, it is extra important to always communicate over Https when using the implicit flow.
- The access token is held in the browser storage by the authentication library. It is retrieved and added to the request headers by your SPA or mobile app.
- Requests made to your web API can now be accompanied by the access token.
- The web API can now verify whether these requests are authentic with the identity provider, using this token.
* Azure Active Directory in this specific case.
On a side-note: The Azure Active Directory Authentication Library (MsAdal) was the popular predecessor to MSAL for JavaScript applications until about a year ago. It was therefore an attractive option for implementing an authentication system for your front-end apps. However, this predecessor exclusively supported the implicit grant flow.
Authorization code flow
The authorization code flow is the currently recommended way to manage tokens from AAD and I’ll try to describe it the best way I can with the following figure and step-by-step explanation.
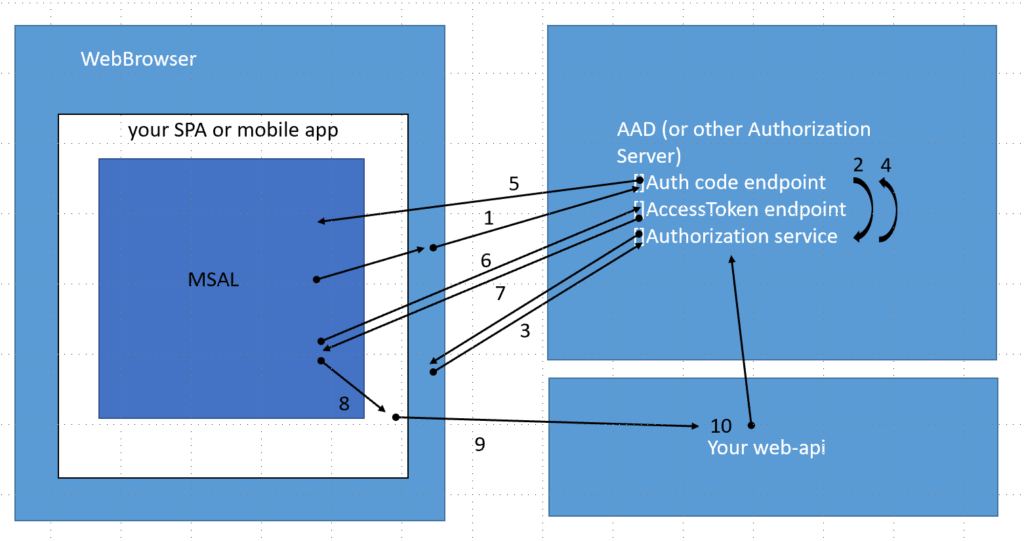
Authorization code flow
- The authentication library signals the browser to navigate to the authorization code endpoint of the identity provider*.
- Because the user is not authenticated, the browser is redirected to login screen for the authentication service.
- The user enters his credentials and these are verified by the authentication service.
- The browser is redirected back to the Auth code endpoint. This time the authorization code can be returned.
- The authorization code is returned as a URL/query parameter to a redirect URL that was pre-configured at the authorization server ensuring that only the designated domain can request the authorization code.
- The authentication library does a POST request to the /token endpoint of the identity provider, providing the (PKCE protected) authorization code.
- The access (bearer) token is retrieved to the return URL.
- The access token is held in the browser storage by the authentication library. It is retrieved and added to the http request headers by your SPA or mobile app. (Refresh token can be fetched from the identity provider once needed and replace the access token).
- Request made to your web API can now be accompanied by the bearer token.
- The web API can now verify whether these requests are authentic with the identity provider, using this token.
* Azure Active Directory in this specific case.
As we can see, the authorization code flow expands on the implicit grant flow by first retrieving an authorization code, before getting the access token with the help of that authorization code. The significant advantages of using the authorization code flow over the implicit grant flow are that (A) the access token is not as exposed and (B) the availability of refresh tokens. These advantages are possible because (A) the authorization code is short-lived and single-use, and that (B) the access token cannot be easily intercepted (due to PKCE and because it is never passed in the URL).
Back to the Azure portal
In short, we can now understand that we would like to use the auth code flow in most scenarios. How to configure the auth code flow in AAD depends on whether additional user claims are needed. If we do not need additional user claims in our front-end, we only need an authorization code from the /authorize endpoint of AAD and therefore both the Access token and ID token checkboxes can be left unchecked. We get the access token from the /token endpoint of AAD and not from the /authorize endpoint after all. If we need more info for our front-end than just the token to send with the request headers to our web API (for example a set of claims that control whether our front-end does or does not show certain features and buttons) we should still use the auth code flow, but enable the checkbox for ID Tokens. This causes an ID Token to be sent alongside the authorization code to the redirect URL. This configuration is what Microsoft calls the ‘hybrid’ flow. Unlike the auth code and the access (bearer) token, the ID token contains additional information like user claims that the front-end may need for displaying purposes.
In modern web-apps you should basically never have to retrieve access tokens directly from the authorization endpoint, because all the MSAL variations now support the authorization code flow. Therefore, the access token checkbox should always be left empty unless you need to work specifically with the implicit grant flow for backward compatibility reasons.
Conclusion
In summary, I’d recommend the following things in most scenarios when implementing AAD authentication for your web applications:
- Use MSAL.
- Use scopes.
- Always use the authorization code flow.
- Use tenant-wide admin consent sparingly and responsibly.
I hope this paper has provided the reader some insight on how and why and has contributed to a better understanding of how to implement OAuth based authentication with Azure Active Directory.