The Amplify Series, Part 2: How does AWS Amplify work?
In the previous blog, we got a high-level overview of AWS Amplify. In this article I will examine how AWS Amplify works and explain the “magic” behind the scenes. While one of the advantages of Amplify is that you don’t need to know any of this to develop a cloud-native application, it is essential to understand its inner working if you want to do more than just quick scaffolding.
I have worked on several Amplify projects without digging deep to get effective. So if you want to get to just building a cloud-native application, you can skip this one. However, for those of you who stay, we will be covering the foundation on which Amplify is built upon, the concept and technologies used, and describe what actions happen in the background when you run specific commands in the Amplify CLI. It is important to note that the examples we give in these articles are very web app-oriented to keep the articles shorter. However, Amplify also supports mobile development with Android, iOS, and hybrid frameworks, and for the most part, the information here is still relevant.
Infrastructure as Code (IaC)
To explain how AWS Amplify works, we first need to discuss the concept of “Infrastructure as Code”.
Before IaC, we would probably log in on a cloud console or web portal of some sort and start configuring our infrastructure by clicking around. Additionally, the cloud provider might have a CLI or another tool to help us provision our infrastructure. After many clicking and cli commands, we finally have our first version up and running.
After testing this setup, we are ready to go to production. Here is where we encounter one of the first problems that IaC solves: How do we replicate the test environment we provisioned and tested? One option is to follow all the steps we did to create a replica. However, as you can already tell, this is very error-prone, and missing even one step might make a big difference.
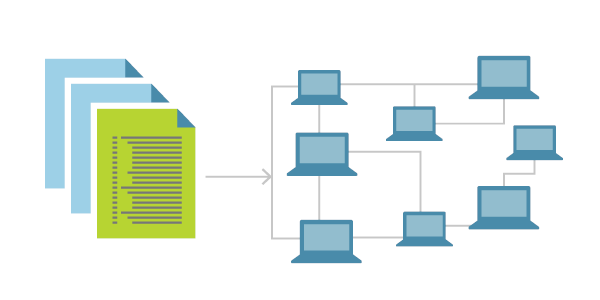
With IaC, we solve this issue by describing these steps we made into some form of code. Once we have this in code, we can easily create a copy of the infrastructure using a provider that understands the code and can provide us with resources. There are also other benefits to IaC. To learn more about it, check out this blog post or this short video.
Many tools provide IaC functionality, such as Terraform, Puppet, Google Cloud Deployment Manager, and Azure resource manager, to name a few. When it comes to AWS, we use AWS Cloudformation.
AWS CloudFormation
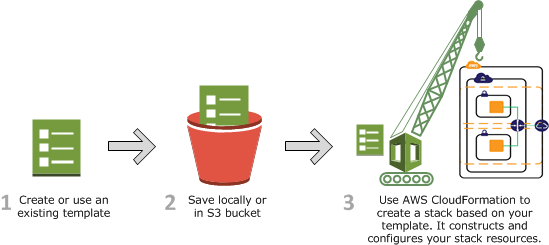
AWS Cloudformation is the Infrastructure as Code solution provided by Amplify. We can define our cloud environment, meaning the resources and their dependencies, in so-called “CloudFormation templates”. These templates are written in JSON or YAML. CloudFormation can take such a template and create a CloudFormation Stack, a set of related resources. For CloudFormation to find the template, it must be uploaded to S3.
However, the good news is that Amplify will do all of the steps above for you. You just need to answer a few questions about what kind of functionality you need for your cloud-native app. Amplify will generate CloudFormation templates based on these answers, deploy them to S3 and use CloudFormation to create, update or delete the stack. We can log in to AWS and go to CloudFormations to look at our stacks at any time. Here is an example of a CloudFormation template generated by Amplify:
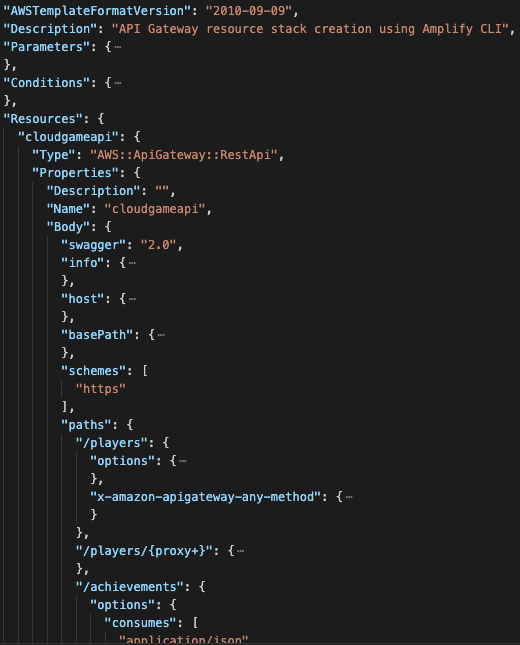
Some items in the example above are minimized, but we can see that we are declaring an API resource with a path “/players” and “/achievements”. The entire file is 2200 lines long, only for the Amplify API category. Learning to do this by hand is a lot of work and error-prone. That is why several tools generate CloudFormation, such as Amplify, AWS CDK, and AWS SAM. Which tool you should use will be covered in the next blog. For now, it is essential to understand the basics of CloudFormation.
Configuring AWS Amplify CLI
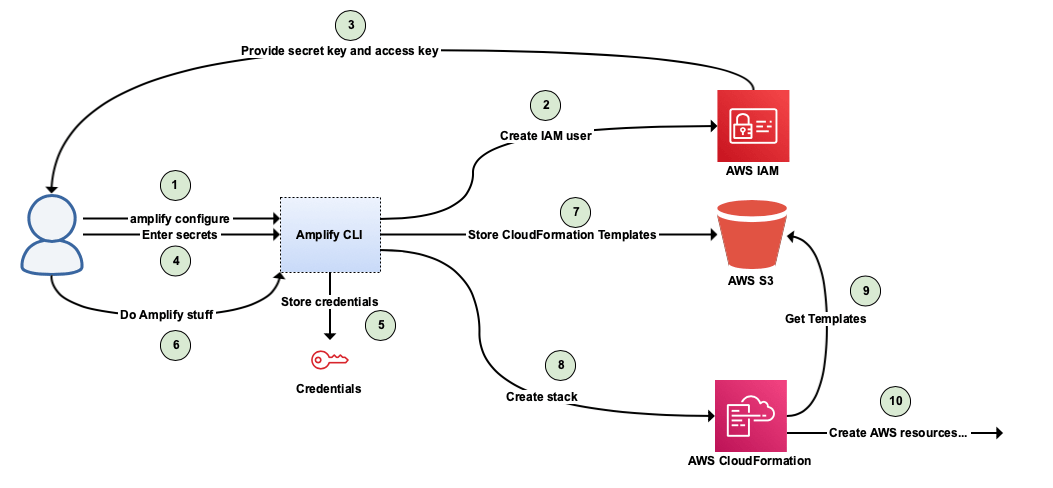
Before you start using the Amplify CLI, you need to configure it to know which account it can use to create AWS resources using S3 and CloudFormation. You can do this by running “amplify configure” in the command-line terminal. This will open a browser window for you to log in to the AWS console and walk you through the steps of creating an IAM account that has enough access to do everything that the Amplify CLI needs to do. At the end of all of the steps, you must give the profile a name. This name will be used in the CLI moving forward with Amplify, and at some points, the CLI will ask you which profile you want to use for which commands.
Once this is done, the CLI will use these credentials to communicate with AWS to generate cloud resources via CloudFormation. Here is a diagram showing the actions that happen when you first configure your CLI and how the credentials are used to access CloudFormation and S3:
Initialising an Amplify project
When your CLI is configured, you can start creating your Amplify project. This is done by navigating to the root of your project and running “amplify init”. The CLI will ask several questions, one of which is related to the credentials we configured. Once we select the correct profile, Amplify will work and perform several actions to create the Amplify project.
Changes in AWS
After running the amplify init command, the CLI will create an S3 bucket to store the CloudFormation templates, and it will create a CloudFormation stack that will point to the S3 bucket. Here is an example of a stack built after running amplify init:
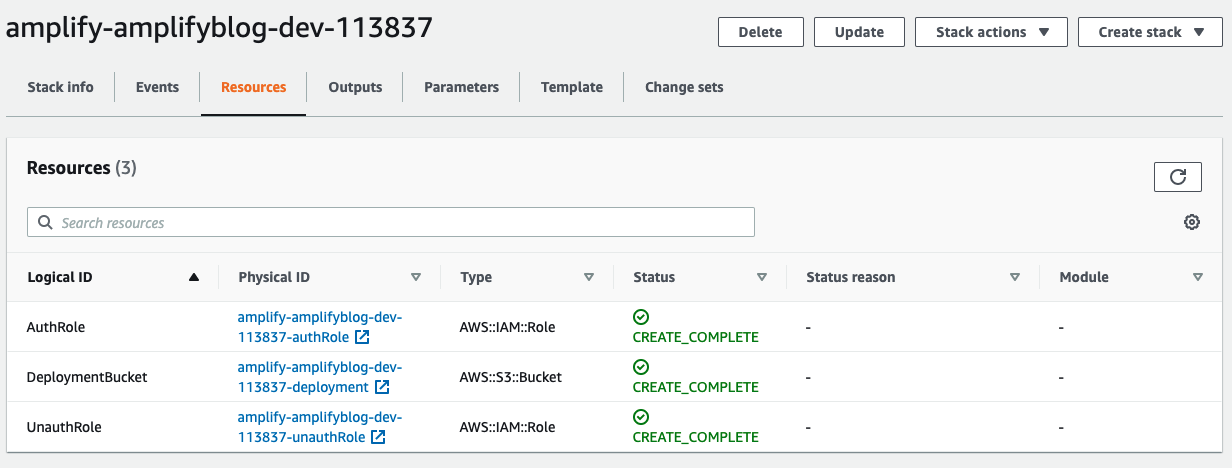
As we can see, the DeploymentBucket is present, which will hold our CloudFormation templates. There are also two IAM roles created for the project. One for authorized users and one for unauthorized users. Once we begin adding more Amplify functionality and setting up authorization rules, these IAM roles will be updated to match what we configure via Amplify.
Another action that is taken by the CLI when running Amplify init is the creation of an Amplify project in the Amplify console:
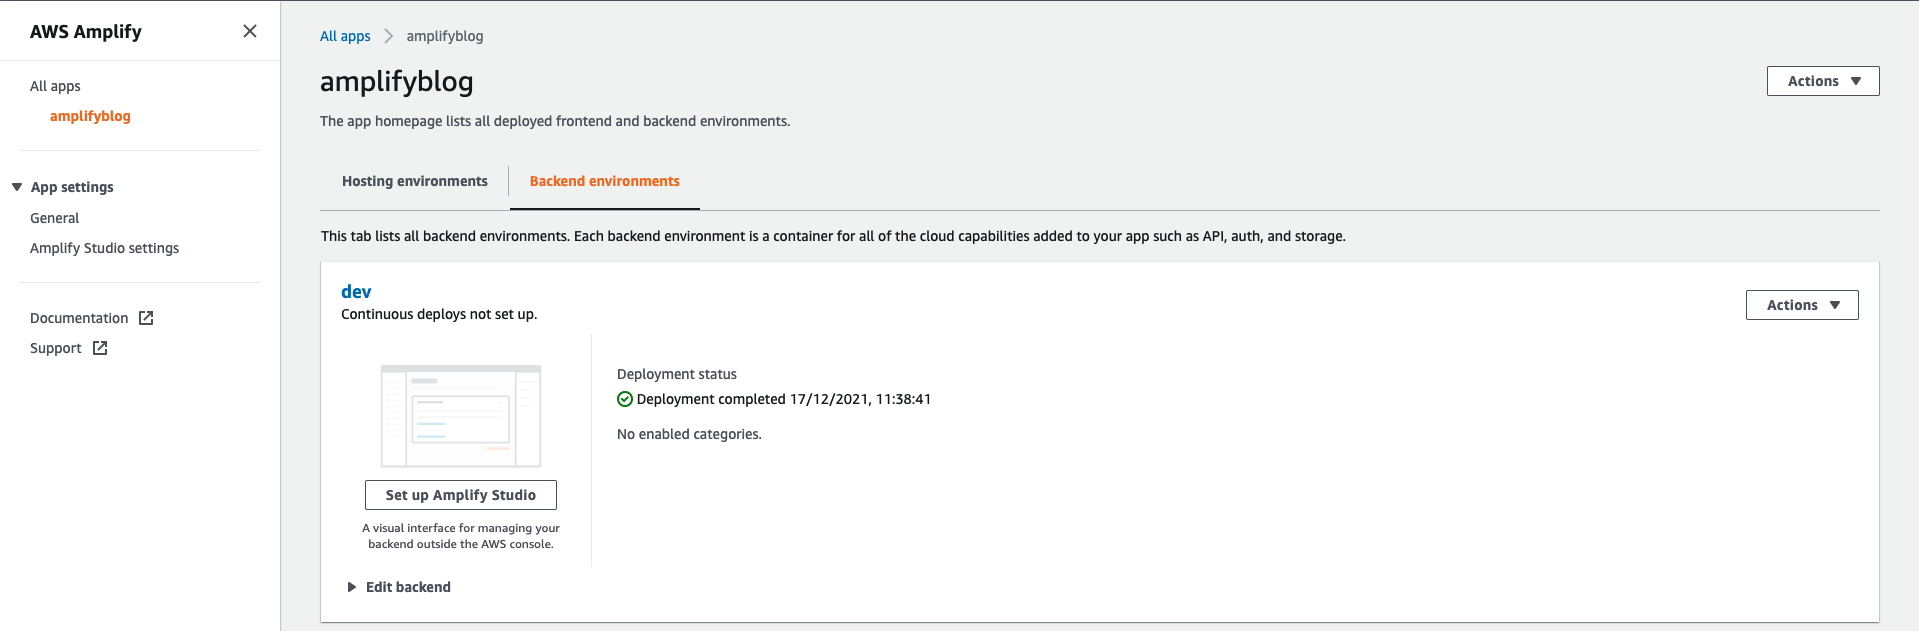
This will become relevant once we start looking into hosting and adding CI/CD for our project.
Changes in the project repository
The CLI also generates and updates several files in our repository, reflecting our choices made in the Amplify CLI. An extensive list of files generated by Amplify can be found here; however, here is a summary of the files changed if you init for an Angular application:
- amplify/cli.json: Feature flags for the CLI
- amplify/README.MD: A list of links to helpful resources
- amplify/team-provider-info.json: Information needed so that other team members can use Amplify. This file can be added to git if running a private application. However, it is advised to remove it or add it to the gitignore if it is a public project. Note: Even if someone gets the information in this file, they would still need the correct credentials to use the information.
- amplify/.config/..: Configuration options set during the “amplify configure” command
- amplify/backend/backend-config.json: Information about resources and how they connect.
- amplify/hooks/…: Command hooks that can be used during the Amplify lifecycle, such as “pre-push”, “post-add-function” etc.
- src/aws-exports.js: This file only exists for JS projects and is used by the JS libraries to know which resources they should communicate with.
- .gitignore: This file is updated by the Amplify CLI to ignore certain generated files and should not be stored in Git.
These changes should all be stored in Git to have a good starting point for your project. In general, changes made by the Amplify CLI should be committed to Git because those are the changes in your Infrastructure as Code setup that Amplify is updating for you based on your CLI choices.
Adding backend functionality to project
Once the project is initialized with Amplify, we can add backend functionality.
Backend functionality
When we talk about backend functionality, we mean AWS Cloud services that will be generated by the CLI and consumed by our frontend application. For example, adding the Amplify (REST) API category will make use of AWS API Gateway. Adding the Amplify Auth category will make use AWS Cognito. Here is a diagram that shows a deployment of a REST backend created with AWS Amplify:
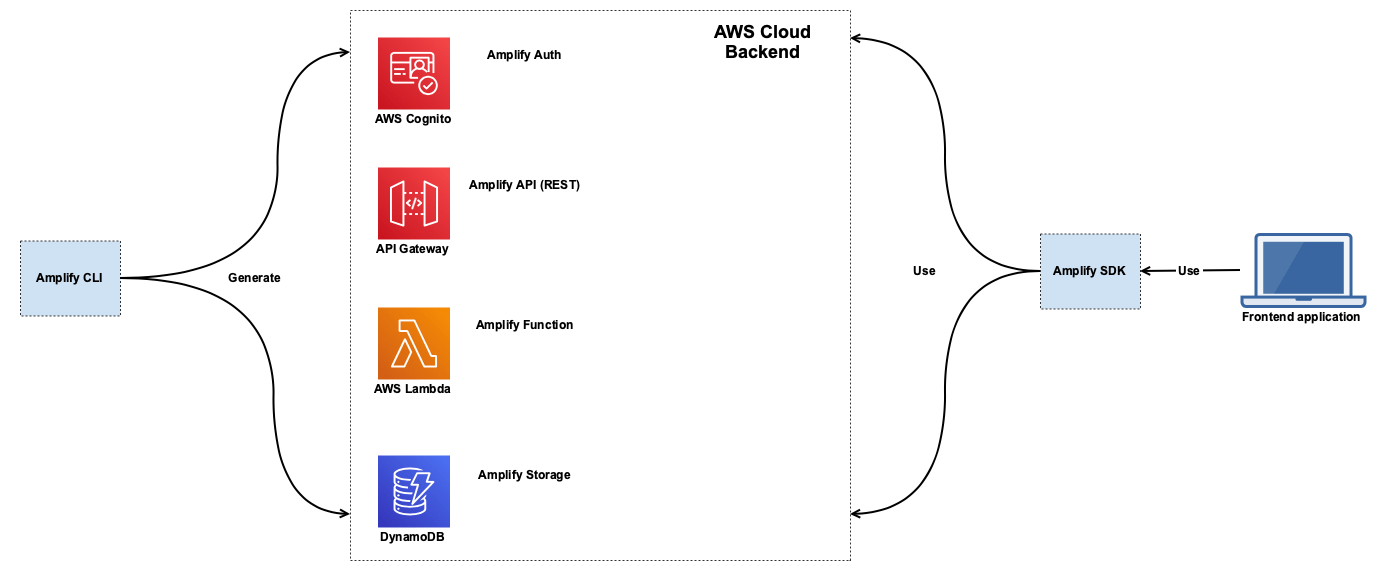
Here we can see that the CLI generates a set of AWS resources. Each resource is part of an Amplify category. On the right side we can see that our frontend application will make use of the Amplify SDK to use these resources.
Using the CLI
We can add backend functionality by running “amplify add <<name of category>>” in the CLI. In this case, if I run “amplify add auth” I will get the following questions:
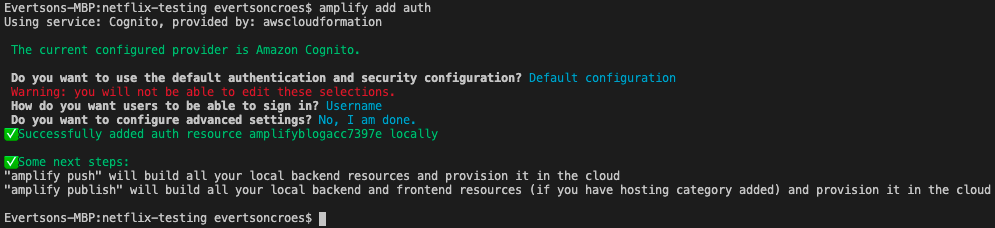
Note that this is one of the more straightforward functionalities to add. When adding API, for example, you will have to answer many more questions. Once we are done running this command, there will be changes in our project:
- amplify/team-provider-info.json: It will now contain a “categories” object containing the “auth” category with identifiers of the resource.
- amplify/backend/backend-config.json: It will now contain an object called “auth” with information related to the AWS service and how it needs to be configured, in this case, AWS Cognito.
- amplify/backend/auth/<<some identifier>>/cli-inputs.json: This file contains the choices you made via the CLI for the auth category. This is the file that will be committed in Git with the state of the auth category for this project. This is much better than adding the CloudFormation templates themselves to Git, as that would make fixing merge conflicts harder.
- amplify/backend/auth/<<some identifier>>/build/<<some identifier>>-cloudformation-template.json: This is the actual CloudFormation template which will be used. This file is already added to the .gitignore by Amplify and will be regenerated when there are relevant changes.
- amplify/backend/auth/<<some identifier>>/build/parameters.json: Contains environment specific parameters for the CloudFormation template. It should also be ignored in Git.
It is important to note that we have not yet done anything in AWS. These changes all remain local until the next step.
Pushing backend changes to AWS
After adding and updating functionality that we need in our application via the CLI, we can push the local changes to AWS running “amplify push”. This is where we will be making changes in AWS and generating the resources that will be needed to support the functionality we want. With this command, we will be generating several resources into our CloudFormation stack by just answering questions in a CLI.
When running the command, the CLI will compare the state of the infrastructure in the S3 deployment bucket and the local changes and give a preview of the changes that will happen if the push continues. In the case of the auth category we added in the last section; the preview would look as follows:
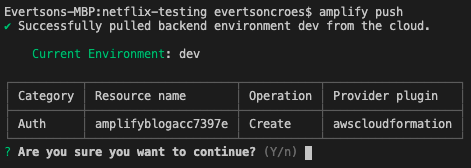
We can see that new resources will be created for the auth category. If we choose “yes” then the CLI will update the S3 bucket with the new CloudFormation templates and use CloudFormation to create/update the stack for our Amplify project. One other important thing to note is that once the CLI starts pushing the changes to AWS, it will also update the aws-exports.js file with the new references so that the frontend libraries can make use of this.
At any point, we can run amplify status to see the state of your current changes. After pushing the changes and running amplify status, we can see that we no longer have any changes:
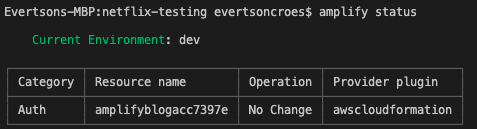
We can also check out our CloudFormation stack to see all the new resources created.
This is the primary development cycle for working with AWS Amplify using the CLI. In short, we:
- Make local changes by running “amplify add <<category>>” or “amplify update <<category>>”
- We run “amplify push” and check if the changes make sense
- We click on “Yes” to let the push continue
- (Optional) We check CloudFormation to see if the stack is in the “CREATE_COMPLETE” or “UPDATE_COMPLETE” status
Connecting backend and frontend
Besides the CLI, Amplify also provides libraries so that your frontend application can make use of the generated resources in an easy way. We need to inform the frontend libraries of the backend resources we have generated and how to find them.
To get this working, we first need to install the libraries. You can find tutorials for all of the integrations here. For Angular, we can run:
“npm install –save aws-amplify @aws-amplify/ui-angular@1.x.x “
Furthermore, we need to configure the Amplify library with the aws-exports.js to know which resources it can use for which category of Amplify functionality. This is usually done somewhere in your frontend code in the earliest part of the app lifecycle. For Angular, we add it in the src/main.ts:
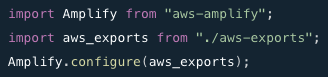
Once this is done, we can run functionality such as “Amplify.Auth.register(userInfo)” to register a new user. We will look into more concrete examples in the following blogs.
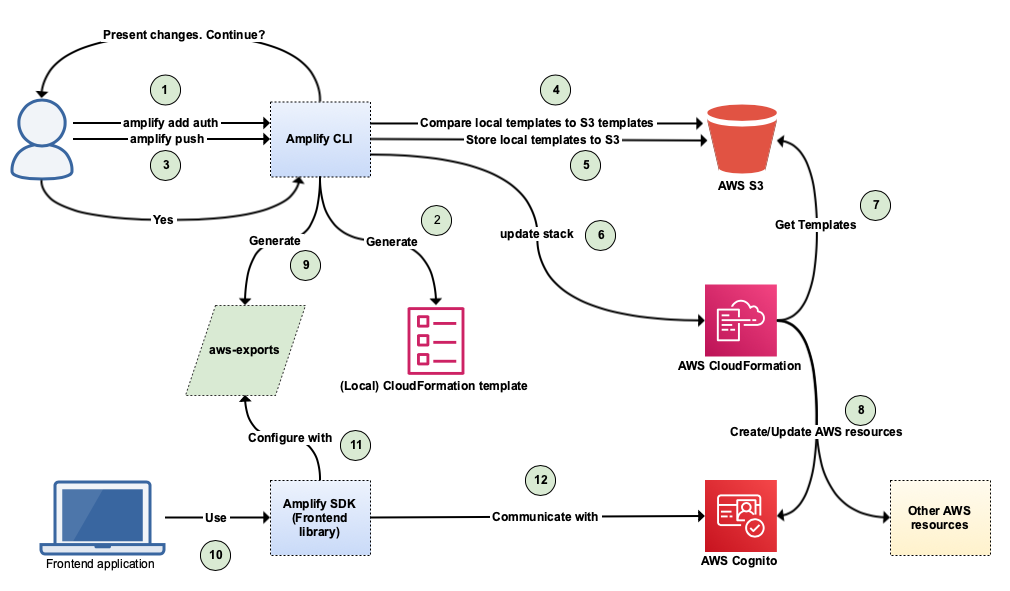
The complete flow of adding Amplify functionality and using it can be illustrated in the following way:
Up next…
In this blog we looked at how AWS Amplify works behind the scenes. If you are considering using Amplify for real life projects, this information will help you have the confidence to make changes and fix issues. In the next blog, we will be looking at why you should consider using AWS Amplify, when to use it, when not to use it and when you should look at alternatives. See you in the next one!
Training: AWS Amplify
Have you always wanted to create a Cloud native app but you don’t know where to begin? The Cloud can be an intimidating concept. In this training you will get a good introduction to the Cloud and you are going...