

Deploying SageMaker Pipelines Using AWS CDK
Introduction
SageMaker is a loved and feared AWS service. You can do anything with it, from building data pipelines, to training machine learning models, to serving said models to your customers. Because of this, there is a range of approaches for any of these problems, which can often be a source of confusion on how to proceed.
In this blog, I clear up one such confusion about the deployment of SageMaker pipelines. I show you how to write your own pipeline definitions and how to deploy them using AWS CDK into your SageMaker domain.
If you are not yet working with AWS SageMaker I highly encourage you to try it out before proceeding with this walkthrough, specifically because we will be addressing some quite advanced concepts.
What is SageMaker?
Before we delve into the how to of deploying SageMaker Pipelines using AWS CDK, it’s essential to understand what SageMaker is and what it brings to the table.
Amazon SageMaker is a fully managed machine learning service provided by AWS. It’s a comprehensive service that covers a wide range of machine learning tasks. It assists with data preparation, provides a notebook development environment, handles endpoint deployment, provides tools for model evaluation and much more. In essence, it’s a one-stop-shop for machine learning operations, designed to simplify the process of building, training, and deploying machine learning models.
However, these components, while individually powerful, need a maestro to orchestrate them into a cohesive workflow. That’s where SageMaker Pipelines come in. They bridge the gap between these elements, ensuring they work together seamlessly. This orchestration acts as the connecting piece in your MLOps workflow, reducing the complexity and enhancing the manageability of your projects.
What is SageMaker Pipelines?
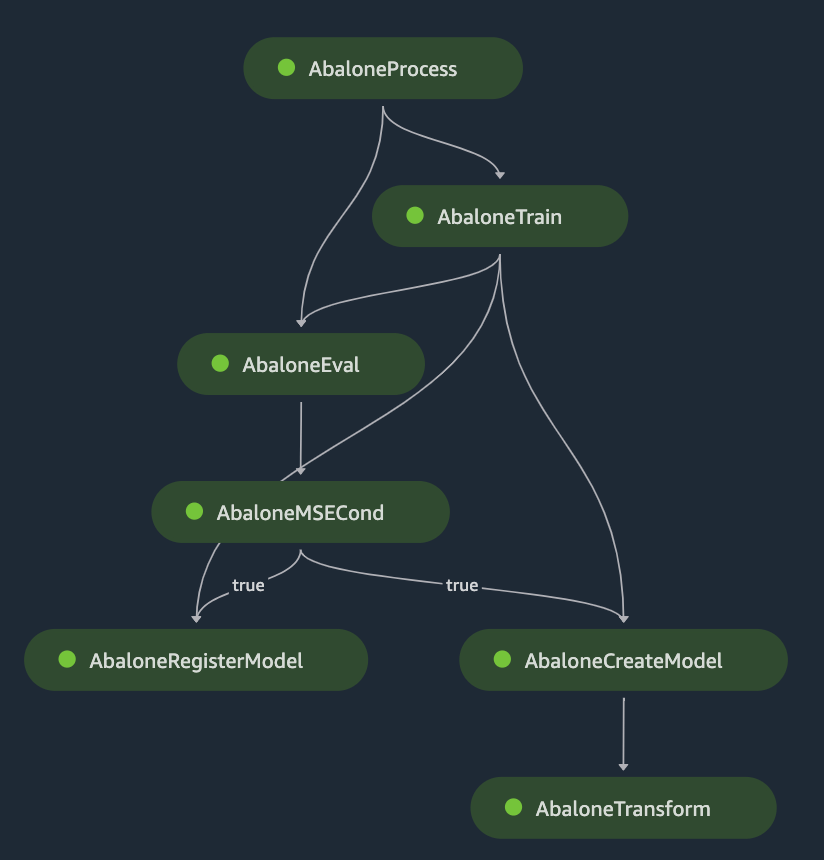
SageMaker Pipelines are a versatile service to orchestrate various tasks within an ML model lifecycle. Each pipeline consists of interconnected steps, each of which can run a configured docker container within SageMaker runtime or call one of the services within SageMaker. A few notable features include, but are not limited to:
- Allows using custom docker images from AWS ECR.
- Can seamlessly pass large files or metrics between various steps.
- Support has a Local Mode for testing the pipelines and containerized steps locally.
- Integrates with services such as AWS Athena and SageMaker Feature Store gathering the necessary (training) data.
- Executable from services such as AWS StepFunctions and AWS Lambda using AWS SDK.
Deploying SageMaker Pipelines using AWS CDK: a high level overview
Before we delve into the specifics, it is beneficial to understand the overall structure of our deployment. The following diagram illustrates the components involved in this blog:
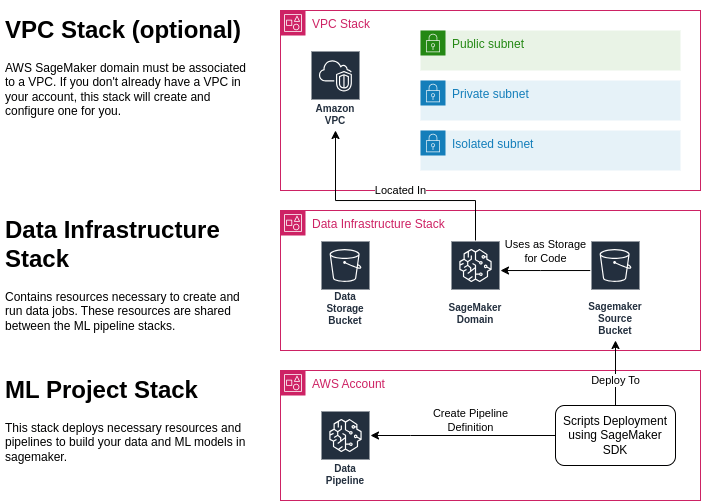
One important aspect to note is that the SageMaker Pipeline does not directly depend on the SageMaker domain. This is correct, the pipeline is a standalone resource, and can be launched programmatically using the AWS SDK or step functions, which is useful in minimal setups.
However, for manual launches, a SageMaker workspace is required. This is where the SageMaker domain becomes necessary.
Therefore, to ensure a comprehensive understanding of the process, we will also cover the creation of a SageMaker domain in this blog. This will provide a complete overview of the deployment process, equipping you with the knowledge to effectively manage your machine learning projects.
Setting Up Your Infrastructure
In this section, we will focus on the initial steps required to set up the necessary infrastructure for our project. The first task involves creating a CloudFormation project which will deploy our AWS resources including: SageMaker domain, users, data buckets and optionally the VPC.
For those interested in the complete code, it is available on Github.
Create a VPC (optional)
If you’ve already got a VPC up and running, you’re one step ahead. Just update the vpc_name in the cdk.json file and feel free to skip this section. However, if you’re looking around and realizing you’re VPC-less, don’t fret. We’ve got you covered.
Creating a SageMaker domain requires a VPC. By adding the following snippet to your infrastructure CDK stack, will create one for you.
Note that this particular VPC comes with a public IP. Be aware that this could incur some running costs.
vpc = ec2.Vpc(
    self,
    id="VpcConstruct",
    ip_addresses=ec2.IpAddresses.cidr("10.0.0.0/16"),
    vpc_name=f"{self.prefix}-vpc",
    max_azs=3,
    nat_gateways=1,
    subnet_configuration=[
        ec2.SubnetConfiguration(
            cidr_mask=24,
            name="Public",
            subnet_type=ec2.SubnetType.PUBLIC,
        ),
        ec2.SubnetConfiguration(
            cidr_mask=23,
            name="Private",
            subnet_type=ec2.SubnetType.PRIVATE_WITH_EGRESS,
        ),
        ec2.SubnetConfiguration(
            cidr_mask=24,
            name="Isolated",
            subnet_type=ec2.SubnetType.PRIVATE_ISOLATED,
        ),
    ],
)
Deploying SageMaker Domain
First things first, before we get into the details of creating a SageMaker domain, we need to establish a default role that all users will assume. This can be fine-tuned or overridden later, depending on your specific use case. Here’s how you can create an execution role:
vpc = ec2.Vpc(
self,
id="VpcConstruct",
ip_addresses=ec2.IpAddresses.cidr("10.0.0.0/16"),
vpc_name=f"{self.prefix}-vpc",
max_azs=3,
nat_gateways=1,
subnet_configuration=[
ec2.SubnetConfiguration(
cidr_mask=24,
name="Public",
subnet_type=ec2.SubnetType.PUBLIC,
),
ec2.SubnetConfiguration(
cidr_mask=23,
name="Private",
subnet_type=ec2.SubnetType.PRIVATE_WITH_EGRESS,
),
ec2.SubnetConfiguration(
cidr_mask=24,
name="Isolated",
subnet_type=ec2.SubnetType.PRIVATE_ISOLATED,
),
],
)
Now, let’s talk about storage. In SageMaker, scripts, notebooks, and similar resources are all stored in an S3 bucket. By default, SageMaker creates one centralized storage bucket for code and data when you create it using AWS console.
We on the other hand will create a separate source and data buckets with the following settings. Both buckets are configured to be inaccessible to the public for obvious reasons.
self.sm_sources_bucket = s3.Bucket(
self,
id="SourcesBucket",
bucket_name=f"{self.prefix}-sm-sources",
lifecycle_rules=[],
versioned=False,
removal_policy=cdk.RemovalPolicy.DESTROY,
auto_delete_objects=True,
# Access
access_control=s3.BucketAccessControl.PRIVATE,
block_public_access=s3.BlockPublicAccess.BLOCK_ALL,
public_read_access=False,
object_ownership=s3.ObjectOwnership.OBJECT_WRITER,
enforce_ssl=True,
# Encryption
encryption=s3.BucketEncryption.S3_MANAGED,
)
The pipeline, by default, will assume the user’s role unless specified otherwise. For our purposes, the user, or the pipeline, should have enough permissions to read the code for pipeline execution and write the results to the data bucket. It’s a good practice to keep the code read-only when running the pipeline, both for security reasons and to avoid any issues during runtime.
# Grant read access to SageMaker execution role
self.sm_sources_bucket.grant_read(self.sm_execution_role)
# Grant read/write access to SageMaker execution role
self.sm_data_bucket.grant_read_write(self.sm_execution_role)
Creating a SageMaker domain itself is a very straightforward process. You just need to give it a name, attach it to the domain VPC you have from the previous steps, and attach the execution role to the default user config. If you want to specify additional security settings such as “VPC Only” mode, you can do it here as well. Similarly, we set tags so all the resources that start under the specific domain or user will inherit cost allocation tags accordingly.
# Fetch VPC information
vpc_name = self.node.try_get_context("vpc_name")
self.vpc = ec2.Vpc.from_lookup(
self, id="ImportedVpc",
vpc_name=vpc_name if vpc_name else f"{self.prefix}-vpc"
)
public_subnet_ids = [public_subnet.subnet_id for public_subnet in self.vpc.public_subnets]
# Create SageMaker Studio domain
self.domain = sm.CfnDomain(
self, "SagemakerDomain",
auth_mode='IAM',
domain_name=f'{self.prefix}-SG-Project',
default_user_settings=sm.CfnDomain.UserSettingsProperty(
execution_role=self.sm_execution_role.role_arn
),
app_network_access_type='PublicInternetOnly',
vpc_id=self.vpc.vpc_id,
subnet_ids=public_subnet_ids,
tags=[cdk.CfnTag(
key="project",
value="example-pipelines"
)],
)
Finally, we create a user that will be used for invoking the pipeline when run manually.
# Create SageMaker Studio default user profile
self.user = sm.CfnUserProfile(
self, 'SageMakerStudioUserProfile',
domain_id=self.domain.attr_domain_id,
user_profile_name='default-user',
user_settings=sm.CfnUserProfile.UserSettingsProperty()
)
Run the deploy command using CDK and there you have it! You’ve successfully deployed a SageMaker domain. You can always tweak and customize your setup to better suit your project’s needs, such as configuring roles, attaching ECR images and git repos for notebooks. In the next section, we’ll dive into deploying a simple pipeline.
cd ./infrastructure_project
cdk deploy
Deploying a Simple Pipeline
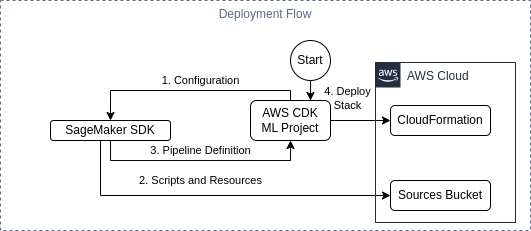
The deployment of a SageMaker pipeline is a complicated process that involves two key tasks. First, we need to generate a pipeline definition using the SageMaker SDK. Then, we deploy this definition using CloudFormation. Let’s delve into the details of each task.
The Pipeline Definition
The pipeline definition is a structured JSON document that instructs AWS on the sequence of steps to execute, the location for execution, the code to be run, the resources required, and the interdependencies of these steps. Essentially, it is a detailed execution plan for your machine learning pipeline.
Creating this JSON document manually can be cumbersome and prone to errors. To mitigate this, the SageMaker SDK provides an abstraction layer that enables the use of Python code constructs to build the pipeline definition. You can start using it by adding it as a python dependency with pip install sagemaker.
To streamline the process of pipeline creation, we establish a base class. This class serves as an interface, which will be particularly useful when we integrate our pipeline with the rest of our CDK code. Here, we utilize Pydantic BaseModel class to enable type checking on configuration parameters you might want to pass to the pipeline.
class SagemakerPipelineFactory(BaseModel):
"""Base class for all pipeline factories."""
@abstractmethod
def create(
self,
role: str,
pipeline_name: str,
sm_session: sagemaker.Session,
) -> Pipeline:
raise NotImplementedError
We can now proceed to write the actual pipeline declaration using the SageMaker SDK, and one such configuration parameter (pipeline_config_parameter).
class ExamplePipeline(SagemakerPipelineFactory):
pipeline_config_parameter: str
def create(
self,
role: str,
pipeline_name: str,
sm_session: sagemaker.Session,
) -> Pipeline:
...
We proceed by declaring a runtime configurable parameter for the instance type. Then we add ScriptProcessor which defines the environment our script will be running in; including the machine instance count, the IAM execution role and the base image.
...
# Use the SKLearn image provided by AWS SageMaker
image_uri = sagemaker.image_uris.retrieve(
framework="sklearn",
region=sm_session.boto_region_name,
version="0.23-1",
)
# Create a ScriptProcessor and add code / run parameters
processor = ScriptProcessor(
image_uri=image_uri,
command=["python3"],
instance_type=instance_type_var,
instance_count=1,
role=role,
sagemaker_session=sm_session,
)
Next we define our first processing step that will use the defined processor (environment definition) to run our script with given job arguments, as well as, input and output definitions.
processing_step = ProcessingStep(
name="processing-example",
step_args=processor.run(
code="pipelines/sources/example_pipeline/evaluate.py",
),
job_arguments=[
"--config_parameter", self.pipeline_config_parameter
],
inputs=[],
outputs=[]
)
One single step is already enough to define a pipeline. While defining the pipeline, make sure to list it’s runtime parameters.
return Pipeline(
name=pipeline_name,
steps=[processing_step],
sagemaker_session=sm_session,
parameters=[instance_type_var],
)
Here is the simple script that our job will be runing. It essentially prints the input job argument.
import argparse
parser = argparse.ArgumentParser()
parser.add_argument("--config_parameter", type=str)
args = parser.parse_args()
print(f"Hello {args.config_parameter}!")
Above, we have demonstrated a minimal example for building a machine learning pipeline. If you are interested in a deeper dive of the possibilities, check out the examples in The Official Documentation.
Deploying the Pipeline Definition
Now that we have our pipeline definition, the next step is deploying it to your AWS Account. This is where CloudFormation comes into play, as it supports the AWS::SageMaker::Pipeline Resource. Looking at the arguments, we see that the pipeline definition should be embedded as a JSON document within the CloudFormation template. This JSON document, in our case, is emitted by SageMaker SDK, which we call during the synthesis phase of the CloudFormation stack creation.
# Define the pipeline (this step uploads required code and packages by the pipeline to S3)
pipeline = pipeline_factory.create(
pipeline_name=pipeline_name,
role=sm_execution_role_arn,
sm_session=sagemaker_session,
)
pipeline_def_json = json.dumps(json.loads(pipeline.definition()), indent=2, sort_keys=True)
Note that a new version of the code is deployed into the source bucket by SageMaker SDK before the CloudFormation stack is applied. This might raise a few eyebrows, but it will not cause issues with existing processes, as it is stored in a folder based on a derived version identifier. This does mean that you may need additional cleanup scripts later down the line.
Once we have a pipeline definition JSON, we can declare the CfnPipeline construct.
def create_pipeline_resource(
self,
pipeline_name: str,
pipeline_factory: SagemakerPipelineFactory,
sources_bucket_name: str,
sm_execution_role_arn: str,
) -> Tuple[sm.CfnPipeline, str]:
...
# Define the pipeline (this step uploads required code and packages by the pipeline to S3)
...
# Define CloudFormation resource for the pipeline, so it can be deployed to your account
pipeline_cfn = sm.CfnPipeline(
self,
id=f"SagemakerPipeline-{pipeline_name}",
pipeline_name=pipeline_name,
pipeline_definition={"PipelineDefinitionBody": pipeline_def_json},
role_arn=sm_execution_role_arn,
)
arn = self.format_arn(
service='sagemaker',
resource='pipeline',
resource_name=pipeline_cfn.pipeline_name,
)
return pipeline_cfn, arn
Finally, we combine all everything together by passing our pipeline factory to pipeline resource creation function along with our source and data buckets.
# Load infrastructure stack outputs as value parameters (resolved at cdk deploy time)
sources_bucket_name = ssm.StringParameter.value_from_lookup(
self, f"/{self.prefix}/SourcesBucketName")
sm_execution_role_arn = ssm.StringParameter.value_from_lookup(
self, f"/{self.prefix}/SagemakerExecutionRoleArn")
# Create a configured pipeline
self.example_pipeline, self.example_pipeline_arn = self.create_pipeline_resource(
pipeline_name='example-pipeline',
pipeline_factory=ExamplePipeline(
pipeline_config_parameter="Hello world!"
),
sources_bucket_name=sources_bucket_name,
sm_execution_role_arn=sm_execution_role_arn,
)
Now the code is complete, deploy the pipeline using the CDK commands.
cd ./data_project
cdk deploy
Testing the Result: deploying SageMaker Pipelines using AWS CDK
After deploying both of the stacks, we can view and run our pipeline in SageMaker Studio.
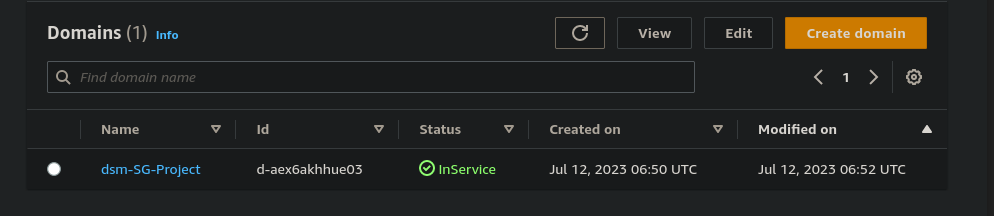
Navigate to the SageMaker service in the AWS Management Console and click on “Domains.” Ensure that your SageMaker domain, created as part of the infrastructure stack, is visible.
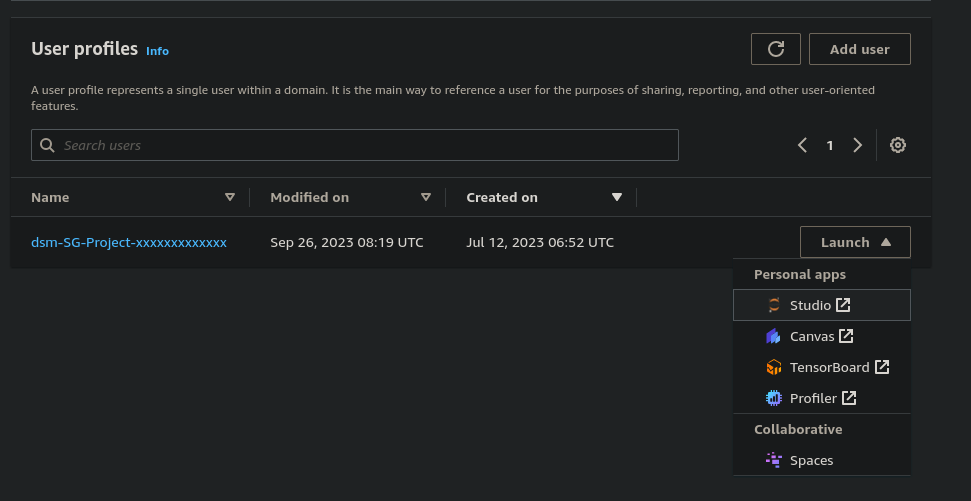
Inside the SageMaker domain, click on “Launch” near your created user and launch the SageMaker Studio.
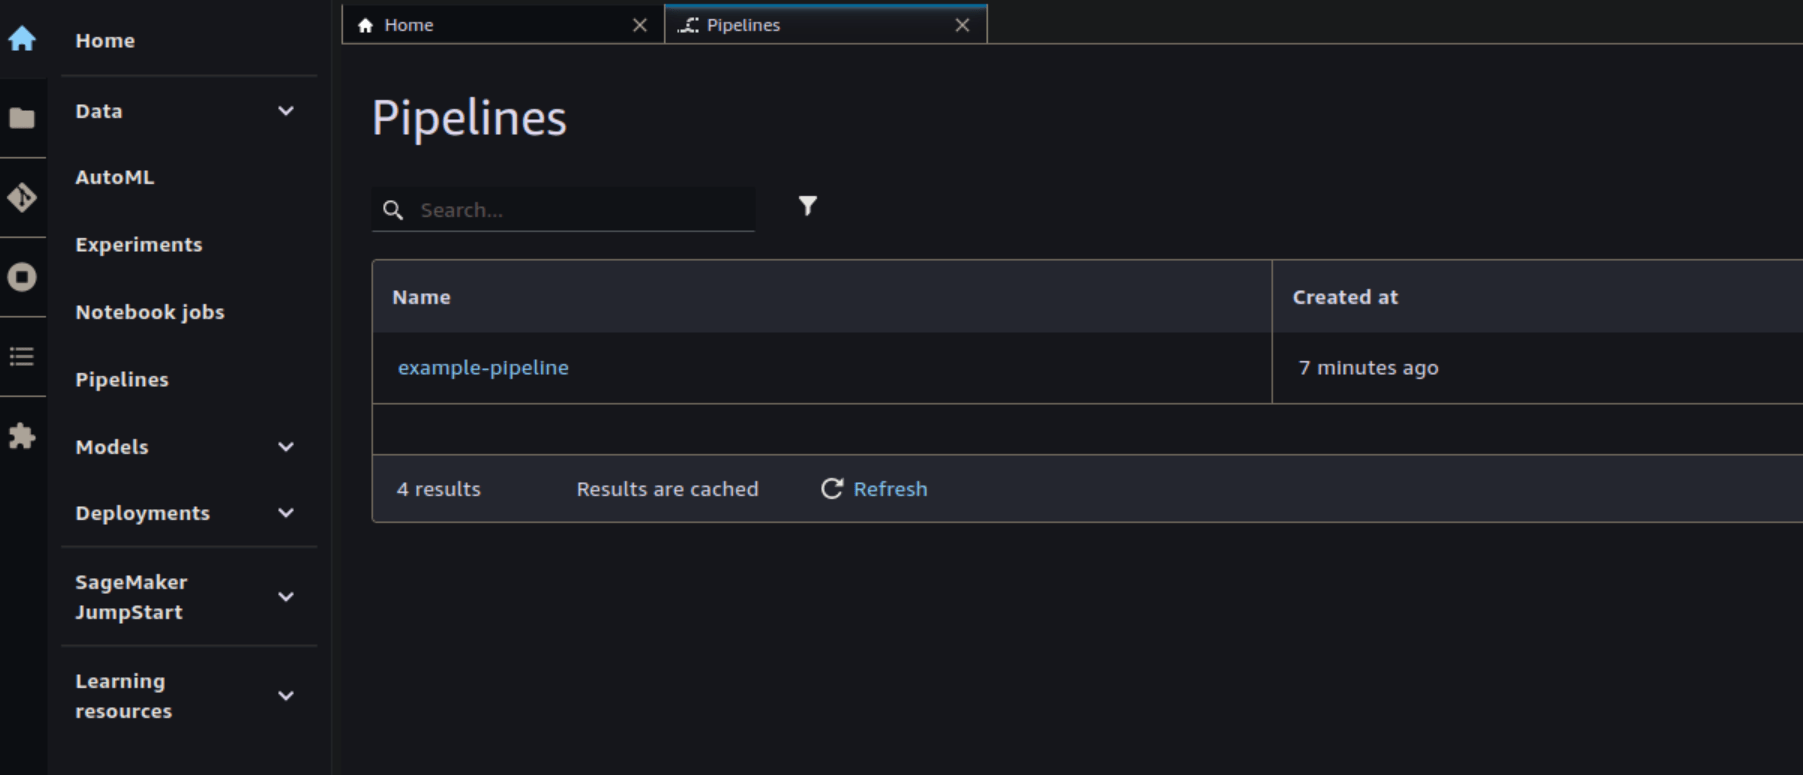
In the navigation select “Pipelines” to see a list of deployed pipelines. Confirm that your example pipeline is listed.
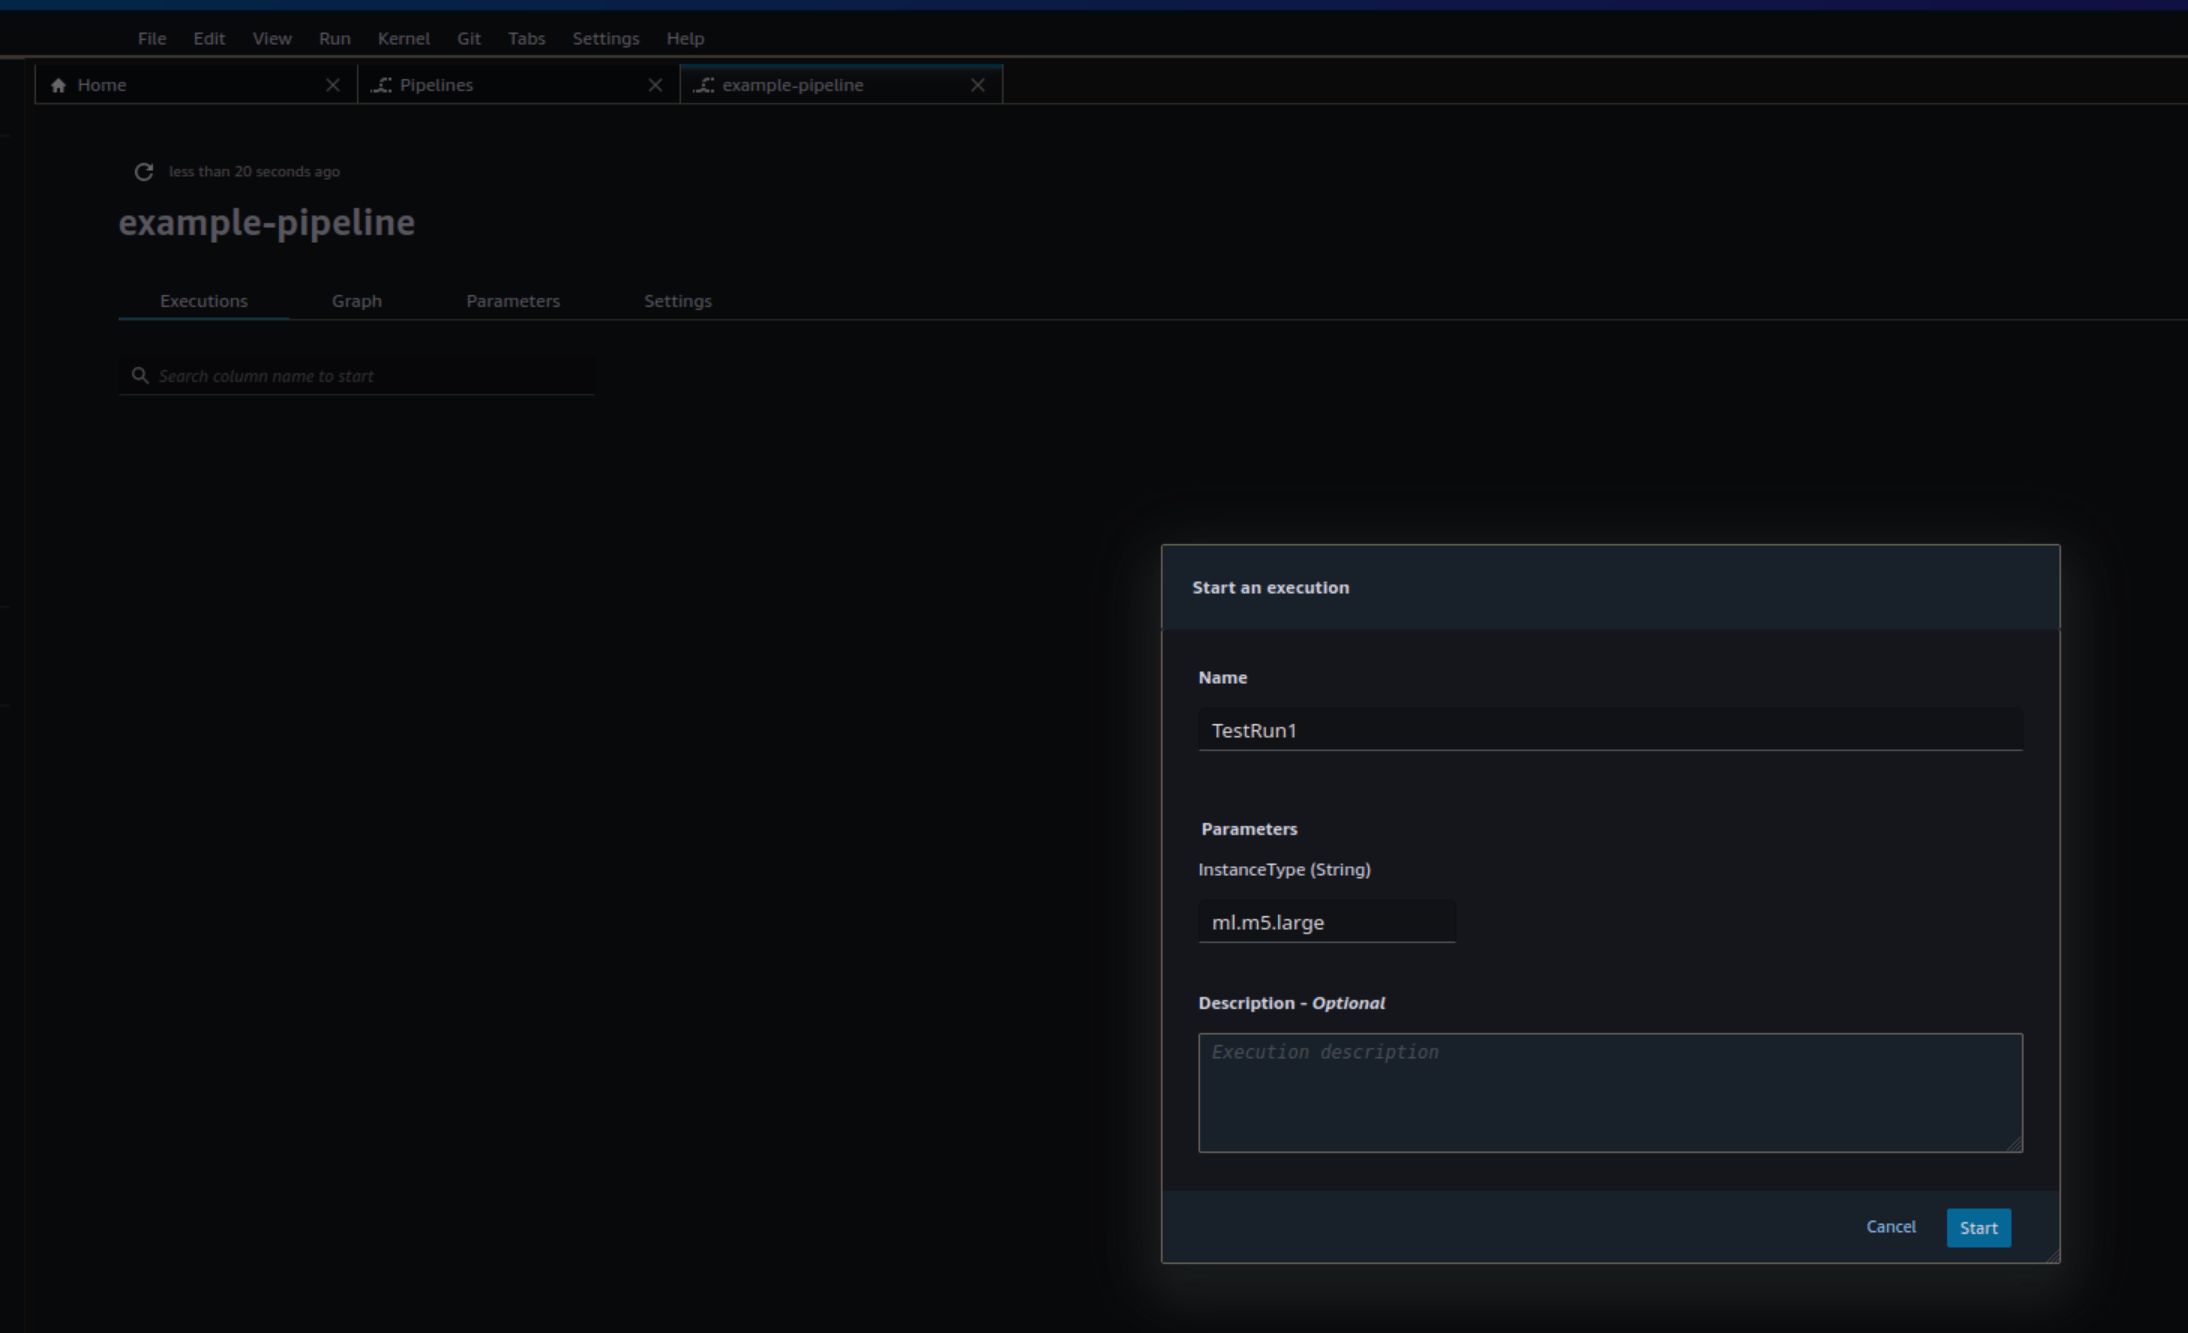
Click on the specific pipeline (e.g., “example-pipeline”) to view its details and start an exectution to start and monitor your pipeline.
Conclusion on deploying SageMaker Pipelines using AWS CDK
In this blog, we have learned how to write a simple SageMaker Pipeline in Python and deploy it in AWS CDK. While doing so, we also have deployed a SageMaker Domain, discussed how the pipeline code is stored in AWS, and shared a few best practices for configuration.
We have only scratched the surface of what is possible with SageMaker, there are various topics that are equally important within MLOps projects such as testing your code and pipelines, local development, and automated quality monitoring.
Stay tuned for more, or contact me if you have any questions.
Want to know more about what we do?
We are your dedicated partner. Reach out to us.