

The Amplify Series, Part 4: Developing and deploying a cloud-native application with AWS Amplify
In this article, we will be using AWS Amplify to create a cloud-native application. We will cover the Authentication, GraphQL API, and Hosting categories of AWS Amplify. We will be using Angular for the frontend. However, the steps taken here should be similar for other frameworks.
We have learned what Amplify is, how Amplify works behind the scenes, and Amplify use cases throughout this series. It is time to see this in action and get hands-on experience using Amplify. At the end of this article, you will have a cloud-native application.
Prerequisites
Before getting started, we need to make sure we have some things set. You need to have the following to be able to follow these instructions and build your application:
- An active AWS account.
- NodeJS: I used version 14.17.5.
- Angular CLI: I used version 13.1.4.
- Git: Necessary to check out the example project.
- Amplify CLI: I used version 7.6.22.
Configuring Amplify CLI
Before we can start using the CLI, we need to configure the AWS Amplify CLI to use our AWS account. Once you have configured your CLI, we can get started.
Installing dependencies & launching the app
We have created an example AWS Amplify Angular app that you can clone. Check out the start_here branch and start from there. To ensure everything is working, run npm run start. You should see a simple application called “The Amplify App”:

This app is currently a simple Angular app with no associated backend yet. From this point, we will start using the CLI to initialise our project, generate backend resources, and connect them to the frontend.
Initialising the backend
The first command we will run is amplify init. You should see output similar to this:
Evertsons-MBP:theamplifyapp evertsoncroes$ amplify init
Note: It is recommended to run this command from the root of your app directory
? Enter a name for the project theamplifyapp
The following configuration will be applied:

Project information
| Name: theamplifyapp
| Environment: dev
| Default editor: Visual Studio Code
| App type: javascript
| Javascript framework: angular
| Source Directory Path: src
| Distribution Directory Path: dist/theamplifyapp
| Build Command: npm run-script build
| Start Command: ng serve

? Initialize the project with the above configuration? Yes
Using default provider awscloudformation
? Select the authentication method you want to use: AWS profile

For more information on AWS Profiles, see:
https://docs.aws.amazon.com/cli/latest/userguide/cli-configure-profiles.html

? Please choose the profile you want to use default
⠴ Initializing project in the cloud...
Once this is done, our Amplify project is created, and we can see several new files in our repository. If you need a refresher of what these files are and how Amplify works, check out part 2 of this blog series: how does AWS amplify work?
If you are creating a public project, it is recommended to add the amplify/team-provider-info.json to the .gitignore, as it contains identifiers to the resources we are using for Amplify. This does not create a security risk since your project is secured with your credentials. If multiple developers are working on the same project, they all need this file.
If everything is working, you should see about 7 changed files.
Configuring the frontend
Now we need to install the relevant Amplify frontend libraries. In this case, we run:
npm install --save aws-amplify @aws-amplify/ui-angularThis will install the amplify library and Angular specific UI elements that we will be using later. After this, we want to configure the Amplify library with our aws-exports.js by adding the following to our src/main.ts:
import Amplify from 'aws-amplify';
import aws_exports from './aws-exports';
Amplify.configure(aws_exports);
Your IDE might complain about the ./aws-exports not having a type definition. An easy for now is to add allowJs:true to our tsconfig.json.
Finally, we also need to add the following to src/polyfill.ts:
(window as any).global = window;
(window as any).process = {
env: { DEBUG: undefined }
};
We need to add these since they are used by Amplify but are not present by default since Angular 6.
You should see around 5 file changes after this step.
Adding Amplify Authentication
We are now going to add user authentication functionality to our application.
Generating backend resources for authentication
The first thing we will do is generate backend resources that will help us with authentication by running amplify add auth. You should see output similar to this:
Evertsons-MBP:theamplifyapp evertsoncroes$ amplify add auth
Using service: Cognito, provided by: awscloudformation

The current configured provider is Amazon Cognito.

Do you want to use the default authentication and security configuration? Default configuration
Warning: you will not be able to edit these selections.
How do you want users to be able to sign in? Username
Do you want to configure advanced settings? No, I am done.
✅ Successfully added auth resource theamplifyappfdeaa7e5 locally

✅ Some next steps:
"amplify push" will build all your local backend resources and provision it in the cloud
"amplify publish" will build all your local backend and frontend resources (if you have hosting category added) and provision it in the cloud
We should now see some new files added to our project, such as files under amplify/backend/auth, which represent our authentication choices. However, nothing has happened in the backend yet. We need to run amplify push to push our changes to AWS and have CloudFormation create the resources for us:
Evertsons-MBP:theamplifyapp evertsoncroes$ amplify push

✔ Successfully pulled backend environment dev from the cloud.

Current Environment: dev

┌──────────┬───────────────────────┬───────────┬───────────────────┐
│ Category │ Resource name │ Operation │ Provider plugin │
├──────────┼───────────────────────┼───────────┼───────────────────┤
│ Auth │ theamplifyappfdeaa7e5 │ Create │ awscloudformation │
└──────────┴───────────────────────┴───────────┴───────────────────┘
? Are you sure you want to continue? Yes
⠋ Updating resources in the cloud. This may take a few minutes...
Adding the authentication component to the frontend
We will be using the Amplify Authenticator UI component to implement authentication in the frontend. We already installed this previously however now, we still need to add it to src/app/app.module.ts:
//Other imports
import { AmplifyAuthenticatorModule } from '@aws-amplify/ui-angular'; // <-- Add this

@NgModule({
declarations: [
//Existing declarations
],
imports: [
//other imports
AmplifyAuthenticatorModule // <-- Add this
],
// Other stuff
})
export class AppModule {}
We are going to start off by simply protecting our entire application with the Amplify authenticator. To do this, add the following to src/app/app.component.html:
<amplify-authenticator><!-- <--Add this -->
<app-header></app-header>
<div class="content-container">
<router-outlet></router-outlet>
</div>
<app-footer></app-footer>
</amplify-authenticator> <!-- <--Add this -->
And we also need to import the default styling in our src/app/styles.css:
@import "@aws-amplify/ui-angular/theme.css";

/* other styles */
If you run your application now, you should see the Amplify authenticator:

You can use this to create an account and log in to see the application. It is a fully-featured authenticator with registration, sign-in, forgot password, and email activation. It also gives feedback when errors occur.
There are several options to customize this UI. You can find out more about the Amplify Authenticator in the documentation.
Once you have created an account, you should be able to log in to the AWS console, navigate to the Cognito service and see a user pool with the name of your project. Inside that user pool, you should see your new account:

Adding signout functionality
We also want to be able to sign out of our application. First we add the actual button in header.component.html:
<nav>
    <!-- other existing code -->
    <button class="aws-button" (click)="signOut()">Sign out</button> <!--  <-- Add this -->
</nav>
And then, we add our sign out logic, which we get directly from Amplify, in our header.component.ts:
import { Auth } from 'aws-amplify'; // <-- Add this

export class HeaderComponent implements OnInit {

// Other existing code

    signOut() { // <-- Add this
      Auth.signOut();
    }
}
And now, we have a sign-out button which we can use to sign out and go back to the Amplify Authenticator.
User data
We will add a Welcome <<username>> text in the header. We can use the Amplify Auth library to get this data. We will begin by creating an Angular service which we will call UserService, which will handle all of our logged-in user’s needs.
In the terminal, run the following at the root of your project:
ng generate service services/shared/userWe will update the new service in the following way:
import { Injectable } from '@angular/core';
import { Auth } from 'aws-amplify';

export interface UserInfo {
  email: string;
  username: string;
}

@Injectable({
  providedIn: 'root'
})
export class UserService {
  constructor() {}

  async getCurrentUserInfo(): Promise {
    const userInfoResponse = await Auth.currentUserInfo();
    return {
      email: userInfoResponse.attributes.email,
      username: userInfoResponse.username
    };
  }
}
It makes use of the Amplify Auth library to get information about the current user. We then make some changes in our header.component.ts file to call this function:
import { UserService, UserInfo } from '../../services/shared/user.service'; //<--- Add this

export class HeaderComponent implements OnInit {
  //other code
  currentUserName: string = ''; //<--- Add this

  constructor(public router: Router, private userService: UserService ) { //<--- Add userService
    //other code
  }

  ngOnInit(): void { //<--- Add this     this.userService       .getCurrentUserInfo()       .then((userInfo: UserInfo) => {
        this.currentUserName = userInfo.username;
      })
      .catch(error => {
        console.log('Error while obtaining user: ', error);
      });
  }
}
And now that we have variable in the header component with the current username, we can display this in the header.component.html:
<nav>
<!-- other code -->
    <span class="welcome-text">Welcome {{ currentUserName }}</span> <!-- <--- add this -->
    <button class="aws-button" (click)="signOut()">Sign out</button>
</nav>
And finally we add some styling in header.component.css so that we can actually see the text on the dark background:
.welcome-text {
  color: white;
  margin-right: 16px;
}
And now we have a text that shows us the username of the user that is logged in:

Check out the Amplify Auth documentation for details.
We’ve changed several things now:
- We added the Amplify Authenticator UI.
- We added a signout button.
- We added user details to the header.
Connecting the backend with GraphQL
In this section, we will add a GraphQL API for our application, which will replace the current in-memory mock data being used for the API page in our application. If you click through the API tab, you will see that we have a list of Posts that can all have a list of Likes and Comments. We will be modeling this in GraphQL.
Generating backend resources for the API
To start, we need to add a resource endpoint:
Evertsons-MBP:theamplifyapp evertsoncroes$ amplify add api
? Select from one of the below-mentioned services: GraphQL
? Here is the GraphQL API that we will create. Select a setting to edit or continue Authorization modes: API key (default, expiration time: 7 days from now)
? Choose the default authorization type for the API Amazon Cognito User Pool
Use a Cognito user pool configured as a part of this project.
? Configure additional auth types? No
? Here is the GraphQL API that we will create. Select a setting to edit or continue Continue
? Choose a schema template: One-to-many relationship (e.g., “Blogs” with “Posts” and “Comments”)

⚠️ WARNING: Some types do not have authorization rules configured. That means all create, read, update, and delete operations are denied on these types:
- Blog
- Post
- Comment
Learn more about "@auth" authorization rules here: https://docs.amplify.aws/cli/graphql/authorization-rules
GraphQL schema compiled successfully.

Edit your schema at /Users/evertsoncroes/Documents/development/private/theamplifyapp/amplify/backend/api/theamplifyapp/schema.graphql or place .graphql files in a directory at /Users
/evertsoncroes/Documents/development/private/theamplifyapp/amplify/backend/api/theamplifyapp/schema
✔ Do you want to edit the schema now? (Y/n) · yes
✅ Successfully added resource theamplifyapp locally

✅ Some next steps:
"amplify push" will build all your local backend resources and provision it in the cloud
"amplify publish" will build all your local backend and frontend resources (if you have hosting category added) and provision it in the cloud
It is important to change the authentication method from API key to Amazon Cognito User Pool to use the Auth resources we created in the last section.
We now have some new files generated for us by the Amplify CLI. We are going to start by editing the amplify/backend/api/schema.graphql to look as follows:
type Post
@model
@auth(rules: [{ allow: owner }, { allow: private, operations: [read] }]) {
id: ID!
title: String!
description: String
likes: [Like] @hasMany
comments: [Comment] @hasMany
}

type Like
@model
@auth(rules: [{ allow: owner }, { allow: private, operations: [read] }]) {
id: ID!
post: Post @belongsTo
}

type Comment
@model
@auth(rules: [{ allow: owner }, { allow: private, operations: [read] }]) {
id: ID!
post: Post @belongsTo
content: String!
}
In this example, we have defined 3 GraphQL Object types for Post, Likes, and Comments. We don’t specify a date field because we get a createdAt and updatedAt field for each type by default.
The Amplify specific parts of this schema are the directives, which you can notice by the @ prefix. The directives used here are:
- @model: This creates a DynamoDB table to back this model. In this case, 3 tables will be created.
- @auth: These are authorization rules for the type. The rules described here are:
- The owner (creator) of a record is allowed to perform all operations on that record
- An “owner” field will be added to each item in the DB, which contains the username of the logged-in user that created the item
- Only logged in users (private) can read the records for this type
- @hasMany: This creates a one-to-many relationship with another type. In our example above, Posts have many comments and likes.
- @belongsTo: This creates a many-to-one relationship with another type. In our example above, comments belong to one post, and likes belong to one post
You can learn more about directives or authorization rules in the Amplify documentation.
After customizing our schema we run amplify push and select yes. We are then asked a few questions related to graphql:
? Do you want to generate code for your newly created GraphQL API Yes
? Choose the code generation language target angular
? Enter the file name pattern of graphql queries, mutations and subscriptions src/graphql/**/*.graphql
? Do you want to generate/update all possible GraphQL operations - queries, mutations, and subscriptions Yes
? Enter maximum statement depth [increase from default if your schema is deeply nested] 2
? Enter the file name for the generated code src/app/API.service.ts
This will generate a lot of front-end code specific to our schema so thatuse we can easily our GraphQL backend.
Connecting the frontend to the API
A few files have been generated that are important to cover. First of all, there is the API.service.ts. This file contains all generated types and statements that can be used with the GraphQL API and injected as an Angular Service into Angular components and services.
Secondly, we also have a directory now called graphql in the root of our project. This file contains generated GraphQL Queries, Mutations and Subscription, and a JSON representation of our GraphQL schema. These files are used as input to generate API.service.ts. We will look at these files later in the article.
Filling the data source
We will start by updating our post.service.ts to save new posts to our Amplify backend instead of in the mockObject. We will make the following changes:
//Other imports
import { APIService } from 'src/app/API.service'; // <--- Add this

@Injectable({
  providedIn: 'root'
})
export class PostService {
  //other code

  constructor(private api: APIService) { // <--- Add api to constructor
  }

  addPost(title: string, description: string) { // <--- replace current addPost with new code
    this.api.CreatePost({
      title,
      description
    });
  }

  //other code
}
Here we import the generated API service and use one of the generated functions, CreatePost, to create a new post item to our backend. If you search for the definition of the CreatePost function in src/app/API.service you can see which parameters it expects. In this case adding a title and description is enough.
Now when we add posts, they will be persisted.
Retrieving data from the backend
The next step is to retrieve all our posts from the backend. We will make the following changes to our post.service.ts:
// other imports
import { APIService, Post as AmplifyPost } from 'src/app/API.service'; // <--- Add this new import

@Injectable({
  providedIn: 'root'
})
export class PostService {
  private posts: BehaviorSubject<Post[]> = new BehaviorSubject<Post[]>([]); // <--- remove mockposts and its usage completely
  private postsData: Post[] = [];

  constructor(private api: APIService, private userService: UserService) {
    this.setOnPostCreateSubscription();
  }

  // Other code

  //Update this function
  getAllPosts(): Observable<Post[]> {
    this.api.ListPosts().then(response => {
      const responsePosts: Post[] = [];
      response.items.forEach(item => {
        const post = this.convertToPost(item as AmplifyPost);
        responsePosts.push(post);
      });

      this.posts.next(responsePosts);
    });

    return this.posts.asObservable();
  }

  //Add this function
  private convertToPost(amplifyPost: AmplifyPost): Post {
    const {
      id,
      title,
      description,
      owner,
      createdAt,
      likes,
      comments
    } = amplifyPost;

    const likesItems = likes ? likes.items : undefined;
    const commentsItems = comments ? comments.items : undefined;

    return {
      id,
      title,
      description: description ? description : '',
      author: owner ? owner : '',
      date: new Date(createdAt),
      likes: likesItems ? likesItems.length : 0,
      comments: commentsItems ? commentsItems.length : 0
    };
  }
}
We are doing a few things here:
- Importing the generated
Postinterface and giving it an alias sincePostalready exists and is used for ourPostcomponent UI model - Removing the mock data completely since this service will now be serving data from the Amplify backend
- Using the
listPostsgenerated function to get all posts in our backend. - Converting the posts retrieved from the amplify backend to the Post model we want to use in our UI. A significant difference here is that we want to count the number of likes and comments and return numbers.
If we run our app now, we should now see new data retrieved from the backend. If we add a new post and refresh the page ,we should see the latest post in the list.
Subscribing to data
It would be nice to have the new post show up in the list immediately after it is added. One way to achieve this is to call getAllPosts after the addPosts was successful. There is a better way, though: Amplify GraphQL also allows us to subscribe to certain events.
In this case, we can subscribe to the event of a post being created by making the following changes to our post.service.ts:
import { UserService, UserInfo } from '../shared/user.service'; // Add this import

@Injectable({
  providedIn: 'root'
})
export class PostService {
  private postsData: Post[] = []; // <-- add this

  constructor(private api: APIService, private userService: UserService) {
    this.setOnPostCreateSubscription(); // <-- add this
  }

  //Add this function
  private async setOnPostCreateSubscription() {
    const userInfo: UserInfo = await this.userService.getCurrentUserInfo();

    if (userInfo) {
      this.api.OnCreatePostListener(userInfo.username).subscribe(response => {
        const responseData = response.value.data;
        if (responseData && responseData.onCreatePost) {
          const post = this.convertToPost(
            responseData.onCreatePost as AmplifyPost
          );
          this.postsData.push(post);
          this.posts.next(this.postsData);
        }
      });
    }
  }

  getAllPosts(): Observable<Post[]> {
    this.api.CustomListPosts().then(response => {
      const responsePosts: Post[] = [];
      response.items.forEach(item => {
        const post = this.convertToPost(item as AmplifyPost);
        responsePosts.push(post);
      });

      this.postsData = responsePosts; // <-- add this
      this.posts.next(responsePosts);
    });
    return this.posts.asObservable();
  }
}
We made these changes:
- Import the
UserServicewe created in the last section. This is needed because of a limitation in Amplify GraphQL subscription (see below). - Created an array that holds the state of the latest data retrieved. We need this since the subscription only returns the new post added. We need to add the newly created post to this list and return it to the component.
- We call the
onCreatePostListenerwith the username of the currently logged in user and we convert the response of this subscription to ourPostmodel object, similarly to how we did this for the query.
Amplify GraphQL limitation
Currently it is not possible to have the owner auth rule in your GraphQL schema and have a subscription on an object without supplying the owner username. If you want to be able to have a subscription on all objects of a type, regardless of who created it, you need to remove the owner auth rule in your schema. However, this means that you will no longer get the owner field in all of your items in the database and that any logged in user can also update and delete posts that don’t belong to them.
For the sake of having a working subscription example, we have created a subscription for the current user, meaning you will only get updated for posts that you post yourself. Hopefully in the future we will be able to have more flexibility regarding subscriptions. Nevertheless, this example should still show how easy it is to setup subscriptions and there are still several use cases where this might be useful.
Likes and comments
For the Like and Comment services we followed steps similar to those followed for the Post. You can view all of these steps in the Git commits we will list at the end of this section. However, there are some key points we still want to cover that we encounter when migrating likes and comments to the Amplify backend.
GraphQL query with filters and pagination
When we want to query the likes or comments, we only want to query them if they belong to the Post that we are currently looking at in the frontend. Luckily, the generated functions we use to query our backend come with built-in filtering and pagination functionality.
If we look at the definition of the ListLikes function in the API.service.ts, we can see the following signature:
async ListLikes(
    filter?: ModelLikeFilterInput,
    limit?: number,
    nextToken?: string
  ): Promise<ListLikesQuery> {

 //code

 }
The ModelLikeFilterInput contains options to filter the results based on several conditions. Click through them to see all of the possibilities. We can also see a limit and a nextToken parameters which are used for pagination. Since we did not build pagination in this application yet, we will refer to the pagination documentation.
To query only the likes that belong to a certain post, we use the following code:
getLikesForPostId(postId: string) {
    this.api.ListLikes({ postLikesId: { eq: postId } }).then(response => {
    //other code
Custom GraphQL Queries, Mutations and Subscriptions
If you follow the patterns we have shown up to now and have posts, likes and comments using the Amplify backend, you will notice that all posts still show 0 likes and comments on the post overview. This is a bug, and has to do with the values that are retrieved in the generated GraphQL query used in the listPosts function.
If we check the definition of the query in the src/graphql/queries.graphl we will see the following:
query ListPosts(
  $filter: ModelPostFilterInput
  $limit: Int
  $nextToken: String
) {
  listPosts(filter: $filter, limit: $limit, nextToken: $nextToken) {
    items {
      id
      title
      description
      likes {
        nextToken
      }
      comments {
        nextToken
      }
      createdAt
      updatedAt
      owner
    }
    nextToken
  }
}
We can see that for the likes and comments, only the nextToken field is being retrieved. The items field is not being retrieved at all, which is why our frontend is defaulting to 0. Thankfully, we can define our own queries.
We can create a new file called src/app/custom-queries.graphql with the following content:
query CustomListPosts(
  $filter: ModelPostFilterInput
  $limit: Int
  $nextToken: String
) {
  listPosts(filter: $filter, limit: $limit, nextToken: $nextToken) {
    items {
      id
      title
      description
      likes {
        items {
          id
        }
      }
      comments {
        items {
          id
        }
      }
      createdAt
      updatedAt
      owner
    }
    nextToken
  }
}
We now query the items for likes and comments and only retrieve the ids, since we only want to count them. Once we add this file, we can run the following in the terminal:
amplify codegenThis will generate new code that you can use in your frontend without having to run amplify push. Now we can update our post.service.ts to make use of this new query:
getAllPosts(): Observable<Post[]> {
    this.api.CustomListPosts().then(response => { // <-- updated here
      //code
If we run the application now we should see the correct counters for likes and comments.
Custom GraphQL Resolvers
In our current example we retrieve likes and comments and we count them in the frontend to show the counters. We could also update our GraphQL schema for Post to include a likesCount and commentsCount fields and define custom logic for these fields.
This would let the backend calculate these numbers for us and return them to the frontend. A demo of this would be too long for this article, so we will refer to the documentation for AWS Lambda resolver configuration, which explains how to set this up.
We’ve introduced quite some changes:
- We added an API endpoint.
- We updated the GraphQL schema.
- We pushed the changes to the backend.
- We added Posts to the GraphQL backend.
- We retrieved Posts from the GraphQL backend.
- We added subscriptions for Posts.
- We added Likes to the GraphQL backend.
- We retrieved Likes from the GraphQL backend.
- We fixed Posts subscriptions.
- We created a custom query to list Posts.
- We added a subscription for likes.
- We added Comments to the GraphQL backend.
- We retrieve Comments from the GraphQL backend.
- We added subscriptions for Comments.
Hosting our application
Now that we have our application working locally, it is time to host it on AWS so that it is available online. We are going to do this by adding the Amplify hosting category. Before we do that, we need to do these steps:
- Log in to the AWS console with your default browser.
- Push all your code to Git.
- Update the
initialbudget inangular.jsonto2mb.
We will run the following command to add hosting:
Evertsons-MBP:theamplifyapp evertsoncroes$ amplify add hosting
? Select the plugin module to execute Hosting with Amplify Console (Managed hosting with custom domains, Continuous deployment)
? Choose a type Continuous deployment (Git-based deployments)
? Continuous deployment is configured in the Amplify Console. Please hit enter once you connect your repository
This will open the AWS console that will enable us to connect our repository to the CI/CD pipeline:

Click on the Hosting environments tab and select your Git repository:

Click on connect branch. Once you are authenticated with your Git repository, select the repository and branch where the latest version of your code exists and click on Next.
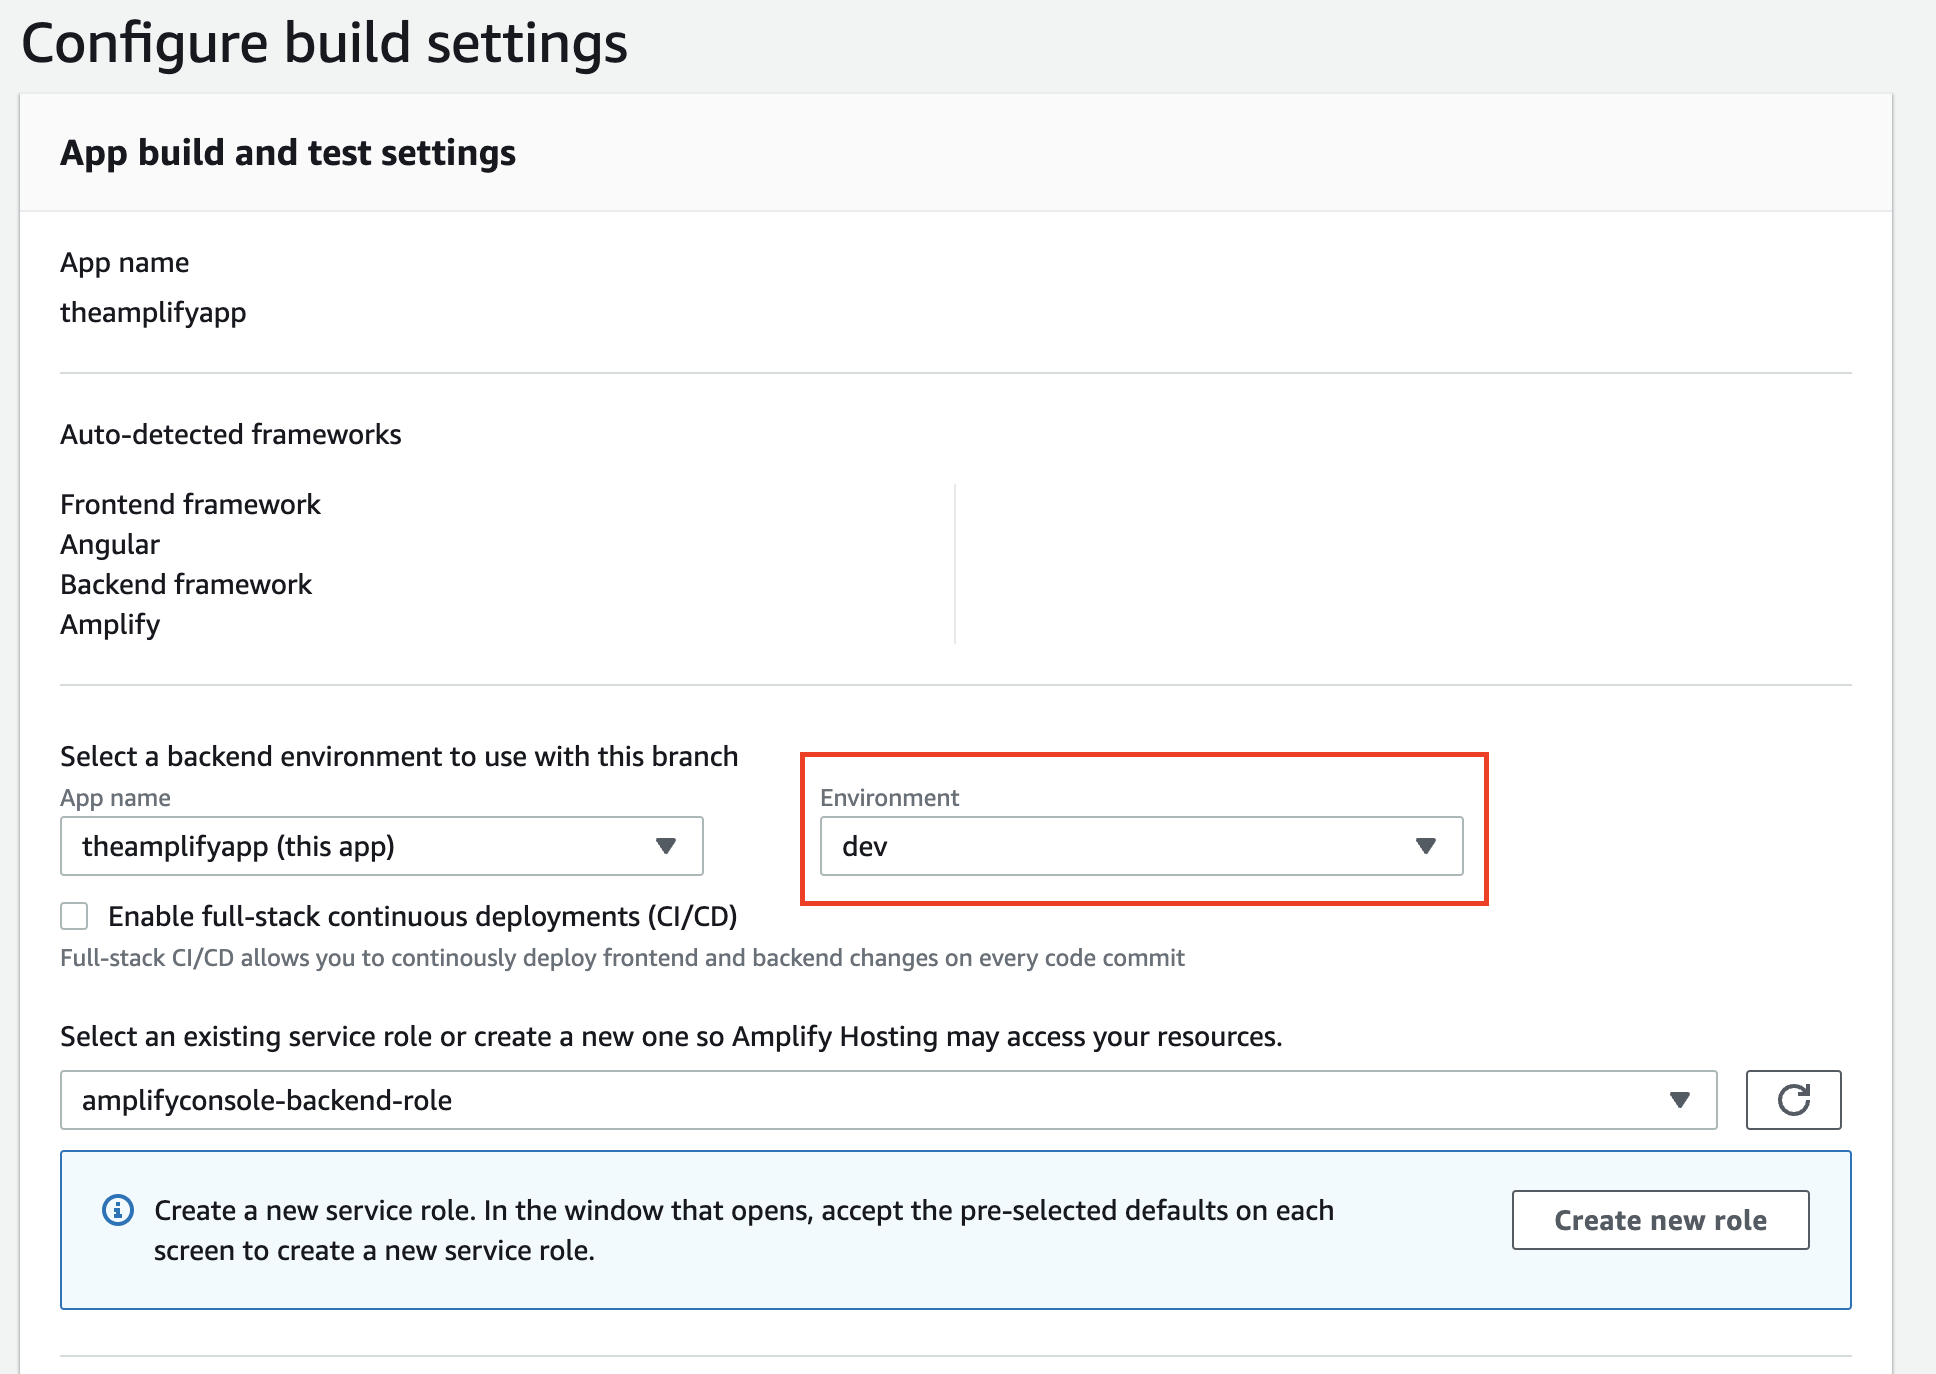
On the next page it is important that you select an environment to use for this deployment. In this case we have only created a dev environment, so we will use that:
In case you don’t have an existing service role for Amplify projects, click on Create new role to generate one and click on the refresh button to see it appear as an option.
If you scroll to the bottom you will see the default build settings. For now these will work, however if in the future you want to extend the build to include more phases or steps you can always change this.
When we click on next we will get a summary of the options we selected. Review them and click on Save and deploy.
From this point on, everytime you push to the develop branch a build will start and the live application will get updated. This is what it looks like when it is building:

You can click on any of the phases, such as provision to see the detailed logging of what is happening:

When it is done building and deploying, we can see that all steps have passed and that there is a link to test out our app:

Configuring redirects for our SPA
If you click on the link you should see your application where you can log in and should see the main page. However, if you click on API you will get an access denied error. For single page applications we need to add an extra setting in the Amplify console in our project related to rewrites and redirects:

The settings are:
- Source address:
</^[^.]+$|\.(?!(css|gif|ico|jpg|js|png|txt|svg|woff|woff2|ttf|map|json)$)([^.]+$)/>. - Target address:
/index.html. - Type: 200 (Rewrite)
- Country: (leave empty).
For details, refer to the Amplify documentation for single page application redirects.
(Extra) Linking a domain name to your deployment
One extra step you could take is to link a domain name to one of your deployments. In this case we are going to create a new environment for our project, link it to the master branch and then link the domain name “theamplifyapp.com” to that deployment.
To start off, I will run the following command in the terminal:
Evertsons-MBP:theamplifyapp evertsoncroes$ amplify init
Note: It is recommended to run this command from the root of your app directory
? Do you want to use an existing environment? No
? Enter a name for the environment prod
? Choose your default editor: Visual Studio Code
Using default provider  awscloudformation
? Select the authentication method you want to use: AWS profile

For more information on AWS Profiles, see:
https://docs.aws.amazon.com/cli/latest/userguide/cli-configure-profiles.html

? Please choose the profile you want to use default
Adding backend environment prod to AWS Amplify app: d1ekyrd95b627y
⠴ Initializing project in the cloud...
Once that is done we can run amplify push and follow the steps we made for the dev environment.
After that, we can go into the Amplify console, click on General, scroll to the bottom and click on connect branch. There we will select the master branch and the prod environment:

Then we click on next” and save and deploy and wait for the build to be successful.
After that is done, we can go to Route53 in the AWS console and register a domain name. Note that this will cost money! In this case I have registered the domain theamplifyapp.com.
Back in the Amplify console, click on the Domain management tab and on Add domain. We should find our registered domain in the available domains and select it. Then we click on Configure domain and set it to the master branch build:
Once we click on Save the process should get started. When it is complete, we can visit our application on our brand new domain!
We made two major changes:
Up next…
With just a few Amplify commands and code changes we have:
- Created a cloud-native application…
- Protected with authentication…
- Backed by a GraphQL backend…
- With a fully configured CI/CD pipeline…
- Hosted on the AWS cloud…
- Connected through a registered domain name
For each of the categories taken there are still plenty of customization options to explore. However, hopefully it has become clear how powerful Amplify can be.
In the next installment of this series we will continue working on our application and we will add the Amplify Storage category. We will use this to create an image library where we can upload images.
[related_post id=”24980″ name=”Training Continuous integration/Continuous delivery” cta=”Learn from our experts”]
Want to know more about what we do?
We are your dedicated partner. Reach out to us.