
Moving your iOS app development and release process to the cloud using Azure DevOps
Developing your applications in the cloud has many advantages, including cost reduction, scalability, and ease of use for developers. In this blog I will explain the basics of what is needed to move the build and release process of an iOS app to the cloud using Azure DevOps.
We can roughly divide this process in the following steps:
- Moving your code repository to Azure DevOps;
- Setting up a build pipeline;
- Using a Service Connection to automatically push app builds to App Store Connect.
I will describe each step in more detail below.
Note: this guide assumes you have an Azure DevOps Project for your repository and build pipelines. Microsoft’s own documentation on how to create such a project can be found here. For more information on the advantages of moving to the cloud, read Luminis’ whitepaper on the subject via this link.
Step 1: Moving your code repository to Azure DevOps
Our first step will be to move our app’s source code from any existing repository to an Azure DevOps repository. It is of course also possible to have our Azure DevOps pipeline pull code from an external repository, but that is beyond the scope of this blog.
If you are creating a new repository in your Azure DevOps Project, you can simply use the import repo feature during the creation of your repository as described here. If you want to use an existing (empty) Azure DevOps repository for your code, you can manually import your source code from your current repository into the existing Azure DevOps repository using this guide.
Assuming your source code was successfully pushed to your Azure DevOps repo, we can continue and create a pipeline to actually build our app.
Step 2: Setting up a build pipeline
Initial pipeline creation
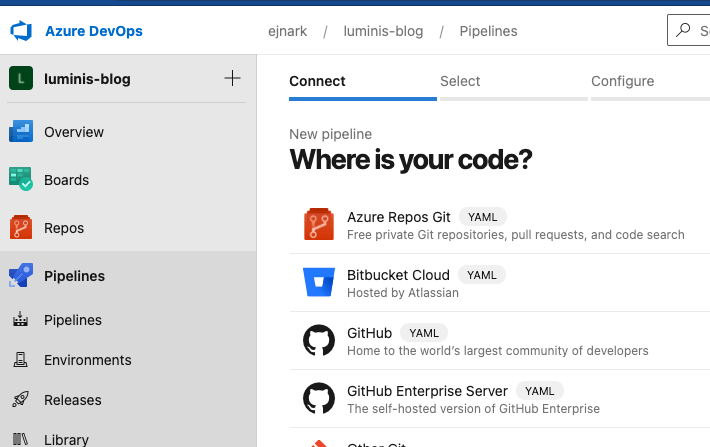
A pipeline is created by navigating to Pipelines > Pipelines from the left bar and selecting Create Pipeline. On the Connect tab, we will select ‘Azure Repos Git’ as our source code location:
On the Select tab, we will select the repository that we moved our app’s source code to in Step 1. Then, on the Configure tab we can select ‘Starter pipeline’. On the ‘Review’ tab we can see that an azure-pipelines.yml file will be created in our repository. This file contains the instructions that Azure DevOps needs to successfully build and publish our app. On this page we can edit its contents before the file is actually created:
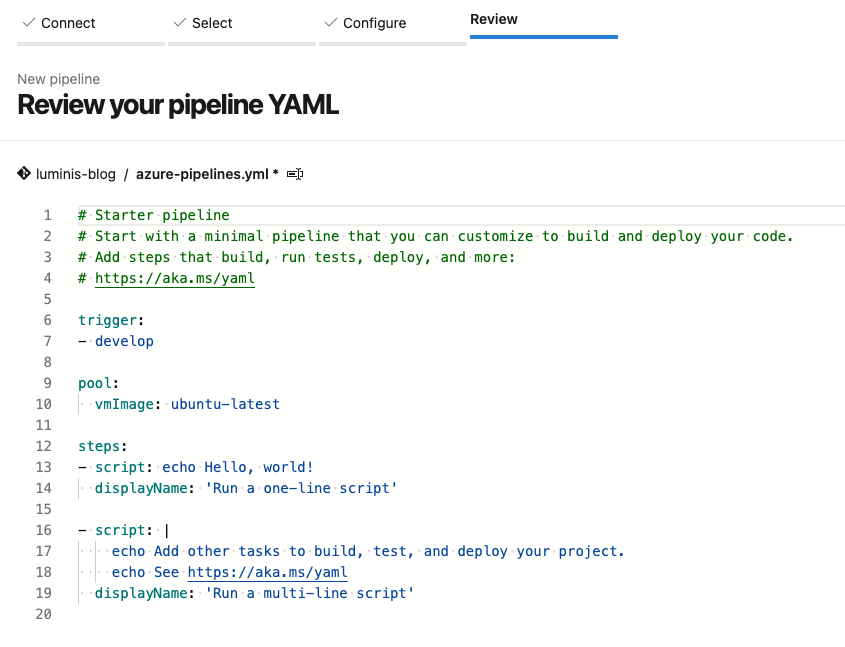
Even though we can change the contents of this file later on, we might as well make some changes for the initial commit.
Remove the comment header and the script parts of the file and change the vmImage to ‘macOS-latest’. Your file should now look like this:
trigger:
- develop

pool:
  vmImage: 'macOS-latest'

variables:

- group:

steps:
The trigger key here describes that every commit to the ‘develop’ branch will trigger an automatic build. Change this to whatever branch you want, or remove it entirely if you do not want to trigger automatic builds. Builds can also be triggered manually from the Pipelines screen. The ‘macOS-latest’ image is needed here because we are building an iOS app which requires Xcode on our build agent.
We will now add tasks under our steps key to further define our build process. Add the following tasks under the steps key:
steps:
  - task: InstallAppleCertificate@2
    inputs:
      certSecureFile: ''
      certPwd: ''
      keychain: 'temp'
      deleteCert: true

  - task: InstallAppleProvisioningProfile@1
    inputs:
      provisioningProfileLocation: 'secureFiles'
      provProfileSecureFile: ''
      removeProfile: true

  - task: Xcode@5
    inputs:
      actions: 'build'
      scheme: ''
      sdk: 'iphoneos'
      configuration: 'Release'
      xcWorkspacePath: '**/YourProject.xcworkspace'
      xcodeVersion: 'default'
      packageApp: true
      signingOption: 'manual'
      signingIdentity: '$(APPLE_CERTIFICATE_SIGNING_IDENTITY)'
      provisioningProfileUuid: '$(APPLE_PROV_PROFILE_UUID)'

  - task: CopyFiles@2
    inputs:
      contents: '**/*.ipa'
      targetFolder: '$(build.artifactStagingDirectory)'
      flattenFolders: true
      overWrite: true

  - task: PublishBuildArtifacts@1
    inputs:
      pathtoPublish: '$(build.artifactStagingDirectory)'
      artifactName: 'drop'
      publishLocation: 'Container'
In order, these tasks do the following: installing an App Store certificate, installing a provisioning profile, running xcodebuild and copying and publishing the created artifacts. As you can see, some values are currently empty. For now, make sure the scheme key under the ‘Xcode@5’ task contains the scheme name of your app and the xcWorkspacePath key contains the correct path to the .xcworkspace file in your repository. After this, select the ‘Save’ sub option:

Enter the commit message and select the branch you want to commit the initial pipeline file to. As the pipeline file is not final in its current form, I recommend committing it to a temporary branch and merging it into your main branch later on.
Configuring the certificate and provisioning profile
As you may have noticed, the ‘InstallAppleCertificate@2’ and ‘InstallAppleProvisioningProfile@1’ tasks still have some empty keys. These tasks require us to upload a .p12 certificate file and a .mobileprovision file to our secure files. Please refer to this guide on how to obtain these files. Note: the linked guide refers to a Cordova project (phonegap), but the part about certificate file generation applies here as well.
If you have added a password to your .p12 file (which is recommended), we will need to store it in our DevOps pipeline. For security reasons, the p12 password will be added to a variable group, which our pipeline file can refer to. To create a variable group, from the sidebar go to Pipelines > Library and select ‘+ Variable group’. The following screen will look like this:

Add the p12 password as a variable and select the lock icon to hide it. This will prevent us from having to store our p12 password in our repository. Name your group and save it.
The .p12 and .mobileprovision files can be stored as secure files under the Secure files tab on the same page (Library):

Now, we can go back to our azure-pipelines.yml file and fill in the missing keys. Go to Pipelines > Pipelines using the sidebar, select your pipeline and then press the ‘Edit’ button to modify the pipeline file.
First of all, we can change the variable group to refer to our newly created group:
variables:
- group: luminis-blog-group
Secondly, we can now fill in the blank keys in the ‘InstallAppleCertificate@2’ and ‘InstallAppleProvisioningProfile@1’ tasks:
steps:
  - task: InstallAppleCertificate@2
    inputs:
      certSecureFile: 'certificate.p12'
      certPwd: '$(p12Password)'
      keychain: 'temp'
      deleteCert: true

  - task: InstallAppleProvisioningProfile@1
    inputs:
      provisioningProfileLocation: 'secureFiles'
      provProfileSecureFile: 'myApp.mobileprovision'
      removeProfile: true
With these final blanks filled, our template can be tested! Save the file and select ‘Run’. If all goes well, you can download your artifact on the result summary page after your build completes:

Now that we have a working pipeline, there is one remaining step: pushing the artifact automatically to App Store Connect, so that it can be released to testers or pushed to the App Store.
Step 3: Using a Service Connection to automatically push app builds to App Store Connect
Even though we have now fully automated building our artifact, we still have to manually upload our artifact to App Store Connect. We can automate this process as well by expanding our pipeline configuration to push our artifact to Apple using a so-called Service Connection. We will however first need to create this Service Connection before we can use it in our pipeline.
Creating a Service Connection
To create a service connection, we require an API token to authenticate ourselves with the App Store Connect API each time we want to push a build automatically. Details on how to generate such a token can be found here. Make sure the token is generated with the developer role.
We also need to install the ‘Apple App Store’ pipeline extension, located here.
With the extension installed, we can proceed to actually create the Service Connection. In your Azure DevOps Project, click on the ‘Project settings’ button located on the bottom of the sidebar. On this page, from the second sidebar, select Service Connections > Create service connection. From the list, select ‘Apple App Store’ and then fill in the details required. Save the connection.

Using the Service Connection in our pipeline file
Now that we have configured a Service Connection, we can use it in our azure-pipelines.yml file. This can be done by adding the ‘AppStoreRelease@1’ task to the bottom of the file, below the ‘PublishBuildArtifacts@1’ task:
 - task: PublishBuildArtifacts@1
   inputs:
     pathtoPublish: '$(build.artifactStagingDirectory)/output/iphoneos/Release'
     artifactName: 'drop'
     publishLocation: 'Container'

 - task: AppStoreRelease@1
   inputs:
     serviceEndpoint: 'Luminis Blog Service Connection'
     appIdentifier: eu.luminis.blog
     ipaPath: '$(build.artifactstagingdirectory)/**/Luminis Blog.ipa'
     shouldSkipWaitingForProcessing: true
     shouldSkipSubmission: true
Save the file and run the pipeline. Provided our Service Connection is working, our pipeline will now push the IPA artifact to App Store Connect at the end of the build, where it can be rolled out to testers or released to the App Store.
Congratulations! You have successfully moved your iOS app build process to the cloud.
Final words
As developing software in the cloud is the new way of working, we need to be able to move our development processes to cloud environments. In this post I have explained the basics of getting an iOS app built on an Azure DevOps environment. If you have any questions or comments regarding this guide, don’t hesitate to contact me at ejnar.kaekebeke@luminis.eu.
Want to know more about what we do?
We are your dedicated partner. Reach out to us.