Creating your serverless web-application using AWS CDK – part 2
Welcome to part two of my blog about creating a serverless web-applications using AWS CDK. In the first part of this blog I explained why I prefer to use infrastructure as code and AWS CDK.
A short recap: we use infrastructure as code because it gives us the opportunity to maintain our infrastructure with greater ease, as opposed to configuring our resources manually using the AWS console. My infrastructure tool of choice in this is AWS CDK. I chose AWS CDK because I can use it to define infrastructure in a programming language I already know, and because it offers me a great balance between flexibility when I need it and great defaults so I do not have to do too much work myself.
In the first part, we also created the basic setup for our serverless web-application with AWS CDK. However it is not quite ready for us to use in production.
To get the application production ready, we need to address the following:
- The url to the application is something.s3-website-region.amazonaws.com. This does not help users easily reach the application.
- The application does not offer a HTTPS connection for the frontend, so access to the application is not secure.
- The current application has no user authentication. You can access the data of any user by simply entering the correct username.
Leveraging the cloud
In addressing the topics I just mentioned, we can see some of the true potential of serverless applications built in the cloud. Setting up HTTPS with certificates, DNS or user authentication can be a lot of work. Even if you decide to use existing services to save you from doing all the work yourself, you will probably still wind up with more manual steps than you would care for. Is that not what we set out to prevent in the first place? Using Amazon’s Web Services you really can use the hard work of others who have come before you. Join me as I show you how adding three new services with just a few lines of codes can bring all we need to get our application ready for production.
Our production setup will look like this:
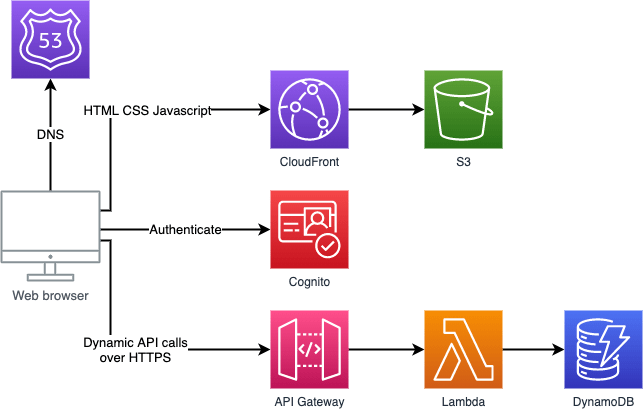
We will use Route53 to link a custom domain we own to the application. This step also allows us to create certificates that we need to enable HTTPS for the frontend. To get HTTPS going for our frontend we also need CloudFront. Finally we add Cognito for user management and authentication. The frontend will redirect users to Cognito to login and receive authentication tokens. These tokens will be validated by API Gateway using a new Lambda function we add.
Domain
To allow users easy access to our application and to create HTTPS certificates, we need to have a custom domain. We also need to have access to the public hosted zone for that domain. A hosted zone is a concept used in Route53. It represents a collection of DNS records that can be managed together, belonging to a single parent domain name. The easiest way to get a custom domain that is ready to use with AWS is to register one through Route53 in the AWS portal. If you register a domain this way, AWS automatically creates a public hosted zone for that domain for you.
All we need to get access to it in the TodoApplicationStack is install and import @aws-cdk/aws-route53 and add this code:
const hostedZone = route53.HostedZone.fromLookup(this, 'TodoApplicationHostedZone', {
  domainName:'tomhanekamp.com'
});
What we do here is a lookup of a hosted zone based on the domain name. For my to do list application I registered tomhanekamp.com as a domain. A condition for this lookup is that the hosted zone is registered in the same AWS account that you use to deploy the CDK stack. Also, the account and region need to be passed into the TodoApplicationStack, which is done by using environment variables. For my to do list application I chose to specify the environment by putting the following code into my bin/todo_application.ts:
#!/usr/bin/env node
import 'source-map-support/register';
import * as cdk from '@aws-cdk/core';
import { TodoApplicationStack } from '../lib/todo_application-stack';

const app = new cdk.App();
new TodoApplicationStack(app, 'TodoApplicationStack', {
  env: {
    account: process.env.CDK_DEFAULT_ACCOUNT,
    region: process.env.CDK_DEFAULT_REGION
  }
});
By doing this, I make CDK take the default account and region from my AWS CLI configuration.
Certificates
The next thing we do for the production set-up is get some certificates for the HTTPS connections to the frontend and the API. You might wonder why we need a certificate for the API as well since it already allows HTTPS connections. While this is true, the API can currently only be accessed on a amazonaws.com domain. Since we are setting up a custom domain anyway I also want the API to be accessible on this domain. As the domain name is embedded in the certificate, this means we need to create a new one.
To create the certificates, we need @aws-cdk/aws-certificatemanager installed and imported in the TodoApplicationStack. We also add this code:
const frontendCertificate = new acm.DnsValidatedCertificate(this, 'TodoApplicationFrontendCertificate', {
  domainName: 'todoapplication.tomhanekamp.com',
  hostedZone: hostedZone,
  region: 'us-east-1'
});

const apiCertificate = new acm.DnsValidatedCertificate(this, 'TodoApplicationApiCertificate', {
  domainName: 'todoapplication-api.tomhanekamp.com',
  hostedZone: hostedZone,
});
With the code above we create two certificates. These certificates will be automatically validated using DNS validation. To make the validation succeed, we specify the Route53 hosted zone we looked up earlier. Apart from the hosted zone we also specify the domain names for the certificates. I use the subdomain todoapplication.tomhanekamp.com for the frontend and todoapplication-api.tomhanekamp.com for the API. If you wonder why the frontend certificate has a third property where we set the region to “us-east-1”, well spotted. This is due to a requirement of CloudFront that certificates requested through ACM for usage with CloudFront should be requested for this region.
CloudFront
Now that we have the certificates we need. We can set up the CloudFront distribution. To do this, we install and import @aws-cdk/aws-cloudfront and the following to TodoApplicationStack:
const distribution = new cloudfront.CloudFrontWebDistribution(this, 'SiteDistribution', {
  originConfigs: [
    {
      s3OriginSource: {
        s3BucketSource: frontendBucket
      },
      behaviors : [ { isDefaultBehavior:true } ],
    }
  ],
  viewerCertificate: {
    aliases: [ 'todoapplication.tomhanekamp.com' ],
    props: {
      acmCertificateArn: frontendCertificate.certificateArn,
      sslSupportMethod: "sni-only",
      minimumProtocolVersion: "TLSv1.2_2021"
    }
  }
});
The first setting we enter into the CloudFront web distribution, is a set of origin configs. These configurations specify the location of the source files for the distribution as well as some configuration for how to handle the origin. To set up our web application we need only a single origin, which is the S3 bucket hosting the frontend. In terms of behaviour we do not actually need to change anything from the defaults. However we must specify at least one default behaviour, so that is what we do.
The other thing we set onto the distribution is that we enable HTTPS. This is after all the main reason we included a CloudFront distribution in our deployment in the first place. We do this by specifying a viewer certificate. Our viewer certificate has a single alias, which in my case is todoapplication.tomhanekamp.com, the hostname for the frontend.
We also give it a couple of properties. First we specify the certificate ARN to be the one of the frontend certificate that we created earlier. The next setting is pretty important if you want to avoid a high bill from Amazon. The SSLSupportMethod setting offers two options, sni-only and vip. The first option makes the distribution accept HTTPS only from clients that support server name indication. SNI is supported by most browsers and clients and therefore should suit most use cases just fine. The second option, “VIP”, makes AWS reserve a dedicated IP address for your endpoint, and they will charge you for that. This option comes at a $600 a month prorated surcharge. Finally we also specify the minimum security protocol version. I choose the highest available and recommended option here.
With the CloudFront distribution in place, we now have HTTPS support for our application completely finished.
DNS records
Earlier in this blog we registered our custom domain and we looked up the public hosted zone that came with it. We now complete the process of adding a custom domain by creating alias records for the frontend and API. To learn more about alias records and when to use them, I recommend this page.
The first thing we do to start is install and import @aws-cdk/aws-route53-targets.
Frontend
Linking our custom domain to the frontend requires little work. We already configured the CloudFront distribution with the right settings. Now all we do is add the following code to the stack:
const websiteARecord = new route53.ARecord(this, "TodoApplicationAPIRecord", {
  recordName: 'todoapplication.tomhanekamp.com',
  zone: hostedZone,
  target: route53.RecordTarget.fromAlias(new route53Targets.CloudFrontTarget(distribution))
});
This adds a DNS “A record” to the stack. To set the domain name for the record we specify it as record name and we link it to the hosted zone we looked up earlier. Finally we set a target. The target we use is a so called AliasRecordTarget. To create it, we set the CloudFront distribution we created earlier as input. This points the record to the distribution. At the same time, because we used an AliasRecordTarget, it turns the record from a regular “A record” into an “alias record”.
API
To link our custom domain to the API, we first need to add some configuration to the API Gateway we added in the basic setup. Back then we added a RestApi construct and we only set the name of the API Gateway. We now change that code to the following:
const apiGateway = new apigateway.RestApi(this, 'TodoApplicationApiGateway', {
  restApiName: 'TodoApplicationApi',
  domainName: {
    domainName: 'todoapplication-api.tomhanekamp.com',
    certificate: apiCertificate,
    securityPolicy: apigateway.SecurityPolicy.TLS_1_2
  }
})
The additions we make here configure a custom domain for the API Gateway. We set the domain name that will be used to reach the API Gateway, in my case todoapplication-api.tomhanekamp.com. We also configure the certificate for HTTPS on the API to be the apiCertificate we created earlier. Finally we set the minimum required TLS version for the HTTPS connection to the API Gateway. I set this to TLS 1.2 which is the safest available option at this time.
After making this change to the API Gateway, we add another alias record to the stack using the following code:
const apiARecord = new route53.ARecord( this, "TodoApplicationAPIRecord", {
  recordName: 'todoapplication-api.tomhanekamp.com',
  zone: hostedZone,
  target: route53.RecordTarget.fromAlias(newroute53Targets.ApiGateway(apiGateway))
});
You will notice that this code is very similar to that for the frontend DNS record. The only changes are the record name and the target. We still create an AliasRecordTarget as the target, but this time we set the API Gateway as input.
User authentication
The last bit of functionality we add to make the application ready for production is user authentication. We do this by adding a Cognito user pool to our deployment where users can sign up and log in to retrieve tokens. We also need to add a functionality to our API that allows it to verify these tokens.
User pool
To add a user pool, we need to import @aws-cdk/aws-cognito. We can then add the following to TodoApplicationStack:
const userPool = new cognito.UserPool(this, "TodoApplicationUserPool", {
  selfSignUpEnabled: true,
  signInAliases: { email: true },
  autoVerify: { email: true },
  removalPolicy: cdk.RemovalPolicy.DESTROY
});
const userPoolClient = userPool.addClient("TodoApplicationUserPoolClient", {
  oAuth: {
    flows: {
      authorizationCodeGrant:true,
    },
    scopes: [ cognito.OAuthScope.OPENID ],
    callbackUrls: [ `https://todoapplication.tomhanekamp.com/` ],
    logoutUrls: [ `https://todoapplication.tomhanekamp.com/` ]
  }
});
userPool.addDomain("TodoApplicationCognitoDomain", {
  cognitoDomain: {
    domainPrefix: "todo-application",
  },
});
The first piece of code adds the user pool. In the case of my application, I want anybody to be able to sign up for it using their email addresses without the need for manual verification. This reflects in the settings I pass into the user pool.
First of these settings is selfSignUpEnabled. If you set this to false, users can only be created by an administrator of the user pool. The second setting I add is signInAliases. This setting defines the methods users can use to sign up and sign in to the user. As I mentioned earlier, I want user to use their email address. The third setting to the user pool is autoVerify. When users sign up to the user pool, they account will need to be verified. You can choose to allow this only as a manual action by an administrator. You can also opt to have Cognito automatically verify users by sending them a verification link via email, which is what I did here. Finally I set the removalPolicy for the user pool to destroy, as the default is “retain”.
With the user pool added, we register our application as app client to the user pool. This allows it to call the API’s of the user pool to register and sign in users. When registering the application as client we specify the OAuth settings for this client. How to best set up OAuth for your application is topic that deserve a blog post of its own and has little to do with using CDK. You can find some explanation in the AWS documentation for configuring an app client and even more detail here.
The last bit of code configures the user pool domain. In this case I opted to use an Amazon Cognito hosted domain with todo-application as domain prefix. This means the urls for the sign-up and sign-in pages of my user pool are in a domain from Amazon Cognito, such as amazoncognito.com.
Verifying tokens
In order to verify the tokens that are sent to the API, I use the Cognito user pool that we created as authorizer. I configure this authorizer for the methods in the API. Every time these methods are called, this authorizer is called upon to verify the token.
We add this authorizer to the TodoApplicationStack with the following code:
const authorizer = new apigateway.CognitoUserPoolsAuthorizer(this, 'TodoApplicationAuthorizer', {
  cognitoUserPools: [userPool]
});
With this code we first add the authorizer itself. We do not need to configure a lot of settings for it, all it needs is a reference to the user pool where the tokens will be verified.
The second thing we do is that we add this authorizer to the API. We do this by altering a piece of code we added in the first part of the blog:
itemResource.addMethod('PUT', new apigateway.LambdaIntegration(addItemLambda), {
  authorizer: authorizer
})

itemResource.addMethod('GET', new apigateway.LambdaIntegration(getItemsLambda), {
  authorizer: authorizer
})
In the first part of this blog we added the HTTP GET and PUT methods to the API and we specified the Lambda Function to call for these methods. Back then we did not specify any options for the method. Now however we specify one option, the authorizer.
Config JS
With all the resource in place for our production set up, we have one thing left to do before we can deploy it. In the previous blog we added code to upload a config.js file with the API url to S3. In this production setup, our frontend also needs to information about the user pool client we added. To get this information to the frontend we add it to the contents of the config.js file.
Replace the code for the frontendConfig with the following:
const frontendConfig = {
  serverUrl: `https://todoapplication.tomhanekamp.com/`,
  region: 'eu-west-1',
  cognitoClientId: userPoolClient.userPoolClientId,
  cognitoDomain: 'todo-application',
  itemsApi: 'https://todoapplication-api.tomhanekamp.com/',
  lastChanged: newDate().toUTCString()
};
You will see that we added four new properties to the configuration. These properties are all used by the CognitoService in the frontend to send requests to the user pool. You might notice that only one of the properties, the cognitoClientId, that are now in the frontend configuration comes from CDK instance in our stack. The other properties are static values. This means we could also just hard code them somewhere in the frontend. However, even though the values of these properties are static now, when we change the domain or region where the application is deployed they would still change. I therefore keep these properties in the frontendConfig. This also helps me if I decide to configure multiple environments for my application in the future as all the environment specific code is in TodoApplicationStack.
Because we added a property to the frontenConfig that relies on userPoolClient, we should also add a dependency for that:
s3Upload.node.addDependency(userPoolClient);
Deploying
Now that all the code is complete, we can deploy our application. Once again let’s make sure the compile the code we deploy to AWS. In my project I do this with:
npm install
npm run build
on the frontend and Lambda functions as they are NodeJS based. With everything compile we deploy the stack with:
cdk deploy
If that passes, you can go to the custom you registered to open your production ready application.
My Todo list application now looks like this:

It doesn’t look all that different from what I showed at the end of the previous blogs. However if you look closely you will see signs of all that we have accomplished in this blog.
First of all, the hostname I used to reach it is now todoapplication.tomhanekamp.com because of the custom domain we added. A big improvement from todoapplicationstack-todoapplicationfrontend8b34e-65bjgh3il4ru.s3-website-eu-west-1.amazonaws.com that it used to be when it comes to being easy to find for my users.
If you look to the left of the hostname in the address bar of my browser, you will also see a padded lock where it previously said “Not Secure”. This means I am now connected to the application using HTTPS and the certificate is considered valid by my browser.
Finally you might notice that the application no longer has an input field for the username and that a logout button was added instead. When I first opened the application after deploying it, it actually looked like this:

When you click on the Login button, the application directs you to Cognito. Here you can sign up for an account that you verify via email. After you sign in, the email address you used to sign up is also your username.
With these changes we have finished what we set out to do. Our application is now ready to be used in production.
You want to have a closer look at some of the code, you can find the complete solution on GitHub.