Searching through images using the CLIP model
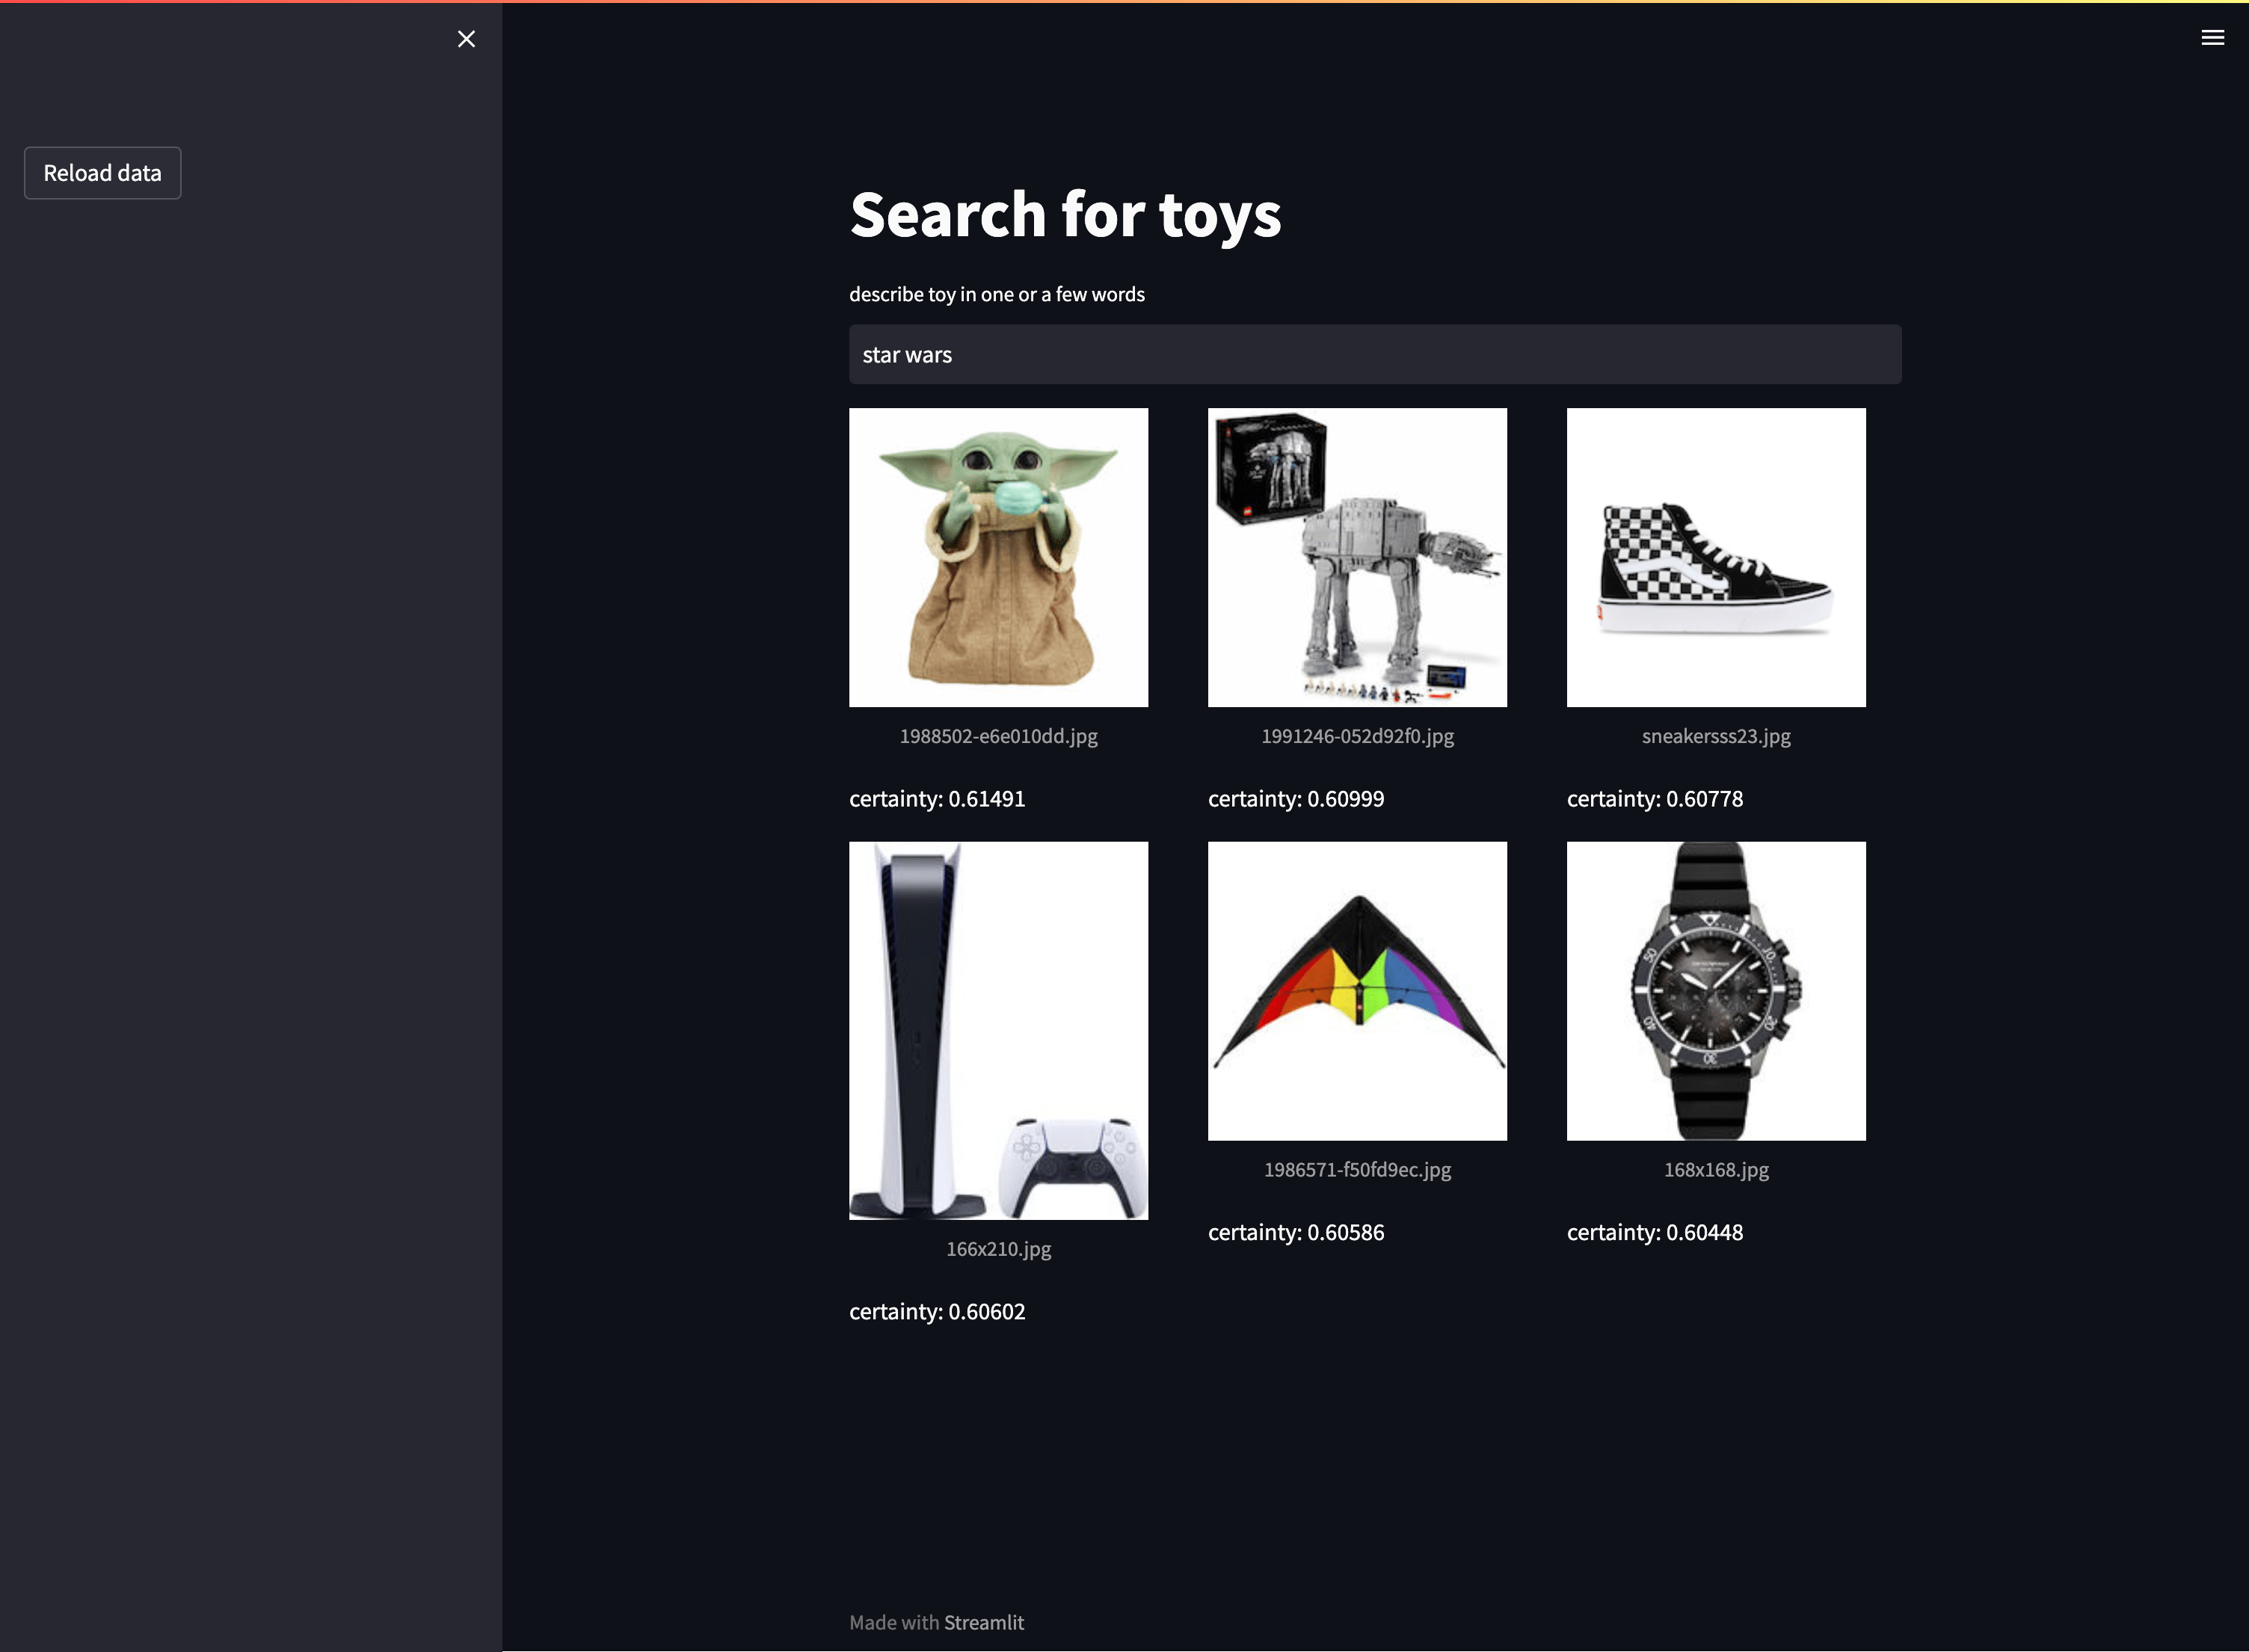
Screenshot Streamlit app for image search
A picture says more than a thousand words. But can you use words to find images? I do not mean going through the meta-data of images but searching for the actual image. That is what we are going to see in this blog post. An app that is searching through images using the CLIP model
I took a few small images from different websites, stored them in a vector store, and sent textual queries to find matches. The screenshot shows the Streamlit app that interacts with the vector store. This blog post shows how many lines of code you need to create your image search.
How it works – the CLIP model
CLIP – Contrastive Language–Image Pre-training is a model that originates from OpenAI. The main idea is to add Natural Language Supervision to a model learning from images. The idea is to create one vector space containing text and images. The idea of a vector space is that similar concepts are close to each other in that vector space. The smaller the distance between two concepts in a vector space, the more likely they talk about the same concept. If we have a combined vector store for text and images, we can compare the concept from text with the concept from an image. Creating such a model is also called a multi-modal model. A good starting point to learn more about CLIP is the webpage from OpenAI.
CLIP is the base for a lot of other models. Huggingface has some excellent models, and a lot of them are free to use. In the next section, you can see how easy it is to use these models with Weaviate, the vector store we use that comes with many extras. The model that I have chosen is sentence-transformers/clip-ViT-B-32-multilingual-v1. I choose this model for its multilingual capabilities. To be honest, the support for the Dutch language is not great. I was surprised by the quality of English requests. The video at the end of this blog gives an idea of the quality.
Running the sample
You can find the code for this sample in my GitHub repository. You want to look at the file run_weaviate_clip.py. You can check the readme.md for instructions on how to run the sample. You can also configure PyCharm to run Streamlit. The following image shows you how to do that.
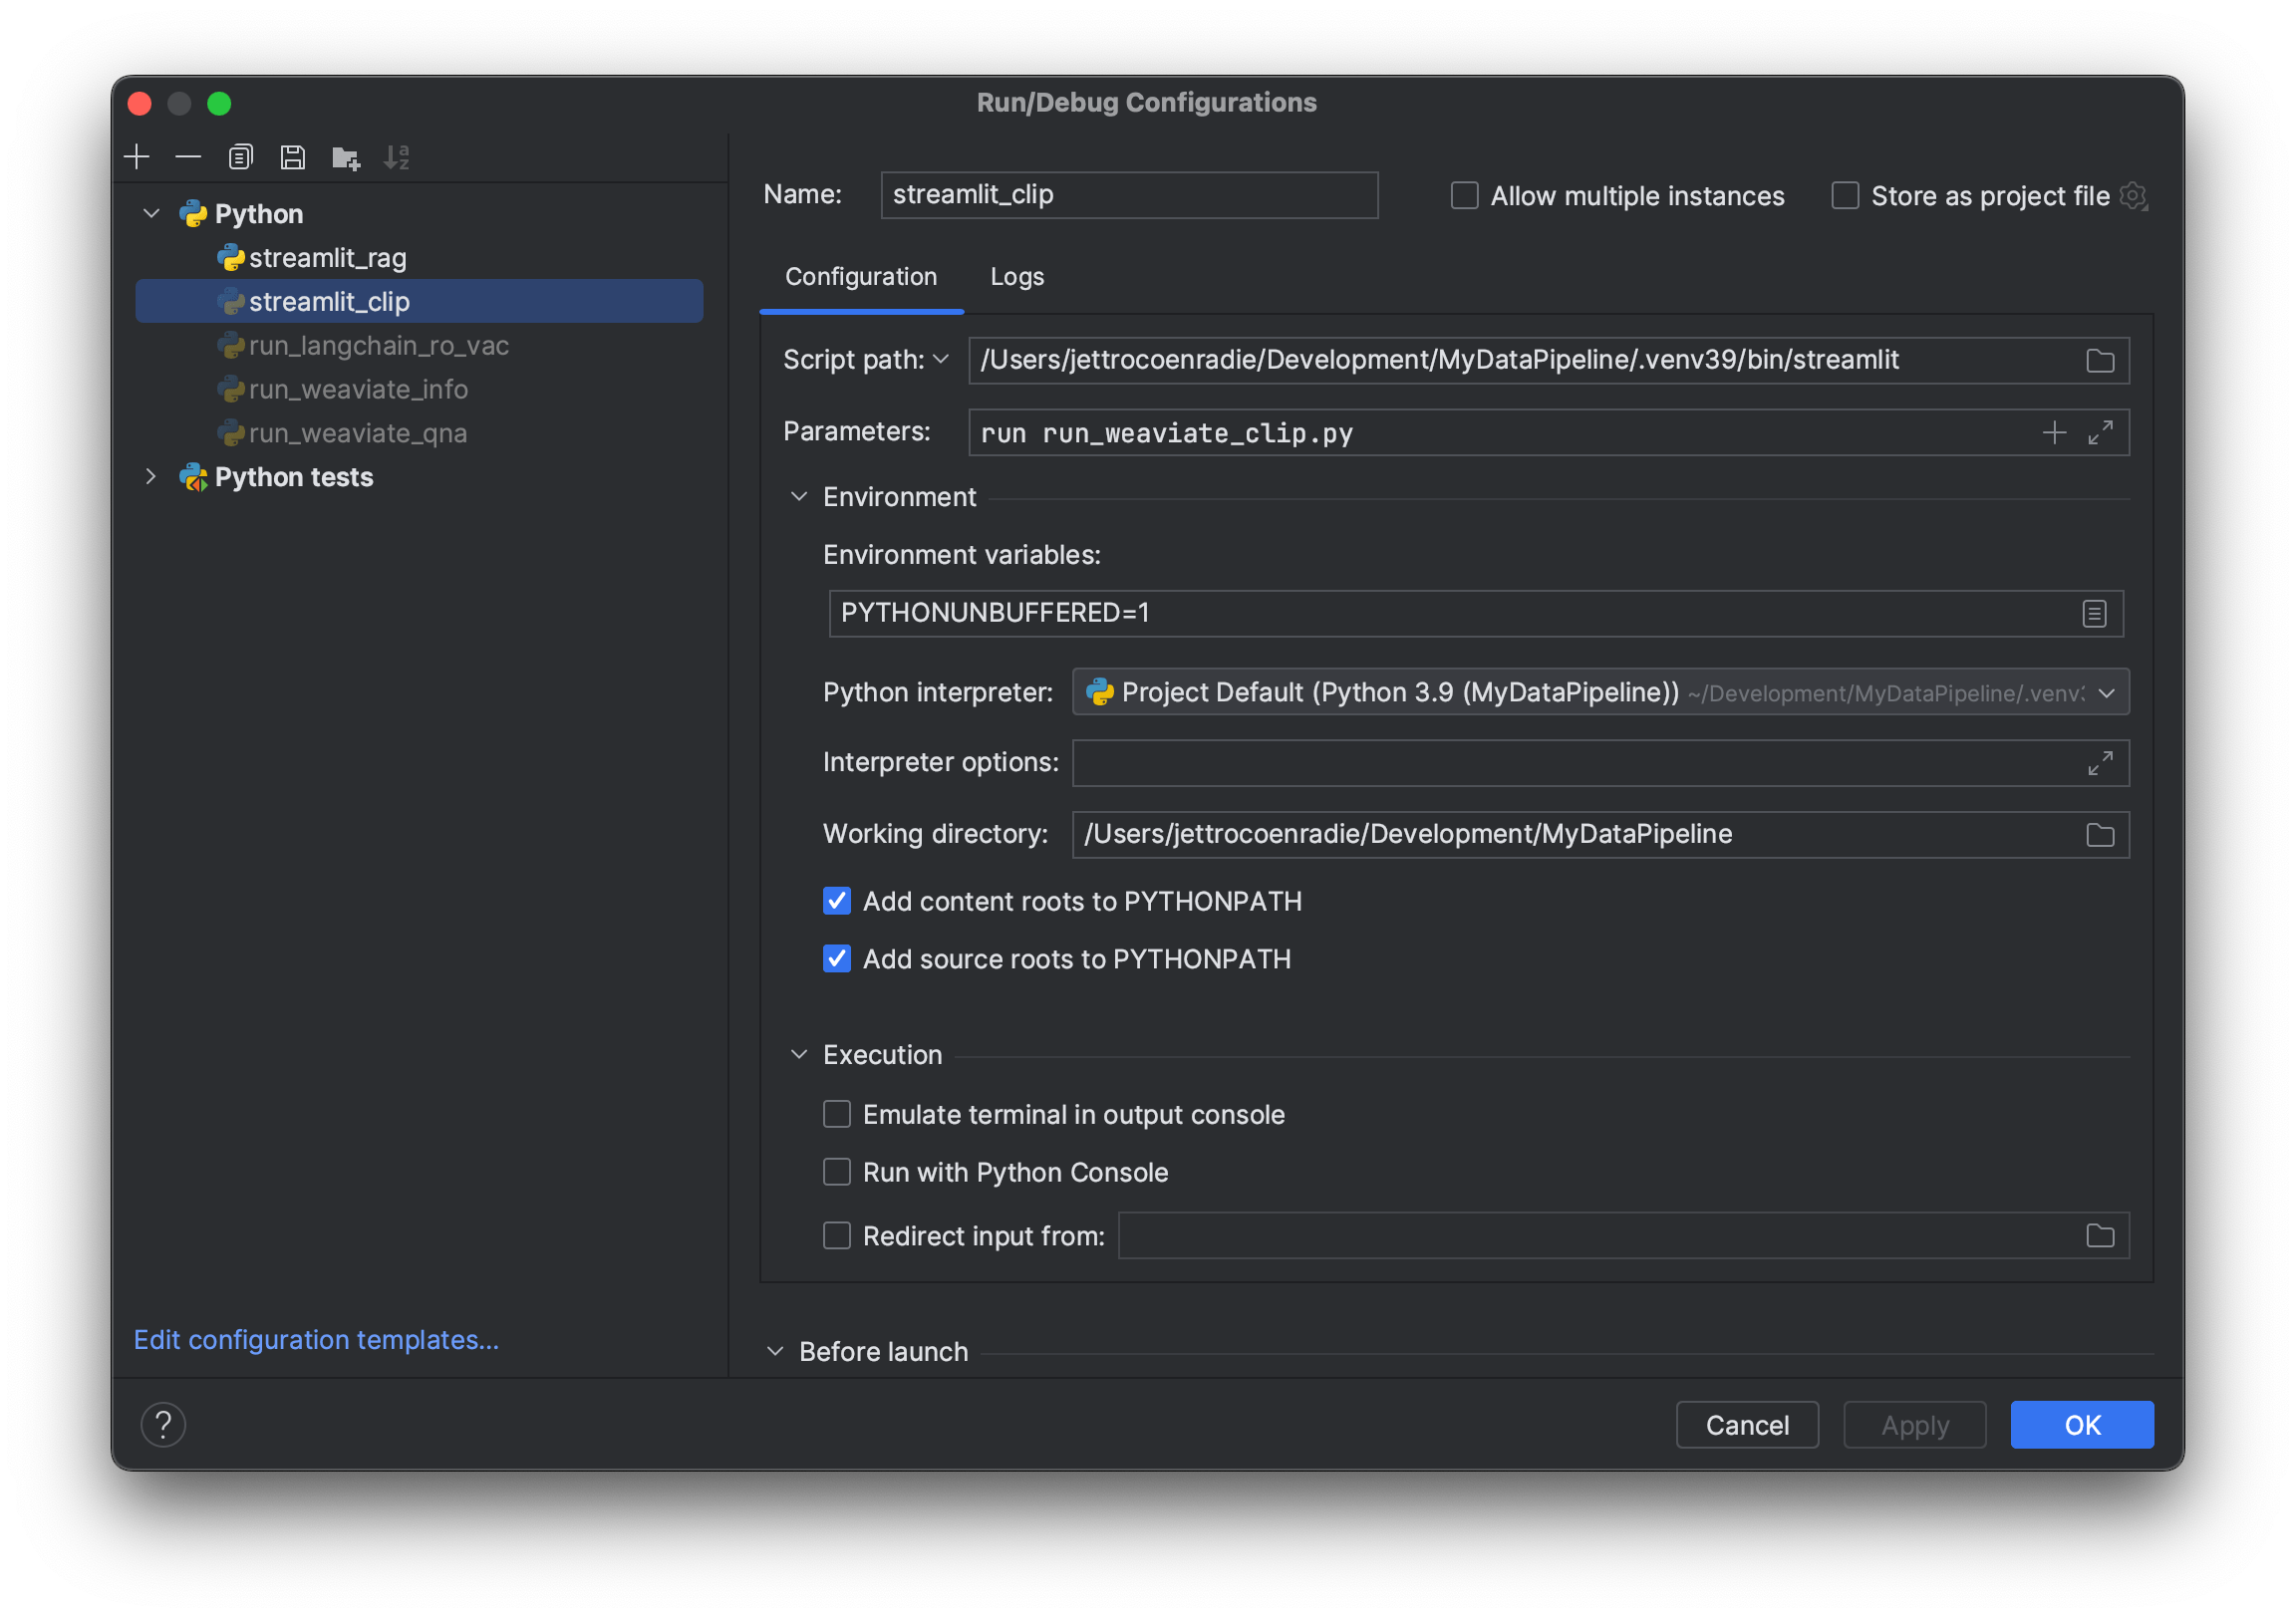
pycharm run configuration for a streamlt app
Setting up Weaviate
You can use docker-compose to set up a local running Weaviate instance. The project contains a docker-compose file named docker-compose-weaviate-clip.yml. The file is in the infra folder. You can start docker using the following command. Beware, it does download the complete CLIP model of around 5 Gb. So you need space, internet, and patience. Notice the two services that we deploy, weaviate and the multi2vec-clip module with the specified model.
---
version: '3.4'
services:
  weaviate:
  command:
    - --host
    - 0.0.0.0
    - --port
    - '8080'
    - --scheme
    - HTTP
    image: semitechnologies/weaviate:1.19.11
    ports:
    - 8080:8080
    restart: on-failure:0
    environment:
      CLIP_INFERENCE_API: 'http://multi2vec-clip:8080'
      QUERY_DEFAULTS_LIMIT: 25
      AUTHENTICATION_ANONYMOUS_ACCESS_ENABLED: 'true'
      PERSISTENCE_DATA_PATH: '/var/lib/weaviate'
      DEFAULT_VECTORIZER_MODULE: 'multi2vec-clip'
      ENABLE_MODULES: 'multi2vec-clip'
      CLUSTER_HOSTNAME: 'node1'
    volumes:
    - ./data_clip:/var/lib/weaviate
  multi2vec-clip:
    image: semitechnologies/multi2vec-clip:sentence-transformers-clip-ViT-B-32-multilingual-v1
    environment:
      ENABLE_CUDA: '0'
...
Configuring the Schema
Weaviate can work without a schema, but providing the schema makes it explicit what you want. Within the schema, we also configure the multi2vec-clip module. Below you can find the schema and the code to load the schema.
{
  "class": "Toys",
  "description": "A sample to search for toys",
  "moduleConfig": {
    "multi2vec-clip": {
      "imageFields": [
        "image"
      ]
    }
  },
  "vectorIndexType": "hnsw",
  "vectorizer": "multi2vec-clip",
  "properties": [
    {
      "dataType": [
        "string"
      ],
      "name": "filename"
    },
    {
      "dataType": [
        "blob"
      ],
      "name": "image"
    }
  ]
}
def load_weaviate_schema(client: WeaviateClient, schema_path: str) -> None:
    if client.does_class_exist(WEAVIATE_CLASS):
        client.delete_class(WEAVIATE_CLASS)
        run_logging.info("Removed the existing Weaviate schema.")

    client.create_classes(path_to_schema=schema_path)
    run_logging.info("New schema loaded for class '%s'.", WEAVIATE_CLASS)
Notice that we throw away the schema if it already exists
Storing the images
Next, we store the images that are provided in the data_sources folder. First, we encode the image as a base64 byte array. Next, we decode the bite array into a utf-8 string. The string is added to weaviate in the field image of type datablob.
def store_images(client: WeaviateClient) -> None:
    with client.client.batch(batch_size=5) as batch:
        for file_name in os.listdir(IMG_PATH):
            if file_name.endswith(".jpg"):
                with open(IMG_PATH + file_name, "rb") as img_file:
                    b64_string = base64.b64encode(img_file.read())

                data_obj = {"filename": file_name, "image": b64_string.decode('utf-8')}
                batch.add_data_object(data_obj, WEAVIATE_CLASS)
                run_logging.info("Stored file: %s", file_name)
Querying the images
Now we can import all the images. The Streamlit app has a button to do exactly that. With all the images in the store, we can finally execute queries. Weaviate makes it easy to execute a near_text query. The next code block executes the query and extracts the required data from the response.
def query(client: WeaviateClient, query_text: str, the_limit: int = 3):
    run_logging.info("Executing the query '%s'", query_text)
    near_text = {"concepts": [query_text]}

    response = (client.client.query
                   .get(WEAVIATE_CLASS, ["filename"])
                   .with_near_text(near_text)
                   .with_limit(the_limit)
                   .with_additional(properties=["certainty", "distance"])
                   .do())
    if response["data"]["Get"]["Toys"]:
        found_picts = response["data"]["Get"]["Toys"]
        return [{"filename": pict["filename"], "certainty": pict["_additional"]["certainty"]} for pict in found_picts]

    return []
Demo time
You can look at the video below for the demo of searching through images using the CLIP model. Pay attention to the search terms and the results. In the beginning, I highlight the value of certainty. A higher value means the model is more certain it found a good match. I like that you can search for wood and colors. Even those terms return reasonable results.
Results that do not look like a match
You might have thought there were many bad results if you watched the demo. One thing that is different in a vector search from the well-known index-based search. With index-based search, whether there is a match depends on the terms you are searching for and the terms in the index. With vector search, we look at the closest match. Therefore, you get the six closest results when asking for six results. That does not mean they are always a good match, but they are the closest match we could find.
You can use certainty to limit results to a specific score, but it is hard to predict which score works for you. That depends on the model, your data, and your query.
Concluding
I hope you like my blog post and you learned something. I also hope you are now convinced that image search has changed dramatically. If you need help, please get in touch with me. I am sure we can figure something out.